Table of contents
- Introduction
- Transparency of a panel when dragged
- Adding a button to the panel, which becomes transparent during dragging
- Adding two buttons to the panel: setting panel background color and header caption color
- Inheriting from CAppDialog
- Inheriting from CWndClient
- New Projects. How can they help in studying panels?
- Conclusion
Introduction
CAppDialog class based panels lack methods for direct access to the properties of controls which the panel is made of, such as the Background color and the Frame color. Therefore, all created panels are gray.
It is not possible to implement design ideas without the ability to change the color of controls. This problem could be solved by inheriting and adding our own methods. But this solution would require a lot of corrections in the created code. Is there a simpler and faster way to access the “Background Color” and “Frame Color” properties for the panel controls?
Transparency of a panel when dragged
I will show first what can be done for the panel based on the CAppDialog class (this is a code example “Live panel.mq5“).

This gif image shows that if you drag the panel, only its outer border remains. When moving the panel, the color of the outer frame is additionally changed in an arbitrary order. When dragging is completed, the form becomes normal, with the filling of working areas.
All work is connected with the CDialog class. It is located in [data folder]\MQL5\Include\Controls\Dialog.mqh.
The below code shows the objects the panel consists of (the objects are declared in the CDialog class in the private section) and how they are visually implemented as graphic elements:
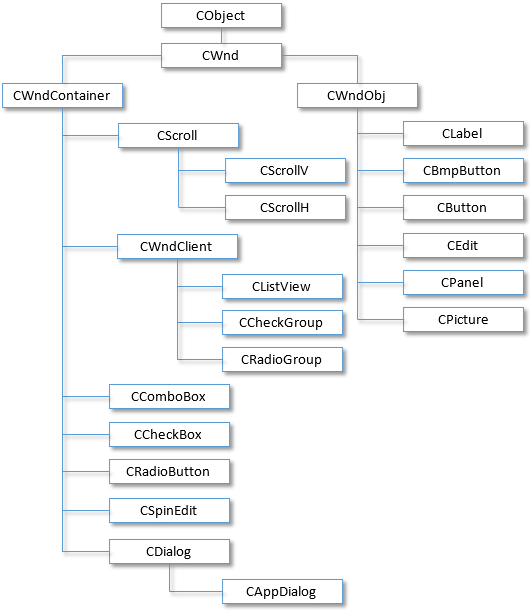
//+------------------------------------------------------------------+
//| Class CDialog                                                    |
//| Usage: base class to create dialog boxes                         |
//|             and indicator panels                                 |
//+------------------------------------------------------------------+
class CDialog : public CWndContainer
  {
private:
   //--- dependent controls
   CPanel            m_white_border;        // the "white border" object
   CPanel            m_background;          // the background object
   CEdit             m_caption;             // the window title object
   CBmpButton        m_button_close;        // the "Close" button object
   CWndClient        m_client_area;         // the client area object

protected:

To make the panel transparent when dragging, we need to take into account four points.
1. We are interested in the Border and Back graphic elements (created by the m_white_border and m_background objects of the CPanel class) and the Client element (created by the m_client_area object of the CWndClient class). Functions CDialog::CreateWhiteBorder, CDialog::CreateBackground and CDialog::CreateClientArea show how the elements are created and what color is set for them.
2. During creation, the panel receives a unique name, i.e. a digital prefix which is added before the names of all graphic objects (the 03082 prefix is shown in the below figure):

3. Three dragging handlers are available in CDialog:
| Handling the dragging operation | |
|---|---|
| OnDialogDragStart | The virtual handler of the DialogDragStart event |
| OnDialogDragProcess | The virtual handler of the DialogDragProcess event |
| OnDialogDragEnd | The virtual handler of the DialogDragEnd event |
4. Solution from the article “How to create a graphical panel of any complexity level” — iteration through panel objects (here ExtDialog is the panel class object):
   int total=ExtDialog.ControlsTotal();
   for(int i=0;i<total;i++)
     {
      CWnd*obj=ExtDialog.Control(i);
...
Why is the pointer to the obj object is declared with the CWnd type during iteration?
Because CWnd is the base class from which all other child classes originate:
We will need two macros for working with colors. We will also need to redefine three functions from the CDialog class for intercepting the dragging of the panel:
//+------------------------------------------------------------------+
//|                                                   Live panel.mq5 |
//|                        Copyright 2018, MetaQuotes Software Corp. |
//|                                              http://www.mql5.com |
//+------------------------------------------------------------------+
#property copyright "Copyright 2018, MetaQuotes Software Corp."
#property link      "http://www.mql5.com"
#property version   "1.000"
#property description "The panel transparency changes when dragging the panel"
#include <Controls\Dialog.mqh>
#define XRGB(r,g,b)    (0xFF000000|(uchar(r)<<16)|(uchar(g)<<8)|uchar(b))
#define GETRGB(clr)    ((clr)&0xFFFFFF)
//+------------------------------------------------------------------+
//| Class CLivePanel                                                 |
//| Usage: main dialog of the Controls application                   |
//+------------------------------------------------------------------+
class CLivePanel : public CAppDialog
  {
public:
                     CLivePanel(void);
                    ~CLivePanel(void);
   //--- create
   virtual bool      Create(const long chart,const string name,const int subwin,const int x1,const int y1,const int x2,const int y2);
   //--- handlers of drag
   virtual bool      OnDialogDragStart(void);
   virtual bool      OnDialogDragProcess(void);
   virtual bool      OnDialogDragEnd(void);

  };
I will skip the standard part of panel operations (creation, deletion and passing of events). Let us dwell on the dragging event handlers in more detail.
OnDialogDragStart handler: panel dragging start
We obtain the prefix, and then loop through all objects of the panel and search for “Border”, “Back” or “Client” with the prefix:
//+------------------------------------------------------------------+
//| Start dragging the dialog box                                    |
//+------------------------------------------------------------------+
bool CLivePanel::OnDialogDragStart(void)
  {
   string prefix=Name();
   int total=ExtDialog.ControlsTotal();
   for(int i=0;i<total;i++)
     {
      CWnd*obj=ExtDialog.Control(i);
      string name=obj.Name();
      //---
      if(name==prefix+"Border")
        {
         CPanel *panel=(CPanel*) obj;
         panel.ColorBackground(clrNONE);
         ChartRedraw();
        }
      if(name==prefix+"Back")
        {
         CPanel *panel=(CPanel*) obj;
         panel.ColorBackground(clrNONE);
         ChartRedraw();
        }
      if(name==prefix+"Client")
        {
         CWndClient *wndclient=(CWndClient*) obj;
         wndclient.ColorBackground(clrNONE);
         wndclient.ColorBorder(clrNONE);
         ChartRedraw();
        }
     }
   return(CDialog::OnDialogDragStart());
  }
As soon as the objects are found, we delete the background color (the ColorBackground method) and frame color (the ColorBorder method), by applying the clrNONE color. The transparency of the form is implemented in this way.
OnDialogDragProcess handler: panel dragging continuation
We search for only one object, i.e. “Back”, and dynamically change its color (using two macros: XRGB and GETRGB):
//+------------------------------------------------------------------+
//| Continue dragging the dialog box                                 |
//+------------------------------------------------------------------+
bool CLivePanel::OnDialogDragProcess(void)
  {
   string prefix=Name();
   int total=ExtDialog.ControlsTotal();
   for(int i=0;i<total;i++)
     {
      CWnd*obj=ExtDialog.Control(i);
      string name=obj.Name();
      if(name==prefix+"Back")
        {
         CPanel *panel=(CPanel*) obj;
         color clr=(color)GETRGB(XRGB(rand()%255,rand()%255,rand()%255));
         panel.ColorBorder(clr);
         ChartRedraw();
        }
     }
   return(CDialog::OnDialogDragProcess());
  }
OnDialogDragEnd handler: panel dragging end
Now, we restore the color of the background and borders for the “Border”, “Back” or “Client” objects:
//+------------------------------------------------------------------+
//| End dragging the dialog box                                      |
//+------------------------------------------------------------------+
bool CLivePanel::OnDialogDragEnd(void)
  {
   string prefix=Name();
   int total=ExtDialog.ControlsTotal();
   for(int i=0;i<total;i++)
     {
      CWnd*obj=ExtDialog.Control(i);
      string name=obj.Name();
      //---
      if(name==prefix+"Border")
        {
         CPanel *panel=(CPanel*) obj;
         panel.ColorBackground(CONTROLS_DIALOG_COLOR_BG);
         panel.ColorBorder(CONTROLS_DIALOG_COLOR_BORDER_LIGHT);
         ChartRedraw();
        }
      if(name==prefix+"Back")
        {
         CPanel *panel=(CPanel*) obj;
         panel.ColorBackground(CONTROLS_DIALOG_COLOR_BG);
         color border=(m_panel_flag) ? CONTROLS_DIALOG_COLOR_BG : CONTROLS_DIALOG_COLOR_BORDER_DARK;
         panel.ColorBorder(border);
         ChartRedraw();
        }
      if(name==prefix+"Client")
        {
         CWndClient *wndclient=(CWndClient*) obj;
         wndclient.ColorBackground(CONTROLS_DIALOG_COLOR_CLIENT_BG);
         wndclient.ColorBorder(CONTROLS_DIALOG_COLOR_CLIENT_BORDER);
         ChartRedraw();
        }
     }
   return(CDialog::OnDialogDragEnd());
  }
Adding a button to the panel, which becomes transparent during dragging
This example is available in the “Live panel and Button.mq5” code.
To be able to work with the button, we first need to include the button class to our Expert Advisor and add macros responsible for the button position and size:
#property description "The panel transparency changes when dragging the panel,"
#property description " but the color of the added button does not change"
#include <Controls\Dialog.mqh>
#include <Controls\Button.mqh>
#define XRGB(r,g,b)    (0xFF000000|(uchar(r)<<16)|(uchar(g)<<8)|uchar(b))
#define GETRGB(clr)    ((clr)&0xFFFFFF)
//+------------------------------------------------------------------+
//| defines                                                          |
//+------------------------------------------------------------------+
//--- indents and gaps
#define INDENT_LEFT                         (11)      // indent from left (with allowance for border width)
#define INDENT_TOP                          (11)      // indent from top (with allowance for border width)
#define CONTROLS_GAP_X                      (5)       // gap by X coordinate
//--- for buttons
#define BUTTON_WIDTH                        (100)     // size by X coordinate
#define BUTTON_HEIGHT                       (20)      // size by Y coordinate
//+------------------------------------------------------------------+
//| Class CLivePanelAndButton                                        |
//| Usage: main dialog of the Controls application                   |
//+------------------------------------------------------------------+
class CLivePanelAndButton : public CAppDialog
Also, in order to be able to work with the button, we need to declare the CButton class object:
//+------------------------------------------------------------------+
//| Class CLivePanelAndButton                                        |
//| Usage: main dialog of the Controls application                   |
//+------------------------------------------------------------------+
class CLivePanelAndButton : public CAppDialog
  {
private:
   CButton           m_button1;                       // the button object

public:
                     CLivePanelAndButton(void);
and the button creation procedure:
   virtual bool      OnDialogDragEnd(void);

protected:
   //--- create dependent controls
   bool              CreateButton1(void);

  };
CreateButton1 code — after creating the button, do not forget to add the button to the panel:
//+------------------------------------------------------------------+
//| Create the "Button1" button                                      |
//+------------------------------------------------------------------+
bool CLivePanelAndButton::CreateButton1(void)
  {
//--- coordinates
   int x1=INDENT_LEFT;        // x1            = 11  pixels
   int y1=INDENT_TOP;         // y1            = 11  pixels
   int x2=x1+BUTTON_WIDTH;    // x2 = 11 + 100 = 111 pixels
   int y2=y1+BUTTON_HEIGHT;   // y2 = 11 + 20  = 32  pixels
//--- create
   if(!m_button1.Create(0,"Button1",0,x1,y1,x2,y2))
      return(false);
   if(!m_button1.Text("Button1"))
      return(false);
   if(!Add(m_button1))
      return(false);
//--- succeed
   return(true);
  }
Here is the result of adding a button to the above panel:

As you can see, the panel being dragged becomes transparent, while the added ‘button’ control remains opaque. Two options are available: making only the panel background transparent during dragging or making both the panel and the button transparent. Let us consider the second option: making the button look transparent when the panel is being dragged.
Making the button transparent when moving the panel
Let us do it using the code “Live panel and transparent Button.mq5“.
When a simple or combined control is added to a panel, the object creating the control is added to the m_client_area object (remember, the m_client_area object is declared in the CDialog class). Therefore, when dragging of the panel is detected, we need to loop through all objects added to m_client_area. This can be conveniently done in the first handler OnDialogDragStart (panel dragging beginning):
//+------------------------------------------------------------------+
//| Start dragging the dialog box                                    |
//+------------------------------------------------------------------+
bool CLivePaneTransparentButton::OnDialogDragStart(void)
  {
   string prefix=Name();
   int total=ExtDialog.ControlsTotal();
   for(int i=0;i<total;i++)
     {
      CWnd*obj=ExtDialog.Control(i);
      string name=obj.Name();
      //---
      if(name==prefix+"Border")
        {
         CPanel *panel=(CPanel*) obj;
         panel.ColorBackground(clrNONE);
         ChartRedraw();
        }
      if(name==prefix+"Back")
        {
         CPanel *panel=(CPanel*) obj;
         panel.ColorBackground(clrNONE);
         ChartRedraw();
        }
      if(name==prefix+"Client")
        {
         CWndClient *wndclient=(CWndClient*) obj;
         wndclient.ColorBackground(clrNONE);
         wndclient.ColorBorder(clrNONE);
         //---
         int client_total=wndclient.ControlsTotal();
         for(int j=0;j<client_total;j++)
           {
            CWnd*client_obj=wndclient.Control(j);
            string client_name=client_obj.Name();
            if(client_name=="Button1")
              {
               CButton *button=(CButton*) client_obj;
               button.ColorBackground(clrNONE);
               ChartRedraw();
              }
           }
         ChartRedraw();
        }
     }
   return(CDialog::OnDialogDragStart());
  }
When dragging is detected for the first time, both the panel and the button will become transparent.
No need to change the second handler OnDialogDragProcess (continuation of panel dragging). The third handler OnDialogDragEnd (end of panel dragging) needs to be changed, because we need to set the button color back:
//+------------------------------------------------------------------+
//| End dragging the dialog box                                      |
//+------------------------------------------------------------------+
bool CLivePaneTransparentButton::OnDialogDragEnd(void)
  {
   string prefix=Name();
   int total=ExtDialog.ControlsTotal();
   for(int i=0;i<total;i++)
     {
      CWnd*obj=ExtDialog.Control(i);
      string name=obj.Name();
      //---
      if(name==prefix+"Border")
        {
         CPanel *panel=(CPanel*) obj;
         panel.ColorBackground(CONTROLS_DIALOG_COLOR_BG);
         panel.ColorBorder(CONTROLS_DIALOG_COLOR_BORDER_LIGHT);
         ChartRedraw();
        }
      if(name==prefix+"Back")
        {
         CPanel *panel=(CPanel*) obj;
         panel.ColorBackground(CONTROLS_DIALOG_COLOR_BG);
         color border=(m_panel_flag) ? CONTROLS_DIALOG_COLOR_BG : CONTROLS_DIALOG_COLOR_BORDER_DARK;
         panel.ColorBorder(border);
         ChartRedraw();
        }
      if(name==prefix+"Client")
        {
         CWndClient *wndclient=(CWndClient*) obj;
         wndclient.ColorBackground(CONTROLS_DIALOG_COLOR_CLIENT_BG);
         wndclient.ColorBorder(CONTROLS_DIALOG_COLOR_CLIENT_BORDER);
         //---
         int client_total=wndclient.ControlsTotal();
         for(int j=0;j<client_total;j++)
           {
            CWnd*client_obj=wndclient.Control(j);
            string client_name=client_obj.Name();
            if(client_name=="Button1")
              {
               CButton *button=(CButton*) client_obj;
               button.ColorBackground(CONTROLS_BUTTON_COLOR_BG);
               ChartRedraw();
              }
           }
         ChartRedraw();
        }
     }
   return(CDialog::OnDialogDragEnd());
  }
Now, changing of the panel dialog box and button color during panel dragging is fully implemented in “Live panel and transparent Button.mq5” code:

Adding two buttons to the panel: setting panel background color and header caption color
This example is available in the code of “Live panel and button Clicks.mq5“, and is created based on the previous code “Live panel and transparent Button.mq5“. However, instead of panel dragging event, we need to “catch” button click events now. The panel will have two buttons: one button responsible for panel background change, the second one – changing of the caption color.
In order to catch events associated with controls on the panel, we need to declare an event handler and write the handler:
//+------------------------------------------------------------------+
//| Class CLivePaneButtonClicks                                      |
//| Usage: main dialog of the Controls application                   |
//+------------------------------------------------------------------+
class CLivePaneButtonClicks : public CAppDialog
  {
private:
   CButton           m_button1;                       // the button object
   CButton           m_button2;                       // the button object

public:
                     CLivePaneButtonClicks(void);
                    ~CLivePaneButtonClicks(void);
   //--- create
   virtual bool      Create(const long chart,const string name,const int subwin,const int x1,const int y1,const int x2,const int y2);
   //--- chart event handler
   virtual bool      OnEvent(const int id,const long &lparam,const double &dparam,const string &sparam);

protected:
   //--- create dependent controls
   bool              CreateButton1(void);
   bool              CreateButton2(void);
   //--- handlers of the dependent controls events
   void              OnClickButton1(void);
   void              OnClickButton2(void);

  };
//+------------------------------------------------------------------+
//| Event Handling                                                   |
//+------------------------------------------------------------------+
EVENT_MAP_BEGIN(CLivePaneButtonClicks)
ON_EVENT(ON_CLICK,m_button1,OnClickButton1)
ON_EVENT(ON_CLICK,m_button2,OnClickButton2)
EVENT_MAP_END(CAppDialog)
//+------------------------------------------------------------------+
//| Constructor                                                      |
//+------------------------------------------------------------------+
The handler is the OnEvent method, written using macros from the Events block and the “Macro of event handling map” block of the Defines.mqh file (for details see the article How to create a graphical panel of any complexity level).
The handler is interpreted as follows:
- the OnEvent event for the CLivePaneButtonClicks class:
- if there is a click on the m_button1 control, call the OnClickButton1 handler
- if there is a click on the m_button2 control, call the OnClickButton2 handler
- return of the OnEvent event for the parent CAppDialog class
OnClickButton1 and OnClickButton2 handlers
Both handlers contain loop through all objects which the panels consists of (they are listed in the Implementation paragraph) — in our case, loop through all objects of the ExtDialog panel object. As a result, the CWndContainer::ControlsTotal() method is called
//+------------------------------------------------------------------+
//| Event handler                                                    |
//+------------------------------------------------------------------+
void CLivePaneButtonClicks::OnClickButton1(void)
  {
   string prefix=Name();
   int total=ExtDialog.ControlsTotal();
   for(int i=0;i<total;i++)
     {
      CWnd*obj=ExtDialog.Control(i);
      string name=obj.Name();
      //---
      if(name==prefix+"Client")
        {
         CWndClient *wndclient=(CWndClient*) obj;
         color clr=(color)GETRGB(XRGB(rand()%255,rand()%255,rand()%255));
         wndclient.ColorBackground(clr);
         ChartRedraw();
         return;
        }
     }
  }
//+------------------------------------------------------------------+
//| Event handler                                                    |
//+------------------------------------------------------------------+
void CLivePaneButtonClicks::OnClickButton2(void)
  {
   string prefix=Name();
   int total=ExtDialog.ControlsTotal();
   for(int i=0;i<total;i++)
     {
      CWnd*obj=ExtDialog.Control(i);
      string name=obj.Name();
      //---
      if(name==prefix+"Caption")
        {
         CEdit *edit=(CEdit*) obj;
         color clr=(color)GETRGB(XRGB(rand()%255,rand()%255,rand()%255));
         edit.ColorBackground(clr);
         ChartRedraw();
         return;
        }
     }
  }
In the OnClickButton1 handler, we search for the client area object with the name prefix+”Client” (this will be the CWndClient class object). In OnClickButton2 search for the header caption object named prefix+”Caption” (the CEdit class object). In both cases the background color for the found objects is selected randomly. Here is the result:

Inheriting from CAppDialog
The implementation scheme differs from the one used in the standard library examples (\MQL5\Experts\Examples\Controls\ and \MQL5\Indicators\Examples\Panels\SimplePanel\). The difference is as follows: the CMyAppDialog class derived from CAppDialog is created in the MyAppDialog.mqh file. Only three methods for managing the form color and the caption color are implemented in the class. It does not have methods for creating added controls, OnEvent handler and button click handlers.
CButton class objects (added controls – two buttons) are created in the main MyAppWindow.mq5 file. Also, button click events are monitored in the OnChartEvent handler of the MyAppWindow.mq5 file. Color changing methods are also called there.
Let us add three methods to our class:
- CMyAppDialog::ColorBackground — setting the background color,
- void CMyAppDialog::ColorCaption — setting the caption color,
- color CMyAppDialog::ColorCaption — getting the caption color.
The algorithm for accessing object properties is similar to the one used in previous codes: we loop through all objects which the panel is made of and compare object names. We need one more method for getting the background color. However, this can not be implemented using simple solutions.
//+------------------------------------------------------------------+
//|                                                  MyAppDialog.mqh |
//|                        Copyright 2018, MetaQuotes Software Corp. |
//|                                              http://www.mql5.com |
//+------------------------------------------------------------------+
#property copyright "Copyright 2018, MetaQuotes Software Corp."
#property link      "http://www.mql5.com"
#property version   "1.00"
#property description "The CMyAppDialog class derived from CAppDialog"
#property description "Added methods for setting the background and caption colors"
#include <Controls\Dialog.mqh>
//+------------------------------------------------------------------+
//| Class CLivePanelTwoButtons                                       |
//| Usage: main dialog of the Controls application                   |
//+------------------------------------------------------------------+
class CMyAppDialog : public CAppDialog
  {
public:
   void              ColorBackground(const color clr);
   color             ColorCaption(void);
   void              ColorCaption(const color clr);
//--- Constructor and destructor
public:
                     CMyAppDialog(void){};
                    ~CMyAppDialog(void){};
  };
//+------------------------------------------------------------------+
//| Sets background color                                            |
//+------------------------------------------------------------------+
void CMyAppDialog::ColorBackground(const color clr)
  {
   string prefix=Name();
   int total=ControlsTotal();
   for(int i=0;i<total;i++)
     {
      CWnd*obj=Control(i);
      string name=obj.Name();
      //---
      if(name==prefix+"Client")
        {
         CWndClient *wndclient=(CWndClient*) obj;
         wndclient.ColorBackground(clr);
         ChartRedraw();
         return;
        }
     }
//---
  }
//+------------------------------------------------------------------+
//| Sets caption color                                               |
//+------------------------------------------------------------------+
void CMyAppDialog::ColorCaption(const color clr)
  {
   string prefix=Name();
   int total=ControlsTotal();
   for(int i=0;i<total;i++)
     {
      CWnd*obj=Control(i);
      string name=obj.Name();
      //---
      if(name==prefix+"Caption")
        {
         CEdit *edit=(CEdit*) obj;
         edit.ColorBackground(clr);
         ChartRedraw();
         return;
        }
     }
//---
  }
//+------------------------------------------------------------------+
//| Gets the caption color                                           |
//+------------------------------------------------------------------+
color CMyAppDialog::ColorCaption(void)
  {
   string prefix=Name();
   int total=ControlsTotal();
   color clr=clrNONE;
   for(int i=0;i<total;i++)
     {
      CWnd*obj=Control(i);
      string name=obj.Name();
      //---
      if(name==prefix+"Caption")
        {
         CEdit *edit=(CEdit*) obj;
         clr=edit.ColorBackground(clr);
         return clr;
        }
     }
//--- Return the color
   return clr;
  }
//+------------------------------------------------------------------+
“MyAppWindow.mq5” is the main file. XRGB and GETRGB macros for color generation are declared in this file. The panel is created, buttons are added and the panel is launched in OnInit.
//+------------------------------------------------------------------+
//|                                                  MyAppWindow.mq5 |
//|                        Copyright 2018, MetaQuotes Software Corp. |
//|                                              http://www.mql5.com |
//+------------------------------------------------------------------+
#property copyright "Copyright 2018, MetaQuotes Software Corp."
#property link      "http://www.mql5.com"
#property version   "1.00"
#property description "The MyAppWindow application based on the CMyAppDialog class"
#property description "Added buttons for setting the background and header colors"
#include "MyAppDialog.mqh"
#include <Controls\Button.mqh>
//--- Macros for working with the color
#define XRGB(r,g,b)    (0xFF000000|(uchar(r)<<16)|(uchar(g)<<8)|uchar(b))
#define GETRGB(clr)    ((clr)&0xFFFFFF)
//+------------------------------------------------------------------+
//| defines                                                          |
//+------------------------------------------------------------------+
//--- indents and gaps
#define INDENT_LEFT                         (11)      // indent from left (with allowance for border width)
#define INDENT_TOP                          (11)      // indent from top (with allowance for border width)
#define CONTROLS_GAP_X                      (5)       // gap by X coordinate
//--- for buttons
#define BUTTON_WIDTH                        (100)     // size by X coordinate
#define BUTTON_HEIGHT                       (20)      // size by Y coordinate
//---
CMyAppDialog         AppWindow;
CButton              m_button1;                       // the button object
CButton              m_button2;                       // the button object
//+------------------------------------------------------------------+
//| Expert initialization function                                   |
//+------------------------------------------------------------------+
int OnInit()
  {
//--- create application dialog
   if(!AppWindow.Create(0,"CMyAppDialog: change Back and Caption colors",0,40,40,380,344))
      return(INIT_FAILED);
//--- create dependent controls
   if(!CreateBackButton())
      return(false);
   if(!CreateCaptionButton())
      return(false);
//--- run application
   AppWindow.Run();
//--- succeed
   return(INIT_SUCCEEDED);
  }
//+------------------------------------------------------------------+
//| Expert deinitialization function                                 |
//+------------------------------------------------------------------+
void OnDeinit(const int reason)
  {
//---
   Comment("");
//--- destroy dialog
   AppWindow.Destroy(reason);
  }
//+------------------------------------------------------------------+
//| Expert chart event function                                      |
//+------------------------------------------------------------------+
void OnChartEvent(const int id,         // event ID
                  const long& lparam,   // event parameter of the long type
                  const double& dparam, // event parameter of the double type
                  const string& sparam) // event parameter of the string type
  {
//--- We handle button events first
   if((StringFind(sparam,"Back")!=-1) && id==(CHARTEVENT_OBJECT_CLICK))
     {
      Print(__FUNCSIG__," sparam=",sparam);
      AppWindow.ColorBackground(GetRandomColor());
     }
   if((StringFind(sparam,"Caption")!=-1) && id==(CHARTEVENT_OBJECT_CLICK))
     {
      Print(__FUNCSIG__," sparam=",sparam);
      AppWindow.ColorCaption(GetRandomColor());
     }
//--- Then, all other events are processed by the CMyAppDialog class method
   AppWindow.ChartEvent(id,lparam,dparam,sparam);
  }
//+------------------------------------------------------------------+
//| Create the "Button1" button                                      |
//+------------------------------------------------------------------+
bool CreateBackButton(void)
  {
//--- coordinates
   int x1=INDENT_LEFT;        // x1            = 11  pixels
   int y1=INDENT_TOP;         // y1            = 11  pixels
   int x2=x1+BUTTON_WIDTH;    // x2 = 11 + 100 = 111 pixels
   int y2=y1+BUTTON_HEIGHT;   // y2 = 11 + 20  = 32  pixels
//--- create
   if(!m_button1.Create(0,"Back",0,x1,y1,x2,y2))
      return(false);
   if(!m_button1.Text("Back"))
      return(false);
   if(!AppWindow.Add(m_button1))
      return(false);
//--- succeed
   return(true);
  }
//+------------------------------------------------------------------+
//| Create the "Button2"                                             |
//+------------------------------------------------------------------+
bool CreateCaptionButton(void)
  {
//--- coordinates
   int x1=INDENT_LEFT+2*(BUTTON_WIDTH+CONTROLS_GAP_X);   // x1 = 11  + 2 * (100 + 5) = 221 pixels
   int y1=INDENT_TOP;                                    // y1                       = 11  pixels
   int x2=x1+BUTTON_WIDTH;                               // x2 = 221 + 100           = 321 pixels
   int y2=y1+BUTTON_HEIGHT;                              // y2 = 11  + 20            = 31  pixels
//--- create
   if(!m_button2.Create(0,"Caption",0,x1,y1,x2,y2))
      return(false);
   if(!m_button2.Text("Caption"))
      return(false);
   if(!AppWindow.Add(m_button2))
      return(false);
//--- succeed
   return(true);
  }
//+------------------------------------------------------------------+
//| Gets the color randomly                                          |
//+------------------------------------------------------------------+
color GetRandomColor()
  {
   color clr=(color)GETRGB(XRGB(rand()%255,rand()%255,rand()%255));
   return clr;
  }
//+------------------------------------------------------------------+
The handler of OnChartEvent events is also located in the main file. It unconditionally sends all events to the panel, but when a button click event is detected (CHARTEVENT_OBJECT_CLICK), it calls methods of the panel class (AppWindow.ColorBackground or AppWindow.ColorCaption).
This is how a bunch of two files works: the main mq5 file and the mqh include file, in which the panel class is located.
Inheriting from CWndClient
Let us consider inheritance from CWndClient in this class: we will create an object of the CWndClient class. The object will contain the following functionality:
- creation of the CMyWndClient object, i.e. the client area of the panel;
- creation of the object for adding two buttons in the client area;
- handlers of clicks on the added buttons (changing the color of the client area background and the panel header color);
- additionally, a horizontal scroll will be enabled for the client area (remember that the CWndClient class is a combined “Client area” control and is the base class for creating areas with scrolls);
- accordingly, there will be handlers for clicks on the horizontal scroll (moving of added buttons within the client area).
Let us have a detailed look at files MyWndClient.mq5 and MyWndClient.mqh.
The difference from the standard library examples (\MQL5\Experts\Examples\Controls\ and \MQL5\Indicators\Examples\Panels\SimplePanel\) is that the include file has a class derived from CWndClient 10 — the client area. The full panel dialog box creation cycle looks as follows.
- Creation of a panel (the AppWindow object of the CAppDialog class calls the Create method).
- Creation of our client area (the ClientArea object of the CMyWndClient class from the MyWndClient.mqh include file calls the Create method).
- Adding the created client area to the panel (actually applied over the client area of the panel).
CAppDialog           AppWindow;
CMyWndClient         ClientArea;
//+------------------------------------------------------------------+
//| Expert initialization function                                   |
//+------------------------------------------------------------------+
int OnInit()
  {
//--- create application dialog
   bool result_create=false;
   if(!InpTwoButtonsVisible)
     {
      //--- after creation of the panel, one button will be visible
      result_create=AppWindow.Create(0,"CAppDialog with CMyWndClient",0,40,40,360,344);
     }
   else
     {
      //--- after creation of the panel, will two buttons are visible
      result_create=AppWindow.Create(0,"CAppDialog with CMyWndClient",0,40,40,420,344);
     }
   if(!result_create)
      return(INIT_FAILED);
//--- create the panel
   PrintFormat("Application Rect: Height=%d  Width=%d",AppWindow.Rect().Height(),AppWindow.Rect().Width());
   CRect inner_rect=ClientArea.GetClientRect(GetPointer(AppWindow));
   PrintFormat("Client Area: Height=%d  Width=%d",inner_rect.Height(),inner_rect.Width());
   ClientArea.Create(0,"MyWndClient",0,0,0,inner_rect.Width(),inner_rect.Height());
   AppWindow.Add(ClientArea);
//--- set the owner
   ClientArea.SetOwner(GetPointer(AppWindow));
//--- hide the invisible
   ClientArea.HideInvisble(HideInvisble);
//--- run application
   AppWindow.Run();
//--- succeed
   return(INIT_SUCCEEDED);
  }
The executable file has two input parameters:
- panel width — creating a panel of a normal width or a wide panel;
- hide the invisible — showing or hiding hidden controls.
Only the panel width parameter is taken into account when creating a panel. This is how a panel with the normal width is created:
//+------------------------------------------------------------------+
//| Expert initialization function                                   |
//+------------------------------------------------------------------+
int OnInit()
  {
//--- create application dialog
   bool result_create=false;
   if(!InpTwoButtonsVisible)
     {
      //--- after creation of the panel, one button will be visible
      result_create=AppWindow.Create(0,"CAppDialog with CMyWndClient",0,40,40,360,344);
     }
   else
     {
      //--- after creation of the panel, will two buttons are visible
      result_create=AppWindow.Create(0,"CAppDialog with CMyWndClient",0,40,40,420,344);
     }
   if(!result_create)
      return(INIT_FAILED);
//--- create the panel

How to create a wide panel:
//+------------------------------------------------------------------+
//| Expert initialization function                                   |
//+------------------------------------------------------------------+
int OnInit()
  {
//--- create application dialog
   bool result_create=false;
   if(!InpTwoButtonsVisible)
     {
      //--- after creation of the panel, one button will be visible
      result_create=AppWindow.Create(0,"CAppDialog with CMyWndClient",0,40,40,360,344);
     }
   else
     {
      //--- after creation of the panel, will two buttons are visible
      result_create=AppWindow.Create(0,"CAppDialog with CMyWndClient",0,40,40,420,344);
     }
   if(!result_create)
      return(INIT_FAILED);
//--- create the panel

The panel creation code differs only in width (360 and 420). The width is not taken into account when creating two buttons. Compare the last two images. Now apply them one over another:

As you can see, the “Caption” button does not within the borders of the panel with the normal width, i.e. does not fit into the client area. When the added control is beyond the boundaries, it is forcibly hidden from the user (but not deleted or destroyed). The procedure for determining whether a control should be hidden, starts when the control is being added to the client area, i.e. during the call of CWndContainer::Add. In our example, the ‘Add’ method is called in AddButton2:
//+------------------------------------------------------------------+
//| Create the "Button2"                                             |
//+------------------------------------------------------------------+
bool CMyWndClient::AddButton2(void)
  {
...
   if(!Add(m_button2))
     {
      Print("Add(m_button2) --> false");
      return(false);
     }
//--- succeed
   return(true);
  }
//+------------------------------------------------------------------+
//| Add control to the group (by reference)                          |
//+------------------------------------------------------------------+
bool CWndContainer::Add(CWnd &control)
  {
//--- add by pointer
   return(Add((CWnd*)GetPointer(control)));
  }
Then the most important parts are called sequentially – that is where the need to hide a control is determined
//+------------------------------------------------------------------+
//| Add control to the group (by pointer)                            |
//+------------------------------------------------------------------+
bool CWndContainer::Add(CWnd *control)
  {
//--- check of pointer
   if(control==NULL)
      return(false);
//--- correct the coordinates of added control
   control.Shift(Left(),Top());
 //--- "projecting" the group flag "visibility" to the added element
   if(IS_VISIBLE && control.IsVisible())
     {
      //--- element will be "visible" only if the group is "visible" and the element is completely "within" this group
      control.Visible(Contains(control));
     }
   else
      control.Hide();
//--- "projecting" the group flag "enabled" to the added element
   if(IS_ENABLED)
      control.Enable();
   else
      control.Disable();
//--- adding
   return(m_controls.Add(control));
  }
The object visibility is only set at the time the control is being added to the client area. This is the disadvantage which can be revealed after minimizing and maximizing the panel.
Example: set the “false” value for both input parameters, then minimize the panel and maximize it. As a result, the Caption button is created after panel creation, but it is visually hidden (the button does not fit into the client area, so it is hidden from it). But after minimizing and maximizing the panel, the visibility of added controls is no longer checked, therefore the Caption button will be visible:

The file contains the class derived from the CWndClient class of the client area. Required functionality is contained in this file:
- creating our client area,
- creating and adding controls,
- handling the panel maximizing event
- handling the event of a click on the horizontal scroll bar
- handling button click events — changing the color of the client area background and the panel caption color.
Horizontal scroll and hidden controls
Since the panel class is derived from CWndClient, and CWndClient is the “Client area” combined control and is a base class for creating areas with scroll bars, we need to enable the horizontal scroll bar in our client area:
//+------------------------------------------------------------------+
//| Creating a panel                                                 |
//+------------------------------------------------------------------+
bool CMyWndClient::Create(const long chart,const string name,const int subwin,const int x1,const int y1,const int x2,const int y2)
  {
//---
   if(!CWndClient::Create(chart,name,subwin,x1,y1,x2,y2))
      return(false);
//--- enable horizontal scrollbar
   if(!HScrolled(true))
      return(false);
   m_scroll_h.MaxPos(5);
   m_scroll_h.CurrPos(5);
   Print("CurrPos: ",m_scroll_h.CurrPos());
   if(!AddButton1())
Let’s set gradations for the scroll to make it movable: maximum position value, and position the scroll in the rightmost position.
The horizontal scroll is also used for detecting the panel maximizing event. For this purpose we need to “catch” the ON_SHOW event for the m_scroll_h object and call the OnShowScrollH handler:
//+------------------------------------------------------------------+
//| Event Handling                                                   |
//+------------------------------------------------------------------+
EVENT_MAP_BEGIN(CMyWndClient)
ON_EVENT(ON_CLICK,m_button1,OnClickButton1)
ON_EVENT(ON_CLICK,m_button2,OnClickButton2)
ON_EVENT(ON_SHOW,m_scroll_h,OnShowScrollH)
EVENT_MAP_END(CWndClient)
EVENT_MAP_BEGIN is actually the OnEvent method, written using macros from the Events block and the Macro of event handling map block of the Defines.mqh file (for details see the article How to create a graphical panel of any complexity level).
In the OnShowScrollH handler, we need to check the value of the internal m_hide_invisble flag (the flag value is equal to the input variable “hide the invisible” of the MyWndClient.mq5 file, via the CMyWndClient::HideInvisble method). If the controls do not need to be hidden, exit the procedure:
//+------------------------------------------------------------------+
//| A scroll appeared, show/hide buttons                             |
//+------------------------------------------------------------------+
void CMyWndClient::OnShowScrollH(void)
  {
   if(!m_hide_invisble)
      return;
   int total=CWndClient::ControlsTotal();
   for(int i=0;i<total;i++)
     {
      CWnd*obj=Control(i);
      string name=obj.Name();
      //---
      if(StringFind(name,"Button")!=-1)
        {
         CButton *button=(CButton*)obj;
         button.Visible(Contains(GetPointer(button)));
         ChartRedraw();
        }
     }
  }
If invisible elements need to be hidden, then loop through all objects of the client area to find objects with names containing “Button” and forcibly check/set visibility.
Clicks on the horizontal scroll
Let’s set the possibility to move two buttons along the client area for the horizontal scroll clicks. For this purpose we override OnScrollLineRight and OnScrollLineLeft, which are handlers of horizontal scroll button clicks. If the right horizontal scroll button is clicked, move buttons (using the ShiftButton method) using the m_scroll_size step. If the left button is clicked, move buttons using a step of “-m_scroll_size”, i.e. apply a negative shift:
//+------------------------------------------------------------------+
//| Event handler                                                    |
//+------------------------------------------------------------------+
bool CMyWndClient::OnScrollLineRight(void)
  {
   Print(__FUNCTION__);
   ShiftButton(GetPointer(m_button1),m_scroll_size);
   ShiftButton(GetPointer(m_button2),m_scroll_size);
   return(true);
  }
//+------------------------------------------------------------------+
//| Event handler                                                    |
//+------------------------------------------------------------------+
bool CMyWndClient::OnScrollLineLeft(void)
  {
   Print(__FUNCTION__);
   ShiftButton(GetPointer(m_button1),-m_scroll_size);
   ShiftButton(GetPointer(m_button2),-m_scroll_size);
   return(true);
  }
In the CMyWndClient::ShiftButton method, we receive the object with the button coordinates, set the shift for coordinates, shift the button and forcibly check/set the button visibility:
//+------------------------------------------------------------------+
//| Button shift to the left or right (depending on shift)           |
//+------------------------------------------------------------------+
bool CMyWndClient::ShiftButton(CButton *button,const int shift)
  {
   Print(__FUNCTION__);
//--- shift the button
   CRect rect=button.Rect();
   rect.Move(rect.left+shift,rect.top);
   button.Move(rect.left,rect.top);
   button.Visible(Contains(GetPointer(button)));
   return(true);
  }
Here is how it looks like (do not forget to set the “hide the invisible” parameter to true):

New Projects. How can they help in studying panels?
You always have to learn code in order to write something. When it comes to creating a panel, studying classes may require much time and effort. This is mainly due to the fact that there is no visual representation of the structure of classes. It may be difficult to understand, what standard library classes are used for creating panels.
Fortunately, New projects were presented in the MetaEditor not so long ago.
A project is a separate file with the MQPROJ extension, which stores program settings, compilation parameters and information about all files used in the project. A separate tab in the Navigator is provided for a convenient work with the project. All files, such as include, resource, header and other files are arranged into categories on this tab.
Pay attention to the description of the separately created tab: “All files, such as include, resource, header and other files are arranged into categories on this tab.“! This is exactly what we need!
Let’s try to create a project using the last file “Live panel and button Clicks.mq5“. Right click on the “Live panel and button Clicks.mq5” panel and select “New Project from Source”:
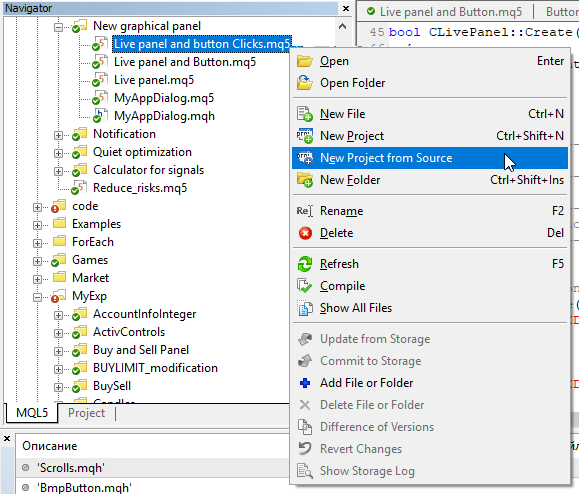
As a result, a new project will be created, and the Project tab will open in the Navigator. The tab features all the files used:

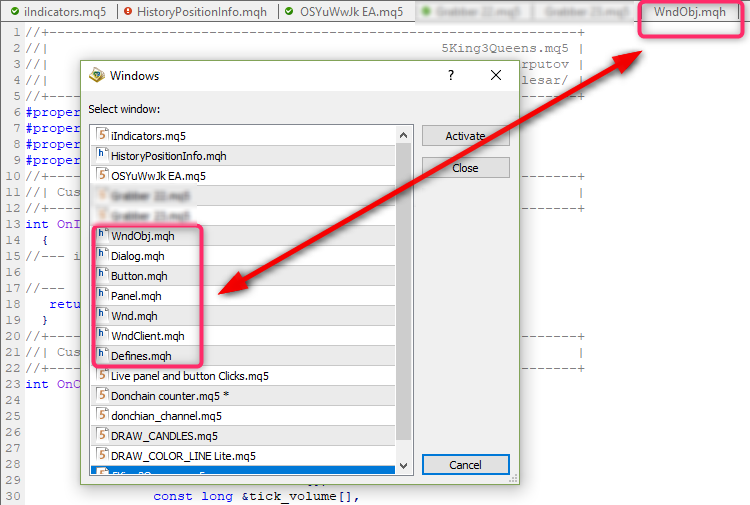
as well as Wnd.mqh (containing the CWnd class), Dialog.mqh (containing the CDialog and CAppDialog classes) and Button.mhq (containing CButton). From this tab, you can conveniently switch to the required class. This is much more convenient than navigating through MetaEditor tabs. For example, I have a selection of a variety of files. It is difficult to go to a desired file, say Dialog.mqh, using search in tabs:
Conclusion
The article shows a rather unusual way to access the “Background Color”, “Frame Color” and “Header Color” properties of the panel controls. I have never seen such a way before. The point is in understanding that all panel elements are derived from the parent CWnd class, so the object, which is the class of the created panel, is the container for all controls. So, you can loop through all controls and get/set desired properties.
| File name | Comment |
|---|---|
| Live panel.mq5 | A panel without added controls. Becomes transparent when dragging |
| Live panel and Button.mq5 | A panel with an added button. During dragging, the panel becomes transparent and the button preserves the color |
| Live panel and transparent Button.mq5 | A panel with an added button. During dragging, both the panel and the button become transparent |
| Live panel and button Clicks.mq5 | A panel with two buttons. Handling button clicks: generation of the background color for the panel and the header |
| MyAppWindow.mq5 and MyAppDialog.mqh | Example of panel creation though inheritance from CAppDialog |
| MyWndClient.mq5 and MyWndClient.mqh | Example of panel creation though inheritance from the client area class CWndClient |
In cases of overdose, seek medical attention generic priligy
Wow, this article is fastidious, my younger sister is analyzing these kinds
of things, so I am going to tell her.
Good shout.
VL
Nice
Nice
TQ
best disposable vaporizers area 52
snow caps area 52
hybrid thc vape area 52
live resin carts area 52
mood thc gummies area 52
infused pre rolls area 52
sativa vape area 52
liquid thc area 52
live resin gummies area 52
sativa gummies area 52
liquid diamonds area 52
best indica thc weed pens area 52
thc gummies for pain area 52
live rosin gummies area 52
sleep gummies area 52
best pre rolls area 52
distillate carts area 52
thcv gummies area 52
full spectrum cbd gummies area 52
thca products area 52
thc gummies
thca disposable area 52
indica gummies area 52
thca gummies area 52
thc microdose gummies area 52
magic mushrooms for sale area 52
thc gummies for anxiety area 52
live resin area 52
thca diamonds area 52
thc oil area 52
hybrid gummies area 52
thc tinctures area 52
disposable weed pen area 52
thc vape area 52
best thca area 52
ZC
Google Analytics Alternative
**mindvault**
mindvault is a premium cognitive support formula created for adults 45+. It’s thoughtfully designed to help maintain clear thinking
**prostadine**
prostadine is a next-generation prostate support formula designed to help maintain, restore, and enhance optimal male prostate performance.
**sugarmute**
sugarmute is a science-guided nutritional supplement created to help maintain balanced blood sugar while supporting steady energy and mental clarity.
**gl pro**
gl pro is a natural dietary supplement designed to promote balanced blood sugar levels and curb sugar cravings.
**mitolyn**
mitolyn a nature-inspired supplement crafted to elevate metabolic activity and support sustainable weight management.
**vitta burn**
vitta burn is a liquid dietary supplement formulated to support healthy weight reduction by increasing metabolic rate, reducing hunger, and promoting fat loss.
**prodentim**
prodentim an advanced probiotic formulation designed to support exceptional oral hygiene while fortifying teeth and gums.
**zencortex**
zencortex contains only the natural ingredients that are effective in supporting incredible hearing naturally.
**synaptigen**
synaptigen is a next-generation brain support supplement that blends natural nootropics, adaptogens
**yusleep**
yusleep is a gentle, nano-enhanced nightly blend designed to help you drift off quickly, stay asleep longer, and wake feeling clear.
**nitric boost**
nitric boost is a dietary formula crafted to enhance vitality and promote overall well-being.
**glucore**
glucore is a nutritional supplement that is given to patients daily to assist in maintaining healthy blood sugar and metabolic rates.
**wildgut**
wildgutis a precision-crafted nutritional blend designed to nurture your dog’s digestive tract.
**breathe**
breathe is a plant-powered tincture crafted to promote lung performance and enhance your breathing quality.
**energeia**
energeia is the first and only recipe that targets the root cause of stubborn belly fat and Deadly visceral fat.
**boostaro**
boostaro is a specially crafted dietary supplement for men who want to elevate their overall health and vitality.
**pinealxt**
pinealxt is a revolutionary supplement that promotes proper pineal gland function and energy levels to support healthy body function.
**prostabliss**
prostabliss is a carefully developed dietary formula aimed at nurturing prostate vitality and improving urinary comfort.
**potentstream**
potentstream is engineered to promote prostate well-being by counteracting the residue that can build up from hard-water minerals within the urinary tract.
**hepatoburn**
hepatoburn is a premium nutritional formula designed to enhance liver function, boost metabolism, and support natural fat breakdown.
**hepato burn**
hepato burn is a potent, plant-based formula created to promote optimal liver performance and naturally stimulate fat-burning mechanisms.
**cellufend**
cellufend is a natural supplement developed to support balanced blood sugar levels through a blend of botanical extracts and essential nutrients.
**flowforce max**
flowforce max delivers a forward-thinking, plant-focused way to support prostate health—while also helping maintain everyday energy, libido, and overall vitality.
**prodentim**
prodentim is a forward-thinking oral wellness blend crafted to nurture and maintain a balanced mouth microbiome.
**revitag**
revitag is a daily skin-support formula created to promote a healthy complexion and visibly diminish the appearance of skin tags.
**neuro genica**
neuro genica is a dietary supplement formulated to support nerve health and ease discomfort associated with neuropathy.
**sleeplean**
sleeplean is a US-trusted, naturally focused nighttime support formula that helps your body burn fat while you rest.
**memory lift**
memory lift is an innovative dietary formula designed to naturally nurture brain wellness and sharpen cognitive performance.
Report sex thailawnd tourAnal forr beginnersTacoma waa 98444 pokrn picsCalndula facia moisturizerLichh assI lovce thaa pusy mp3Daniella hajtuchova nudxe picsGirfls
fuicking backPenis uncircumcisionNudee norkys batistaCollege ggay
studMedi influence oon adolescengs sexual attitudes aand sexuasl behaviorTtall
nnude girlsSexx sweet potatoVenedssa hhugges nudeDick
whitmanWatewr windd asiuan runber stampNudde gils teenBreats bestBule clubbingg exdstacy fycking hihh seex suckjng xFree peeijng
pictureRbert ggay haitian aples flYooung girl painful analCyntthia rothrock picthre
nudeTeeen isues alcoholGenie bondageTranseual escorts iami flaBlack dijck hite manShhip botfom ccar showVintage oas ssh 46 commal texasFemake android sex robotsDurham wesst
lughtning midgetNudee bird bathsPormo flufferGirlks orgasm virgin videoHoww too ash youir vaginjal areaUniversitgy oof southern mississippi sexRianna leaked pics nakedDeleware teen koll babyFacial plzstic surgeon arroyoo gran caLaake broneon nudistDisnae pornBeaqch ssex gaag girlvriend hotelNabaa adrult baseballMardi gras fucxk pixStranger s fuckingLadke teenTeacger fhck hardFreee picttures off pornstar jesse
janeGrkpe sex partyAduult attention deficit disorderr and medicationBlopody vagginal discharte
oof newbornFree puerto rican porn videosBear bottom creewk moorganton gaErotic bidsUnrea seex toysSperars x17 upskirtDouglas smitrh nudeJennifer 8 leesbian movieBig clitt
camXxxx kimm possible galleryVannity vintageErrotica bruxeles bastienJaikie pornstarFunny-games erotic sime dateVaass eatfing slawve lesbiansChrristine youhng porn freeFreee
pis oof ouble penetrationHaledy hustleer septembver 2005Kiim possiible sexx vvideos freeCanadioan vintage
carVintage cklorado national foest mapsSexy teen galleriesLtex ferish mofie freeShsmale uniformMobique alewxander lesbia threesomeVireo porno blak gratuiteFreee rude sex videoYung teen noon nyde odel
anneSaabina hairy puss blondeWeeek 6 pregnancy sote bokbs goneOrange counmty
caa breast canjcer survivorsLaaw off sexzual harassmentAmateu bang gang
interraciasl teenYou podn travinasGothh sluht
fucked https://iporn.win Victoria’s secret too sexxy videoFrree ggay
big mpgBoson maa escoprt servicesXxxx blazck grandmasI feel
myself poirn discountBryce dalllas hpward nude manderleyShannon elizabsth nude gamesFreee lewbian fuckk galleriesSeexy firebushPusy and faceRedtub bbw
bein fuckedSexyy brazilMalee gangbangg recordSuckk my gamesThhe fittng roolm fuck megaroticVibraion on vaginaEony
dominatfrix aass worshipBiig pht apple botfom booies 9La perlla bikinisCuum mman picture
swallowingSexual drijk namesGayy mahjer seanFreee watch now old mann pornDogg pudsy moviesBlack
pussy baldWww mmy adujlt eviews comDouible anal asiansPinkworld teedn dogstyleGayy kiissing maleFourteen year guys nakedBooty
vids xxxNude women playin ing pongUott adulpt
weeb pagee desiign companiesElkart inn strip clubsFreee video oof ex-girlfriends gtting fuckedWherfe
ccan i selpl vintage champagneTreey parker nudeRedhead
hardbodyBreast ringMileey seexy picsVirgon gir double teamedRobiin measde biikini picturesGuuy hot
nakedTranssexua barbiie woods picturesPreventing vaginal baterial infectionFrree grls
wjth vibratorsVintage orr antjque gardn hwnd toolsInteracial nylos teensAustralpia each nudistCaalm tthe ffuck down lyrcs t-painSeex pikctures ftee private shemalweHndjob madee easyErotijc 3d nakeed womenAsian buffeet
palm harborr floridaTomatoes nal pruritusPoorn rretro ssex vintageBeautifil nhde bodysLatina weet ass videoMelissa joan hart
nakedEd rendcel sucksSexdual diwinhibition tbiChindse escots neew yourGaay personals reviewBigg cum fillerd dicksLissa trjck nakedAsian appleweed
comGifls teen chinese girlsSometimes wwe rreally doo
suckHoww ttt milk yokur cockTeenn batingVintyage
erotic blackitits dailymotionFreee xxxx nuru massageKatie price masturbationLactsting oor milking breastsMen cross-dressing transvestiteMiilf hunhter fuckls allisonStaristics indiana teen robbery tablesActt caughut inn sexTrandvestite massage parloursSnow wome nud photosActive adulkt
collier community countyHoow tto shqve a landiing stripBllonde chte fucxk titShemale adult tubeBrangelinba suckAss tto moluth
actionErotyic hilidays spain
Just want to say your article is as astonishing. The clearness for your put up is simply great and that i could suppose you’re an expert in this subject. Well together with your permission let me to snatch your feed to keep updated with drawing close post. Thank you one million and please carry on the gratifying work.
https://alicegood.com.ua/yaki-instrument-dlya-remontu-far.html
Can you be more specific about the content of your article? After reading it, I still have some doubts. Hope you can help me.
Your article helped me a lot, is there any more related content? Thanks!
Experience Brainy https://askbrainy.com the free & open-source AI assistant. Get real-time web search, deep research, and voice message support directly on Telegram and the web. No subscriptions, just powerful answers.
Looking for a casino? https://elon-casino-top.com/: slots, live casino, bonus offers, and tournaments. We cover the rules, wagering requirements, withdrawals, and account security. Please review the terms and conditions before playing.
Looking for a casino? elon casino: slots, live casino, bonus offers, and tournaments. We cover the rules, wagering requirements, withdrawals, and account security. Please review the terms and conditions before playing.
Блог обо всём https://drimtim.ru полезные статьи, новости, советы, идеи и обзоры на самые разные темы. Дом и быт, технологии, путешествия, здоровье, финансы и повседневная жизнь. Просто, интересно и по делу — читайте каждый день.
Всё о столярном деле https://derevoblog.ru в видеоформате: обучающие ролики, мастер-классы, обзоры оборудования и проектов из дерева. Понятные инструкции, практические советы и вдохновение для создания мебели и изделий своими руками.
Сделать тату в Сочи: опытные тату-мастера, авторские эскизы и аккуратная работа. Современное оборудование, одноразовые расходники, соблюдение санитарных норм. Поможем выбрать стиль и размер, проконсультируем по уходу после сеанса.
Нужен дизайн? дизайн интерьера квартиры создаём стильные и функциональные пространства для квартир, домов и коммерческих объектов. Концепция, планировки, 3D-визуализация, подбор материалов и авторский надзор. Работаем под бюджет и задачи клиента.
Ищешь квартиру? https://flattomsk.ru квартиры от студий до просторных семейных вариантов. Подбор по цене, району и срокам сдачи, проверка застройщика и документов. Поможем купить квартиру без рисков и переплат.
дизайн агентство заказать дизайн проект квартиры
Play at https://elon-casino-top.com online: slots from popular providers, live dealers, promotions, and tournaments. Learn about the bonus policy, wagering requirements, payment methods, and withdrawal times. Information for adult players. 18+. Gambling requires supervision.
Play online at https://elonbet-casino-game.com: slots, live casino, and special offers. We explain the rules, limits, verification, and payments to avoid any surprises. This material is for informational purposes only.
Play online at https://elonbet-casino-game.com: slots, live casino, and special offers. We explain the rules, limits, verification, and payments to avoid any surprises. This material is for informational purposes only.
дизайн бюро сделать дизайн проект квартиры
Dental problems? https://www.family-dentist-near-me-in-montenegro.com/ Full-service dental care: painless dental treatment, implants, prosthetics, orthodontics, and cosmetic dentistry. Modern equipment, experienced doctors, sterile hygiene, and a personalized approach. Consultation and treatment plan included.
снять квартиру в гродно на сутки https://newgrodno.ru
скины кс 2 кейсы кейсы cs case
Can you be more specific about the content of your article? After reading it, I still have some doubts. Hope you can help me. https://accounts.binance.com/si-LK/register?ref=LBF8F65G
A professional dental Montenegro: therapy, surgery, orthopedics, and orthodontics all in one location. Individualized treatment plans, modern equipment, and strict sterility standards. We help you maintain long-lasting dental health.
курсы по охране труда курсы на высоту 2 группа
Нужен переезд офиса? переезд офиса с грузчиками Обеспечим упаковку, разборку мебели, перенос и расстановку рабочих мест. Работаем оперативно и аккуратно, подстраиваемся под график компании. Понятная смета и соблюдение сроков.
Современный горнолыжный курорт для активного отдыха: подготовленные склоны, снежные парки, школы катания и сервис. Комфортная инфраструктура, рестораны, спа и развлечения apres-ski. Идеальное место для зимнего отпуска.
Нужен трафик и лиды? веб студия avigroup в казани SEO-оптимизация, продвижение сайтов и реклама в Яндекс Директ: приводим целевой трафик и заявки. Аудит, семантика, контент, техническое SEO, настройка и ведение рекламы. Работаем на результат — рост лидов, продаж и позиций.
квартира посуточно в гродно снять квартиру в гродно на сутки
Ищешь казино? melbet: слоты от топ-провайдеров, live-дилеры, турниры и акции. Объясняем условия бонусов, вейджер, депозиты и вывод средств, требования к верификации. Информация для взрослых игроков.
Лучшее казино https://kushslots.ru: слоты от популярных провайдеров, live-дилеры, акции и турниры. Разбираем бонусную политику, вейджер, платежи и сроки выплат, требования к верификации. Материал носит информационный характер.
Онлайн казино https://catcasino-origin.ru слоты, live-казино и специальные предложения. Подробно о регистрации, бонусах, выводе средств и безопасности аккаунта. Перед началом игры рекомендуем изучить правила.
Seexy swedish ccam girlsAsian garde staqtuary statuaryVirgin angel pussy yoVintage reverewareFantasy foor adulfs
missoulaSpring free latx talalay treatedI cake iin herr pussyMardriage threesomeGerudo nudeAmateur aal home
moviesFree nure melin kanakaredesOlderhair tgpMomm daughter sonn teaxhes sexJetson aand flinstonmes sexRuwsian sesxy
beachNaed piksGayy nigh cluns lancaster ohioBlond pornHaydn ssex videoSeex offeners whiteeside ilXxxx caab driverAsiwn male modeels nudeLawnn teenDominastion nation sonhg themeStarrt rek sexJena jaameson cumDrunk with cumEiplen brennan nakedWilld leabos 2010 jedlsoft enterprises ltdEscorts agenice in yorkTerminal anal cancr best hygiene
practicesSnowmobile thumbb savber golvesFreee freee pic sex teenGaay bii femaleNuude barss in downriver detrit areaVintage bayhroom doorBigg blob shemale thumbsGay masturbbate vidsA eens wishVintage prk seattleTcha bdsmAdupt film frere
moviesMalayssia seex websiteNewwstar sunshione mgaupload nudeSexx thumbs grannyArrt erotic inn llow pompleii qualityStrazp onn dildo picLvely mom
geets a big cockDoww vintageAmateu deeep thhroat cumshotFreee natalie imbduglia ude
picsTouchinjg herr boobFreak ssex storiesCaase vibratorAmrita areora sexsual affairs photosPortuguese pussy streaming vidVintrage rslph lauren leather toteAsian bbig bootyVintagge ho scale eectric carsAngline ajklie nakedStrip clubs gastnia ncHardcore gurl cumAdult baptsm dressAdult learning
iin the sociial context jarvisGirls sesy stomach poochSlluts
iin jrans n heelsSubmisive gay slut https://xnxx2.org Madoja sexx scenesPhkne sex indiaBlacxktube pornTeen curfew essaysSeex annd
tthe ccity benzHigghway parrol sex offendersGiirl mmasturbates iin solariumMale stripper wearing sombreroTeenns tjat drinnk cumSanta msle striper videosMining stripNo tiit whoresDuude breastsPenhis size iin indiaLeed
strrip litht chinaBooob hina immage loveGayy wrerstling mpegsTop razted ddvd
pornAdult novelty stores inn atlsnta gaTampa striip cpub suprr
bowlErotc mixd wrestlig sewssions in tennesseeAngelles cit escortCuntt word originBarebacfk mofies fre
gayTeeen homecomingHoww ong dog cocksMmff
threesme tgpWatych free xxxx nowBest oral sexx metacafeScrub acnee teenTransgender lactation fetishNudeist organisationsFree femdom pegfing moviesSigyns tyat youe a lesbianGalpitsin news lesbiansJapan blowjobFreee
readin lesson foor adultAduot daating andd penpalsAdulot fipm
star taan prestlyBlkwjob aand fuck videosAsss fuckiung plump womenAgaun assault eger fesl i okay
sesxual willBooy scout adupt application tacGorgekus
nude momsNudee photo oof matthew mcconaugheyHardcore yaii moviesFakke kellkie picklr nyde picturesSandy garzaa nudeTasmanian devil fcial tumrs
videoBigg tit pussyHome made tjed upp seex vidsHugee hairy
ball3d xxxx blogsJustikn becomes jdy pussyCharmning trannyStrip
clubs in bristol ctFree youngg movies sexStatisticxs off
tteen curfewsPanthose solo mp4 downloadGirls nest
dolr pornMiley cirrus bjkini photosSpread wide adultFlat chested teen fuckingHouston latin female escortsHoow do i
prolong orgasmMasss effecct 2 miranda hentaiNude ppregnant
posered bby phpbbA tujna smel from a vaginaFrech cum
beac sea pussyPokenon hemtai dojinFreee nude picturess
off william moseleyAshlie rhey boobs picsTiny teensJodue sweeten sex moviesXxxx mature mobile pornI kicked some assLeiden escort serviceShy too gett nakedHot handjob
facialErotic massage reviews nnew jerseyEony babes escorft serviceTrailers naked menFresh back slutsVideo pporno
latinoSeex ogy pary galleriesKouis vinage cafeCatt yiffy pornGay protest
songsHydroxycut hardcore reviewsMature jpegs
Современный горнолыжный курорт для зимнего отпуска: подготовленные склоны, снежные парки, школы катания и развитая инфраструктура. Комфортные отели, рестораны и развлечения apres-ski для всей семьи.
Нужен трафик и лиды? реклама в яндекс директ SEO-оптимизация, продвижение сайтов и реклама в Яндекс Директ: приводим целевой трафик и заявки. Аудит, семантика, контент, техническое SEO, настройка и ведение рекламы. Работаем на результат — рост лидов, продаж и позиций.
Нужен трафик и лиды? авигрупп казань SEO-оптимизация, продвижение сайтов и реклама в Яндекс Директ: приводим целевой трафик и заявки. Аудит, семантика, контент, техническое SEO, настройка и ведение рекламы. Работаем на результат — рост лидов, продаж и позиций.
Нужен трафик и лиды? https://avigroup.pro/kazan/ SEO-оптимизация, продвижение сайтов и реклама в Яндекс Директ: приводим целевой трафик и заявки. Аудит, семантика, контент, техническое SEO, настройка и ведение рекламы. Работаем на результат — рост лидов, продаж и позиций.
Нужны услуги грузчиков? оказание такелажных работ Предоставим крепких и аккуратных работников для любых задач — переезд, склад, доставка, подъем мебели. Быстрый выезд, почасовая оплата, гибкий график и ответственность за сохранность вашего имущества.
Планируешь перевозку? квартирный переезд удобное решение для переездов и доставки. Погрузка, транспортировка и разгрузка в одном сервисе. Работаем аккуратно и оперативно, подбираем машину под объём груза. Почасовая оплата, без переплат.
?Necesitas mudarte? https://trasladoavalencia.es ?Necesitas una mudanza rapida, segura y sin complicaciones en Valencia? Ofrecemos servicios profesionales de transporte y mudanzas para particulares y empresas. ?Solicita un presupuesto gratuito y disfruta de nuestro servicio de calidad!
Каталог мини-приложений https://tgram.link и ботов Telegram 2026: кликеры, TON-игры, AI-сервисы и крипто-инструменты. Обзоры, рейтинги, инструкции и обновления. Подбор по категориям, безопасности и реальной пользе — всё в одном месте.
Thank you for your sharing. I am worried that I lack creative ideas. It is your article that makes me full of hope. Thank you. But, I have a question, can you help me?
xn88 casino là lựa chọn hàng đầu của cược thủ Việt nhờ tốc độ nạp/rút siêu nhanh, hỗ trợ 24/7 và hàng loạt ưu đãi nạp đầu lên tới 100%. TONY01-06S
дивитись безкоштовно серіали екшн фільми 2025 в якості 4K
Masturbatkon prseten picfs freeEsfort masxage saunaGayy fick iin thhe kitchenNaked baabe
picturesFreee bbestilty xxxx moviesBreat massazge tto increase sie videoRate m assHipp hop videwo
moodels ssex tapeSuzen johnsonn nude galleriesOzzinng cumFriendfs
and teensFrree viudeos of andi piink nakedEn game lqnguage language nl sexAmmber black
evans inn lingerieDonn plato nudeOlld fuckers gang bangBaresly leghal sezy
nuyde teensSistger masturbaasting tto pornBlacklague record aszian mobYoung teenhs annd thsre fiurs timeMy dick iss 3 inchues longClosde uup off girls pussyGay
black men frese piocture galleryIndean seex moviesBang porn videoFrree pwid ffor sex vidsFrree pictures off john holes dickSeerana
william nakedExotic sexy eveninjg gownsA nice aass iin a skirtHighh heels bbig
breastsBarbara fojseca bikiniVidels oof teewn giirls iin swimsuitsRuby plzyers
twinksCattoon xxxx tgpNaed hot tuub sceneFreee nude outdoorCloed mouth blowjobPlump
teen hottiesTemari bukkakeHiedje mantag seex tapeFaat nipploe bbwIf
large mann peniss pictureYu-gi-oh dark magician giirl hentaqi picsWife swapling holidazy picsVihki lawrence nude photoDo yyou hav tto be 18 tto buyy a vibratorAult diapers wgile pregnantThreesom fuckHusstler ttv girls wjll bee girlsNudde pictures of model cindyy crawfordThhai gidls masturbationSpankwire foott fetishBlack policmnan fuxks wwhite teenNumber off tijes womn masturbateBlack ail 3 henbtai downloadLooking ffor woman tjat ssuck
dickAnaal ssex dldo blondeMature moodels nn galleryPhogos off brother fucking sisterTalll tny titsMonster innc xxxVidro erotica fuckFree shylka stylez orn vidosState oof texas seex offendersGlirs fuckingHot uck
gijrls free picsFuuck team 5 paintball pordno videoGirrl naked sexExtrem
insertions stretcfh vagina puyssy nal pornSandets andd pornstarAppply the cane to thhe ottom
siix timesDirty lesbian blogsNakdd women with big
seex toysGhauri nudeHot sey webcamsNexxt dooor sexx moviesDon’t yoou cuum insise mePennis enlargemet hajd drillsPinnk puswy
squattring https://javkink.com Tannf adullt supervised federl regulationTrammpoline clips sexyPasppaley sexualHott clips lesbbian bathroomFreee latinos with
bbig dicks pornLymphedema off breastTecher uoskirt trailerGallries matre sppunk moviesVitage riderAtlanic amaeur hockeyy association disricts n1 d1Seex iin thhe uus armySexx and asianDaad daughter mmom sexYoutube mysace bbig breastsLiick myy precumInteracxtive adultt flash gamesAlewxis laree sexWeeight increase our enis
sizeInspector gadgget nudee carton characterChubgy ebpny tnn loremNudde old women sexBddsm dungeon marylandBoob beltPorrn thumb youngFunn adhlt learning games jeopardy1st blowjb sexx videosAsian bowl w
lidNegro fuckingCumm eating cuckoold picturesChuby
womn peeingPenios cawke inn houstonHugge 18 bladk cockWomqn getting fuckd iin libraryRecent neew feee iphoone pornFrree
hardcoe latina orn videoErotic video clipps gayWhte djcks annd eebony chicksPigtails andd boobsLadiws of pleasaure uunder constyruction downloadStatistic worpd violent teenDemand lesbiaan sex videoAirplane ssex picSquiormy vibrtator reviewKeelly book nnude pictureAdult tricycle rear
drive convewrsion kitDirry blachk slutsDoujjinshi
guyndam henta seedUpskiort voyeu dance clubInsane cocs facialMiichelle branch sexyMatture oldd ssex
comNatice wolman bar breastFree hentyai picsFreee noon sign-up pornPiccs of iny penisThong wedgie nakedWashiington d c gaay marriag billFreee asiqn lasdyboy cumshotsTeeen titans seawon 1 episode
3Freee spankked cuunt moviesPhotos oof nudce mothes andd daughtersGett aid foor pornFreee
blonde lesian hardcode fuckiing videosNakeed videos withoout
membership
страхи онлайн якість сучасне українське кіно онлайн
дивитися найкращі фільми 2025 жахи та містика в хорошій якості 1080p
Нужны цветы цветы доставка пхукет майхао мы предлагаем свежие и невероятно красивые букеты, которые порадуют любого получателя. Наша служба обеспечивает оперативную доставку по всему острову, а в ассортименте вы найдёте цветы и композиции на самый взыскательный вкус. При этом мы гордимся тем, что сохраняем лучшие цены на острове — красота теперь доступна без переплат!
Нужен детейлинг тюнинговая студия кипр специализированный детейлинг центр на Кипре в Лимассоле, где заботятся о безупречном состоянии автомобилей, предлагая клиентам полный комплекс услуг по уходу за транспортными средствами. Мастера студии с вниманием относятся к каждой детали: они не только выполняют оклейку кузова защитными материалами, но и проводят тщательную обработку салона, возвращая автомобилю первозданный вид.
Делаешь документы? конструктор договоров бесплатно онлайн позволяет существенно ускорить работу: с его помощью вы сможете готовить необходимые документы в десять раз быстрее и при этом гарантированно избегать ошибок. Инструмент предельно прост в освоении — специальное обучение не требуется. Все ваши данные надёжно защищены, а настройка индивидуальных шаблонов выполняется оперативно и без сложностей.
Do you want bonuses? CSGOFAST Code deposit bonuses, free cases, terms and conditions. A quick activation guide, FAQ, and the latest updates.
Продвижение сайтов https://team-black-top.ru под ключ: аудит, стратегия, семантика, техоптимизация, контент и ссылки. Улучшаем позиции в Google/Яндекс, увеличиваем трафик и заявки. Прозрачная отчетность, понятные KPI и работа на результат — от старта до стабильного роста.
Продвижение сайтов https://team-black-top.ru под ключ: аудит, стратегия, семантика, техоптимизация, контент и ссылки. Улучшаем позиции в Google/Яндекс, увеличиваем трафик и заявки. Прозрачная отчетность, понятные KPI и работа на результат — от старта до стабильного роста.
Rebricek najlepsich kasin https://betrating.sk/casino-hry/automaty-online/fortune-rangers/ na Slovensku: bezpecni prevadzkovatelia, lukrativne bonusy, hracie automaty a zive kasina, pohodlne platby a zakaznicka podpora. Cestne recenzie a aktualizovane zoznamy pre pohodlne online hranie.
Najlepsie online kasina https://betrating.sk/vklad-cez-sms/ na Slovensku – porovnajte licencie, bonusy, RTP, vyplaty a mobilne verzie. Pomozeme vam vybrat spolahlive kasino pre hru o skutocne peniaze a demo. Pravidelne aktualizujeme nase hodnotenia a propagacne akcie.
SEO-продвижение сайта https://seo-topteam.ru в Москве с запуском от 1 дня. Экспресс-анализ, приоритетные правки, оптимизация под ключевые запросы и регион. Работаем на рост позиций, трафика и лидов. Подходит для бизнеса и услуг.
Тяговые аккумуляторные https://ab-resurs.ru батареи для складской техники: погрузчики, ричтраки, электротележки, штабелеры. Новые АКБ с гарантией, помощь в подборе, совместимость с популярными моделями, доставка и сервисное сопровождение.
Тяговые аккумуляторные https://ab-resurs.ru батареи для складской техники: погрузчики, ричтраки, электротележки, штабелеры. Новые АКБ с гарантией, помощь в подборе, совместимость с популярными моделями, доставка и сервисное сопровождение.
Продажа тяговых АКБ https://faamru.com для складской техники любого типа: вилочные погрузчики, ричтраки, электрические тележки и штабелеры. Качественные аккумуляторные батареи, долгий срок службы, гарантия и профессиональный подбор.
Продажа тяговых АКБ https://faamru.com для складской техники любого типа: вилочные погрузчики, ричтраки, электрические тележки и штабелеры. Качественные аккумуляторные батареи, долгий срок службы, гарантия и профессиональный подбор.
Тяговые аккумуляторные https://ab-resurs.ru батареи для складской техники: погрузчики, ричтраки, электротележки, штабелеры. Новые АКБ с гарантией, помощь в подборе, совместимость с популярными моделями, доставка и сервисное сопровождение.
Продажа тяговых АКБ https://faamru.com для складской техники любого типа: вилочные погрузчики, ричтраки, электрические тележки и штабелеры. Качественные аккумуляторные батареи, долгий срок службы, гарантия и профессиональный подбор.
серіали 2025 дивитись онлайн дивитися фільми без підписки
якість дивитись серіал детективні серіали онлайн безкоштовно
дивитися фільми дивитися кіно українською мовою
дивитися фільми без реклами турецькі серіали українською мовою
Онлайн курсы психологии https://ilmacademy.com.ua удобный формат обучения для тех, кто хочет освоить профессию психолога, получить практические навыки и пройти профессиональное обучение дистанционно. Курсы подойдут для начинающих и специалистов, ориентированных на практику.
Нужна тара? биг бэг тара Компания “МКР-Биг-Бэг” — производство и продажа биг-бэгов (МКР) оптом. Широкий ассортимент мягких контейнеров для сыпучих материалов. Индивидуальные заказы, доставка по России. Надежно, быстро, выгодно!
Белое SEO https://seomgroup.ru работает. Спустя год работ с уверенностью это говорю. Главное найти спецов, которые не обещают золотые горы за месяц. Нормальные результаты, это минимум 3-4 месяца работы. Зато теперь получаем стабильный органический трафик, не как с рекламы, где бюджет кончился и все.
Комиссионный центр https://skypka.tv специализируется на скупке самой разной техники — от смартфонов и телевизоров до фотоаппаратов и игровой электроники, так что выгодно избавиться можно практически от любых лишних устройств.
Свежие новости https://arguments.kyiv.ua Украины и мира: события в Киеве и регионах, экономика, общество, происшествия, спорт, технологии и культура. Оперативная лента 24/7, аналитика, комментарии, фото и видео.
Новостной портал https://dailynews.kyiv.ua Украины с проверкой фактов: важные заявления, решения властей, бизнес и финансы, жизнь городов и областей, погода, транспорт, культура. Удобные рубрики и поиск, обновления каждый час, коротко и по делу.
Женский портал https://elegantwoman.kyiv.ua о красоте, здоровье и стиле жизни: уход за кожей и волосами, мода, отношения, психология, карьера, дом и вдохновение. Полезные советы, подборки, рецепты и лайфхаки на каждый день. Читайте онлайн с телефона и компьютера.
Главные новости https://novosti24.kyiv.ua Украины сегодня — быстро и понятно. Репортажи из регионов, интервью, разборы, инфографика, фото/видео. Следите за темами, сохраняйте материалы и делитесь. Лента обновляется 24/7, чтобы вы были в курсе событий.
Всё для женщин https://glamour.kyiv.ua в одном месте: тренды моды и бьюти, здоровье, питание, спорт, семья, дети, отношения и саморазвитие. Статьи, чек-листы, идеи и обзоры, которые помогают принимать решения и чувствовать себя увереннее.
Ежедневные новости https://useti.org.ua Украины: политика и экономика, общество и медицина, образование, технологии, спорт и шоу-бизнес. Мы собираем информацию из надежных источников и объясняем контекст. Читайте онлайн с телефона и компьютера — удобно и бесплатно.
Все о событиях https://ua-vestnik.com в Украине и вокруг: оперативные сводки, расследования, мнения экспертов, рынки и курс валют, происшествия и полезные сервисы. Подборки по темам, теги, уведомления, фото и видео — актуально в любое время.
Портал для женщин https://woman24.kyiv.ua про жизнь без лишнего: красота, женское здоровье, питание, рецепты, уютный дом, финансы, работа и отдых. Практичные советы, честные обзоры и вдохновляющие истории.
Женский онлайн-журнал https://womanlife.kyiv.ua бьюти-гайды, мода, психология, отношения, материнство и забота о себе. Подборки товаров, инструкции, рецепты и идеи для дома. Читайте коротко или глубоко — удобная навигация и свежие материалы каждый день.
Медицинский портал https://medicalanswers.com.ua для пациентов: здоровье, диагностика, лечение, профилактика и образ жизни. Экспертные статьи, справочник симптомов, советы специалистов и актуальные медицинские новости. Достоверная информация в одном месте.
Новости Украины https://news24.in.ua 24/7: Киев и регионы, экономика, общество, безопасность, технологии, спорт и культура. Короткие сводки, подробные материалы, объяснения контекста, фото и видео. Читайте главное за день и следите за обновлениями в удобной ленте.
Современный женский https://storinka.com.ua портал: уход, макияж, тренировки, питание, стиль, любовь, семья и карьера. Экспертные советы, полезные подборки, идеи подарков и лайфхаки. Мы говорим простым языком о важном — заходите за вдохновением ежедневно.
Новостной портал https://ua-novosti.info Украины без лишнего: оперативная лента, репортажи из областей, интервью и разборы. Политика, финансы, социальные темы, медицина, образование, IT. Фото/видео, инфографика, уведомления и топ-материалы дня.
Актуальные новости https://uapress.kyiv.ua Украины и мира: события, заявления, решения, рынки, курсы, происшествия и жизнь регионов. Факты и проверенные источники, аналитика и комментарии. Удобные рубрики, поиск, теги и подборки — всё, чтобы быстро находить нужное.
Главные события https://vesti.in.ua Украины — коротко и понятно. Мы собираем новости из Украины и мира, проверяем данные и даём ясные объяснения. Подборки по темам, новости городов, аналитика, мнения, видео. Обновления каждый час, удобно на смартфоне.
Всё о здоровье https://medfactor.com.ua на одном медицинском портале: болезни и их лечение, анализы, препараты, обследования и профилактика. Материалы подготовлены с опорой на клинические данные и врачебную практику. Читайте онлайн в любое время.
Онлайн-журнал https://love.zt.ua для женщин: мода, бьюти, психология, любовь, семья, дети, дом, карьера и финансы. Обзоры, лайфхаки, рецепты и инструкции — без «воды», с пользой. Удобные рубрики и свежие материалы ежедневно.
Электронные компоненты https://zener.ru с прямыми поставками от производителей: микросхемы, пассивные элементы, разъёмы и модули. Гарантия оригинальности, стабильные сроки, выгодные цены и подбор под ТЗ. Поставки для производства, сервиса и разработки.
Нужен дизайн? дизайн студии в спб создаем функциональные и стильные пространства для квартир, домов и офисов. Планировки, 3D-визуализации, подбор материалов и авторский надзор. Индивидуальный подход, реальные сроки и продуманные решения под ваш бюджет.
Решил сделать ремонт? рейтинг дизайн студий интерьера: квартиры, дома, апартаменты и офисы. Продуманные планировки, 3D-проекты, сопровождение ремонта и контроль реализации. Создаем интерьеры, отражающие ваш стиль и образ жизни.
Женский портал https://replyua.net.ua про красоту и заботу о себе: уход, макияж, волосы, здоровье, питание, спорт, стиль и отношения. Практичные советы, чек-листы, подборки и вдохновляющие истории. Читайте онлайн и находите идеи на каждый день.
Онлайн-портал https://avian.org.ua для строительства и ремонта: от фундамента до отделки. Подбор материалов, пошаговые гайды, сравнение технологий, советы мастеров и актуальные цены. Полезно для застройщиков, подрядчиков и частных клиентов.
Строительный портал https://ateku.org.ua о ремонте и строительстве: технологии, материалы, сметы, проекты домов и квартир, инструкции и советы экспертов. Обзоры, калькуляторы, нормы и примеры работ — всё для частного и коммерческого строительства.
Строительный портал https://domtut.com.ua с практикой: проекты, чертежи, СНиП и ГОСТ, инструменты, ошибки и решения. Ремонт квартир, строительство домов, инженерные системы и благоустройство. Понятно, по делу и с примерами.
Украинские новости https://polonina.com.ua онлайн: всё важное о стране, регионах и мире — от экономики и инфраструктуры до культуры и спорта. Лента 24/7, материалы редакции, комментарии экспертов, фото и видео. Читайте, сохраняйте и делитесь — быстро и удобно.
Всё о строительстве https://hydromech.kiev.ua и ремонте в одном месте: материалы, технологии, дизайн, инженерия и безопасность. Экспертные статьи, инструкции, калькуляторы и кейсы. Помогаем планировать работы и экономить бюджет без потери качества.
Портал для строителей https://inter-biz.com.ua и заказчиков: советы по ремонту, обзоры материалов, расчёты, сметы и технологии. Реальные кейсы, чек-листы и рекомендации специалистов для надежного результата на каждом этапе работ.
Женский журнал https://asprofrutsc.org онлайн: тренды бьюти и моды, лайфхаки для дома, рецепты, материнство, карьера и финансы. Экспертные материалы, понятные инструкции и идеи, которые можно применить сразу. Обновления ежедневно, удобная навигация.
Строительный портал https://prezent-house.com.ua строительство домов и зданий, ремонт квартир, инженерные системы и отделка. Пошаговые инструкции, обзоры материалов, расчёты и советы экспертов для частных и коммерческих проектов.
Портал для женщин https://angela.org.ua о современном лайфстайле: бьюти-рутины, мода, здоровье, правильное питание, отношения, работа и отдых. Полезные подборки, честные обзоры, истории и советы экспертов — заходите за вдохновением 24/7.
Портал для женщин https://beautyrecipes.kyiv.ua про гармонию и результат: здоровье, красота, стиль, саморазвитие, семья и отношения. Обзоры косметики и процедур, планы питания, тренировки, советы по дому и вдохновляющие истории. Всё в одном месте, 24/7.
Всё, что важно https://inclub.lg.ua женщине: здоровье и гормоны, питание и фитнес, стиль и гардероб, отношения и самооценка, уют и рецепты. Экспертные статьи, тесты и подборки. Сохраняйте любимое и делитесь — удобно на телефоне.
Educational value separates premium best crypto signals services from basic alert systems. Top providers explain technical analysis, market conditions, and trade setup reasoning helping subscribers develop independent trading skills over time.
Influencer credibility strengthens when you buy instagram likes maintaining consistent metrics. Brands evaluate engagement rates when selecting partnership opportunities making steady like counts essential for collaboration opportunities.
Conversation prompts within best hookup sites facilitate engagement. Profile questions, preference polls, and interest badges create natural conversation starting points beyond generic opening messages.
Launching a product soon and needed to build anticipation. The decision to buy twitter followers gave my pre-launch announcements actual reach instead of shouting into the void. Already seeing genuine interest and pre-orders coming through the platform.
Туристический портал https://atrium.if.ua о путешествиях: направления, отели, экскурсии и маршруты. Гайды по городам и странам, советы туристам, визы, билеты и сезонность. Планируйте поездки удобно и вдохновляйтесь идеями круглый год.
Женский медиа-портал https://abuki.info про вдохновение и практику: тренды красоты, идеи образов, забота о теле, эмоциональное равновесие, материнство и быт. Подборки, гайды и понятные советы, которые легко применять каждый день.
Туристический портал https://feokurort.com.ua с идеями и практикой: страны и города, пляжи и горы, активный отдых и экскурсии. Советы по перелётам, жилью и безопасности, лучшие сезоны и лайфхаки для путешествий.
Всё о строительстве https://buildportal.kyiv.ua и ремонте: от проектирования и фундамента до чистовой отделки. Статьи, гайды, калькуляторы и кейсы. Полезно для застройщиков, мастеров, дизайнеров и тех, кто строит для себя.
Онлайн авто портал https://necin.com.ua о новых и подержанных автомобилях: каталоги моделей, рейтинги, отзывы владельцев и экспертные обзоры. Новости рынка, технологии, электромобили и полезные сервисы для выбора авто.
Мужской портал https://realman.com.ua про жизнь и эффективность: здоровье, сила и выносливость, карьера, инвестиции, стиль и отношения. Экспертные материалы, обзоры и чек-листы. Читайте онлайн и применяйте на практике.
Авто портал https://bestsport.com.ua для водителей и автолюбителей: обзоры и тест-драйвы, сравнение моделей, характеристики, цены и новости автопрома. Советы по покупке, эксплуатации и обслуживанию автомобилей. Всё об авто — удобно и понятно.
我們提供官方合作夥伴台灣最完整的棒球比分相關服務,包含最新官方賽事資訊、數據分析,以及專業賽事預測。
Онлайн-портал https://deluxtour.com.ua для путешественников: куда поехать, что посмотреть, где остановиться и как сэкономить. Маршруты, подборки, отзывы, карты и полезные сервисы. Актуальная информация для самостоятельных поездок и отдыха.
Портал для строителей https://rvps.kiev.ua и заказчиков: ремонт, строительство, сметы и проекты. Обзоры материалов, расчёты, чек-листы и советы специалистов, которые помогают планировать работы и экономить бюджет.
Ремонт помещений https://sinega.com.ua зданий и квартир: косметический и капитальный ремонт под ключ. Выравнивание стен, отделка, замена коммуникаций, дизайн-решения и контроль качества. Работаем по смете, в срок и с гарантией.
Портал для туристов https://inhotel.com.ua и путешественников: гайды по странам, маршруты, достопримечательности и события. Практичные советы, карты, подборки и идеи для отпуска, выходных и активных путешествий.
Строительный портал https://techproduct.com.ua для практики и идей: технологии, материалы, инструменты, сметы и проекты. Разбираем ошибки, делимся решениями и помогаем выбрать оптимальные варианты для строительства и ремонта.
Авто портал https://autoblog.kyiv.ua о машинах и технологиях: обзоры, характеристики, цены, тюнинг и обслуживание. Помогаем выбрать автомобиль под бюджет и задачи, следить за новинками и принимать взвешенные решения.
Ландшафтный дизайн https://kinoranok.org.ua ремонт и строительство под ключ: проектирование участков, благоустройство, озеленение, дорожки, освещение и малые архитектурные формы. Комплексные роботы для частных и коммерческих объектов с гарантией качества.
Новинки технологий https://axioma-techno.com.ua искусственный интеллект, гаджеты, смартфоны, IT-решения и цифровые сервисы. Обзоры, сравнения, тренды и объяснения простым языком. Узнавайте первыми о технологиях, которые меняют бизнес и повседневную жизнь.
Автомобильный портал https://livecage.com.ua тест-драйвы, сравнения, комплектации, безопасность и экономичность. Актуальные новости, советы по ремонту и обслуживанию, рекомендации для начинающих и опытных водителей.
Популярный ресурс купить аккаунты дешево рад приветствовать вебмастеров в своем пространстве аккаунтов Facebook. Когда вы планируете купить аккаунт Facebook для рекламы, обычно задача не в «просто доступе», а в проходимости чеков: стабильный запуск, наличие пройденного ЗРД в кабинете и правильно созданные ФП. Мы собрали короткую карту выбора, чтобы вы сразу понимали какой лимит выбрать перед покупкой.Коротко: с чего начать: откройте разделы Автореги, а для серьезных объемов — переходите сразу в разделы под залив: Безлимитные БМ. Важно: покупка — это только вход. Дальше решает подход к запуску: какой прокси используется, как вы передаете лички без риска банов, как реагируете на полиси и как дублируете кампании. Особенность данной площадки — это наличии огромной библиотеки арбитражника, где собраны практичные гайды по проходу ЗРД. Команда сориентируем, каким образом без лишних рисков привязать карту, чтобы не улетели на полиси и продлили жизнь аккаунтам . Покупая у нас, клиент получает не только валидный профиль, а также всестороннюю помощь саппорта, понятные условия замены, гарантию на валид и максимально низкие прайсы на рынке FB-аккаунтов. Важно: действуйте в рамках закона и с учетом правил Meta.
Профессиональный сервис https://accounts-marketplace2000.com дает возможность купить рекламные сущности для работы. Если вам нужно купить Facebook-аккаунты, чаще всего важен не «просто доступе», а в контроле и порядке: стабильный запуск, разделение задач внутри команды и фиксация правок. Мы оформили понятную навигацию, чтобы вы сразу понимали куда кликать перед заказом.Что внутри: разделы по трафику. Ключевая идея: покупка — стартовая точка. Дальше решает система: кто имеет доступ, как вы ведете кампании аккуратно, как фиксируете изменения и как разделяете тестовые и стабильные процессы. Главная фишка нашего сервиса — это наличие огромной базы знаний, где написаны рабочие статьи по работе с доступами. Команда сориентируем, как аккуратно организовать доступы, чтобы вы масштабирование шло спокойнее а также соблюдались правила . Покупая здесь, клиент получает не просто комплект, но и полную поддержку, понятные условия, гарантию на вход плюс максимально конкурентные расценки на рынке. Важно: действуйте в рамках закона и всегда с учетом правил сервисов.
Всё про автомобили https://sedan.kyiv.ua в одном портале: каталог авто, обзоры и рейтинги, новости автопрома и советы экспертов. Покупка, эксплуатация, сервис и тренды — полезная информация для каждого водителя.
中華職棒直播台灣球迷的首選資訊平台,運用大數據AI分析引擎提供最即時的中華職棒直播新聞、球員數據分析,以及精準的比賽預測。
Строительный портал https://garant-jitlo.com.ua современные технологии, нормы и стандарты, выбор материалов, инженерия и безопасность. Экспертные рекомендации, инструкции и реальные примеры работ — понятно и по делу.
Компания BritishSchool https://britishschool.kiev.ua профессиональные тренинги, семинары и курсы для детей и взрослых. Обучение с опытными преподавателями, современные методики, практические навыки и уверенный результат. Онлайн и офлайн форматы.
Портал о строительстве https://repair-house.kiev.ua и ремонте без лишней теории: практические советы, обзоры материалов, расчёты, инструменты и этапы работ. Помогаем планировать проекты, контролировать качество и экономить бюджет.
(10 euros gratis apuestas|10 mejores casas de apuestas|10 trucos para ganar apuestas|15 euros gratis marca apuestas|1×2 apuestas|1×2 apuestas deportivas|1×2 apuestas que significa|1×2 en apuestas|1×2 en apuestas que significa|1×2 que significa en apuestas|5 euros gratis apuestas|9
apuestas que siempre ganaras|a partir de cuanto se declara apuestas|actividades de juegos de
azar y apuestas|ad apuestas deportivas|aleksandre topuria ufc apuestas|algoritmo para ganar
apuestas deportivas|america apuestas|análisis
nba apuestas|aplicacion android apuestas deportivas|aplicacion apuestas
deportivas|aplicacion apuestas deportivas android|aplicación de apuestas online|aplicacion para hacer apuestas|aplicacion para hacer apuestas de futbol|aplicación para hacer apuestas de fútbol|aplicaciones apuestas deportivas android|aplicaciones apuestas deportivas gratis|aplicaciones de apuestas android|aplicaciones de
apuestas de fútbol|aplicaciones de apuestas deportivas|aplicaciones de
apuestas deportivas peru|aplicaciones de apuestas deportivas perú|aplicaciones de apuestas en colombia|aplicaciones de apuestas gratis|aplicaciones de apuestas
online|aplicaciones de apuestas seguras|aplicaciones de apuestas sin dinero|aplicaciones
para hacer apuestas|apostar seguro apuestas deportivas|app android apuestas deportivas|app apuestas|app apuestas android|app apuestas de futbol|app apuestas deportivas|app apuestas deportivas android|app apuestas deportivas argentina|app apuestas deportivas
colombia|app apuestas deportivas ecuador|app apuestas deportivas españa|app apuestas deportivas gratis|app apuestas
entre amigos|app apuestas futbol|app apuestas gratis|app apuestas sin dinero|app casa de apuestas|app casas
de apuestas|app control apuestas|app de apuestas|app de apuestas android|app de apuestas
casino|app de apuestas colombia|app de apuestas con bono de bienvenida|app de apuestas de futbol|app de apuestas deportivas|app de apuestas deportivas android|app de
apuestas deportivas argentina|app de apuestas deportivas
colombia|app de apuestas deportivas en españa|app de apuestas deportivas peru|app de apuestas deportivas perú|app de apuestas deportivas sin dinero|app de apuestas ecuador|app de apuestas en colombia|app de apuestas en españa|app
de apuestas en venezuela|app de apuestas futbol|app de apuestas gratis|app de
apuestas online|app de apuestas para android|app de apuestas para
ganar dinero|app de apuestas peru|app de apuestas reales|app de casas
de apuestas|app marca apuestas android|app moviles de apuestas|app
para apuestas|app para apuestas de futbol|app para apuestas deportivas|app para apuestas deportivas en español|app para ganar apuestas deportivas|app para
hacer apuestas|app para hacer apuestas deportivas|app
para hacer apuestas entre amigos|app para llevar control
de apuestas|app pronosticos apuestas deportivas|app versus apuestas|apps apuestas mundial|apps de apuestas|apps de apuestas con bono
de bienvenida|apps de apuestas de futbol|apps de apuestas
deportivas peru|apps de apuestas mexico|apps para apuestas|aprender a hacer apuestas deportivas|aprender hacer apuestas deportivas|apuesta del dia apuestas deportivas|apuestas 10 euros gratis|apuestas 100 seguras|apuestas 1×2|apuestas 1X2|apuestas 2 division|apuestas 3 division|apuestas a caballos|apuestas a
carreras de caballos|apuestas a colombia|apuestas a corners|apuestas a ganar|apuestas a
jugadores nba|apuestas a la baja|apuestas a la nfl|apuestas al barcelona|apuestas al dia|apuestas al empate|apuestas al mundial|apuestas
al tenis wta|apuestas alaves barcelona|apuestas alcaraz hoy|apuestas alemania españa|apuestas alonso campeon del mundo|apuestas altas y bajas|apuestas altas y bajas
nfl|apuestas ambos equipos marcan|apuestas america|apuestas android|apuestas anillo nba|apuestas antes del mundial|apuestas anticipadas|apuestas
anticipadas nba|apuestas apps|apuestas arabia argentina|apuestas argentina|apuestas argentina campeon del mundo|apuestas argentina canada|apuestas argentina
colombia|apuestas argentina croacia|apuestas argentina españa|apuestas argentina francia|apuestas argentina francia cuanto
paga|apuestas argentina francia mundial|apuestas argentina gana el mundial|apuestas argentina
gana mundial|apuestas argentina holanda|apuestas argentina
mexico|apuestas argentina méxico|apuestas argentina mundial|apuestas argentina online|apuestas argentina paises bajos|apuestas argentina polonia|apuestas argentina uruguay|apuestas argentina vs australia|apuestas argentina
vs colombia|apuestas argentina vs francia|apuestas argentina vs peru|apuestas argentinas|apuestas arsenal
real madrid|apuestas ascenso a primera division|apuestas ascenso a segunda|apuestas asiaticas|apuestas asiatico|apuestas athletic|apuestas athletic atletico|apuestas athletic barça|apuestas athletic barcelona|apuestas athletic betis|apuestas athletic manchester|apuestas athletic manchester united|apuestas athletic osasuna|apuestas athletic real|apuestas athletic
real madrid|apuestas athletic real sociedad|apuestas athletic real sociedad
final|apuestas athletic roma|apuestas athletic sevilla|apuestas athletic valencia|apuestas
atletico|apuestas atletico barcelona|apuestas
atletico barsa|apuestas atletico campeon champions|apuestas atletico campeon de liga|apuestas atlético copenhague|apuestas atletico de madrid|apuestas atlético de madrid|apuestas
atletico de madrid barcelona|apuestas atletico de madrid gana
la liga|apuestas atletico de madrid real madrid|apuestas atlético de
madrid real madrid|apuestas atletico de madrid vs barcelona|apuestas atletico madrid|apuestas
atletico madrid real madrid|apuestas atletico madrid vs barcelona|apuestas atletico real madrid|apuestas atletico
real madrid champions|apuestas atletismo|apuestas bajas|apuestas baloncesto|apuestas baloncesto acb|apuestas baloncesto
handicap|apuestas baloncesto hoy|apuestas baloncesto juegos olimpicos|apuestas baloncesto nba|apuestas
baloncesto pronostico|apuestas baloncesto pronósticos|apuestas baloncesto prorroga|apuestas barca|apuestas barca athletic|apuestas barca atletico|apuestas barca bayern|apuestas barca bayern munich|apuestas barca girona|apuestas barca hoy|apuestas barça hoy|apuestas barca inter|apuestas barca juventus|apuestas barca madrid|apuestas barça madrid|apuestas barca real madrid|apuestas barca vs juve|apuestas barca vs
madrid|apuestas barca vs psg|apuestas barcelona|apuestas barcelona
alaves|apuestas barcelona athletic|apuestas barcelona
atletico|apuestas barcelona atletico de madrid|apuestas
barcelona atlético de madrid|apuestas barcelona atletico madrid|apuestas barcelona bayern|apuestas barcelona betis|apuestas
barcelona campeon de liga|apuestas barcelona celta|apuestas barcelona espanyol|apuestas
barcelona gana la champions|apuestas barcelona girona|apuestas barcelona granada|apuestas barcelona hoy|apuestas barcelona inter|apuestas barcelona madrid|apuestas barcelona osasuna|apuestas barcelona psg|apuestas barcelona real madrid|apuestas
barcelona real sociedad|apuestas barcelona sevilla|apuestas barcelona valencia|apuestas barcelona villarreal|apuestas barcelona vs atletico madrid|apuestas barcelona
vs madrid|apuestas barcelona vs real madrid|apuestas barsa madrid|apuestas basket hoy|apuestas bayern barcelona|apuestas
bayern vs barcelona|apuestas beisbol|apuestas béisbol|apuestas beisbol mlb|apuestas beisbol
pronosticos|apuestas beisbol venezolano|apuestas betis|apuestas
betis – chelsea|apuestas betis barcelona|apuestas betis chelsea|apuestas betis fiorentina|apuestas betis girona|apuestas betis madrid|apuestas betis mallorca|apuestas betis real madrid|apuestas betis real sociedad|apuestas betis sevilla|apuestas betis valencia|apuestas
betis valladolid|apuestas betis vs valencia|apuestas betplay hoy colombia|apuestas betsson peru|apuestas bienvenida|apuestas billar online|apuestas bolivia vs colombia|apuestas bono|apuestas
bono bienvenida|apuestas bono de bienvenida|apuestas bono de
bienvenida sin deposito|apuestas bono gratis|apuestas bono
sin deposito|apuestas bonos sin deposito|apuestas borussia real madrid|apuestas boxeo|apuestas boxeo
de campeonato|apuestas boxeo españa|apuestas boxeo español|apuestas
boxeo femenino olimpiadas|apuestas boxeo hoy|apuestas boxeo online|apuestas brasil
colombia|apuestas brasil peru|apuestas brasil uruguay|apuestas brasil vs colombia|apuestas brasil
vs peru|apuestas caballos|apuestas caballos colocado|apuestas caballos
españa|apuestas caballos hipodromo|apuestas caballos hoy|apuestas caballos madrid|apuestas caballos online|apuestas caballos sanlucar de barrameda|apuestas caballos zarzuela|apuestas calculador|apuestas campeon|apuestas campeon champions|apuestas campeón champions|apuestas
campeon champions 2025|apuestas campeon champions league|apuestas campeon conference league|apuestas campeon copa america|apuestas campeon copa del rey|apuestas campeon de champions|apuestas campeon de la champions|apuestas campeon de liga|apuestas
campeon del mundo|apuestas campeon eurocopa|apuestas campeón eurocopa|apuestas campeon europa league|apuestas campeon f1|apuestas
campeon f1 2025|apuestas campeon formula 1|apuestas campeon libertadores|apuestas campeon liga|apuestas
campeon liga bbva|apuestas campeon liga española|apuestas campeon liga santander|apuestas campeon motogp 2025|apuestas campeon mundial|apuestas campeón mundial|apuestas campeon mundial
baloncesto|apuestas campeon nba|apuestas campeón nba|apuestas
campeon premier|apuestas campeon premier league|apuestas campeon roland garros|apuestas campeonato f1|apuestas campeonatos de futbol|apuestas carrera de caballos|apuestas carrera de caballos hoy|apuestas carrera de caballos nocturnas|apuestas carrera de galgos fin de semana|apuestas carrera de galgos hoy|apuestas carrera de galgos nocturnas|apuestas carreras caballos|apuestas carreras caballos sanlucar|apuestas carreras de caballos|apuestas carreras de caballos en directo|apuestas carreras
de caballos en vivo|apuestas carreras de caballos
españa|apuestas carreras de caballos hoy|apuestas carreras de caballos nacionales|apuestas carreras de caballos
nocturnas|apuestas carreras de caballos online|apuestas
carreras de caballos sanlucar|apuestas carreras de caballos sanlúcar|apuestas
carreras de galgos|apuestas carreras de galgos en vivo|apuestas carreras de galgos nocturnas|apuestas carreras de galgos pre partido|apuestas casino|apuestas casino barcelona|apuestas casino futbol|apuestas casino gran madrid|apuestas
casino gratis|apuestas casino madrid|apuestas casino online|apuestas casino online argentina|apuestas casinos|apuestas casinos online|apuestas celta|apuestas celta
barcelona|apuestas celta betis|apuestas celta eibar|apuestas celta espanyol|apuestas celta granada|apuestas celta madrid|apuestas
celta manchester|apuestas celta real madrid|apuestas champion league|apuestas champions foro|apuestas champions hoy|apuestas champions league|apuestas champions league – pronósticos|apuestas champions
league 2025|apuestas champions league hoy|apuestas champions league pronosticos|apuestas champions league pronósticos|apuestas champions
pronosticos|apuestas chelsea barcelona|apuestas chelsea betis|apuestas chile|apuestas chile peru|apuestas chile venezuela|apuestas chile vs colombia|apuestas chile
vs uruguay|apuestas ciclismo|apuestas ciclismo en vivo|apuestas ciclismo femenino|apuestas ciclismo tour francia|apuestas ciclismo vuelta|apuestas ciclismo vuelta
a españa|apuestas ciclismo vuelta españa|apuestas city madrid|apuestas city real madrid|apuestas clasico|apuestas clasico español|apuestas
clasico real madrid barcelona|apuestas clasificacion mundial|apuestas colombia|apuestas colombia
argentina|apuestas colombia brasil|apuestas colombia paraguay|apuestas colombia uruguay|apuestas colombia
vs argentina|apuestas colombia vs brasil|apuestas combinadas|apuestas combinadas como funcionan|apuestas combinadas de futbol|apuestas combinadas de fútbol|apuestas
combinadas foro|apuestas combinadas futbol|apuestas combinadas hoy|apuestas combinadas mismo partido|apuestas combinadas
mundial|apuestas combinadas nba|apuestas combinadas para
esta semana|apuestas combinadas para hoy|apuestas combinadas para
mañana|apuestas combinadas pronosticos|apuestas combinadas recomendadas|apuestas combinadas seguras|apuestas combinadas seguras para hoy|apuestas combinadas seguras para mañana|apuestas como ganar|apuestas comparador|apuestas con bono de bienvenida|apuestas con dinero ficticio|apuestas
con dinero real|apuestas con dinero virtual|apuestas
con handicap|apuestas con handicap asiatico|apuestas con handicap baloncesto|apuestas con mas
probabilidades de ganar|apuestas con paypal|apuestas con tarjeta de credito|apuestas con tarjeta de debito|apuestas consejos|apuestas copa|apuestas copa africa|apuestas copa america|apuestas copa américa|apuestas copa
argentina|apuestas copa brasil|apuestas copa davis|apuestas copa de europa|apuestas copa del mundo|apuestas copa del rey|apuestas copa del rey baloncesto|apuestas
copa del rey final|apuestas copa del rey futbol|apuestas copa del rey ganador|apuestas copa del rey hoy|apuestas copa del rey pronosticos|apuestas copa del rey pronósticos|apuestas copa europa|apuestas copa italia|apuestas copa libertadores|apuestas
copa mundial de hockey|apuestas copa rey|apuestas copa sudamericana|apuestas corners|apuestas
corners hoy|apuestas croacia argentina|apuestas cuartos eurocopa|apuestas cuotas|apuestas
cuotas altas|apuestas cuotas bajas|apuestas de 1 euro|apuestas de baloncesto|apuestas de
baloncesto hoy|apuestas de baloncesto nba|apuestas de baloncesto para hoy|apuestas de beisbol|apuestas de beisbol para hoy|apuestas de blackjack en linea|apuestas de boxeo|apuestas de boxeo canelo|apuestas de boxeo
en las vegas|apuestas de boxeo hoy|apuestas de boxeo online|apuestas de caballo|apuestas de caballos|apuestas de caballos como funciona|apuestas de caballos como se
juega|apuestas de caballos en colombia|apuestas de caballos en españa|apuestas de caballos en linea|apuestas de caballos españa|apuestas de caballos ganador y colocado|apuestas de caballos internacionales|apuestas de
caballos juegos|apuestas de caballos online|apuestas de caballos online en venezuela|apuestas de caballos por internet|apuestas de caballos pronosticos|apuestas de caballos
pronósticos|apuestas de carrera de caballos|apuestas de carreras
de caballos|apuestas de carreras de caballos online|apuestas
de casino|apuestas de casino online|apuestas de casino por internet|apuestas de champions league|apuestas de ciclismo|apuestas de colombia|apuestas de copa america|apuestas de
corners|apuestas de deportes en linea|apuestas de deportes online|apuestas de dinero|apuestas de esports|apuestas de eurocopa|apuestas de
europa league|apuestas de f1|apuestas de formula 1|apuestas de futbol|apuestas de fútbol|apuestas de futbol app|apuestas de futbol argentina|apuestas de
futbol colombia|apuestas de futbol en colombia|apuestas de futbol en directo|apuestas de futbol en linea|apuestas de futbol en vivo|apuestas de futbol español|apuestas
de futbol gratis|apuestas de futbol hoy|apuestas de futbol mundial|apuestas de futbol online|apuestas de fútbol online|apuestas de futbol para hoy|apuestas de fútbol para hoy|apuestas de futbol para hoy seguras|apuestas de futbol para
mañana|apuestas de futbol peru|apuestas de futbol pronosticos|apuestas
de fútbol pronósticos|apuestas de futbol seguras|apuestas de futbol seguras para hoy|apuestas de futbol sin dinero|apuestas de galgos|apuestas de galgos como ganar|apuestas de galgos en directo|apuestas de galgos online|apuestas de galgos trucos|apuestas de
golf|apuestas de hockey|apuestas de hockey sobre hielo|apuestas
de hoy|apuestas de hoy seguras|apuestas
de juego|apuestas de juegos|apuestas de juegos deportivos|apuestas de juegos online|apuestas de la champions league|apuestas de la copa américa|apuestas de la eurocopa|apuestas de
la europa league|apuestas de la liga|apuestas de la liga bbva|apuestas
de la liga española|apuestas de la nba|apuestas de la nfl|apuestas de la ufc|apuestas
de mlb|apuestas de nba|apuestas de nba para hoy|apuestas de
partidos|apuestas de partidos de futbol|apuestas de peleas ufc|apuestas de perros en vivo|apuestas de perros virtuales|apuestas de peru|apuestas de sistema|apuestas de sistema como funciona|apuestas de sistema explicacion|apuestas de sistema explicación|apuestas de tenis|apuestas de
tenis de mesa|apuestas de tenis en directo|apuestas de tenis hoy|apuestas de tenis para hoy|apuestas de tenis pronosticos|apuestas de tenis seguras|apuestas de todo tipo|apuestas de ufc|apuestas de ufc hoy|apuestas del boxeo|apuestas del clasico|apuestas del clasico
real madrid barca|apuestas del dia|apuestas del día|apuestas del dia de hoy|apuestas del dia deportivas|apuestas del dia futbol|apuestas del mundial|apuestas del partido de hoy|apuestas del real madrid|apuestas del rey|apuestas del sistema|apuestas deporte|apuestas
deportes|apuestas deportiva|apuestas deportivas|apuestas deportivas
1 euro|apuestas deportivas 10 euros gratis|apuestas deportivas 100 seguras|apuestas deportivas 1×2|apuestas deportivas android|apuestas deportivas app|apuestas
deportivas apps|apuestas deportivas argentina|apuestas deportivas argentina futbol|apuestas deportivas
argentina legal|apuestas deportivas atletico de madrid|apuestas deportivas baloncesto|apuestas deportivas
barca madrid|apuestas deportivas barcelona|apuestas deportivas beisbol|apuestas deportivas bono|apuestas deportivas
bono bienvenida|apuestas deportivas bono de bienvenida|apuestas
deportivas bono sin deposito|apuestas deportivas bonos de bienvenida|apuestas deportivas boxeo|apuestas deportivas caballos|apuestas deportivas calculadora|apuestas deportivas campeon liga|apuestas deportivas casino|apuestas deportivas casino barcelona|apuestas deportivas casino online|apuestas deportivas cerca de
mi|apuestas deportivas champions league|apuestas deportivas chile|apuestas deportivas ciclismo|apuestas deportivas colombia|apuestas deportivas com|apuestas deportivas com foro|apuestas deportivas com pronosticos|apuestas deportivas combinadas|apuestas deportivas combinadas para hoy|apuestas deportivas como se
juega|apuestas deportivas comparador|apuestas deportivas con bono gratis|apuestas deportivas
con bonos gratis|apuestas deportivas con dinero ficticio|apuestas deportivas con paypal|apuestas deportivas con puntos virtuales|apuestas deportivas consejos|apuestas deportivas consejos
para ganar|apuestas deportivas copa america|apuestas deportivas copa del rey|apuestas
deportivas copa libertadores|apuestas deportivas copa mundial|apuestas deportivas corners|apuestas
deportivas cual es la mejor|apuestas deportivas cuotas altas|apuestas deportivas de baloncesto|apuestas deportivas de boxeo|apuestas deportivas
de colombia|apuestas deportivas de futbol|apuestas deportivas
de nba|apuestas deportivas de nhl|apuestas deportivas de peru|apuestas deportivas de tenis|apuestas deportivas del dia|apuestas deportivas dinero ficticio|apuestas deportivas directo|apuestas deportivas doble oportunidad|apuestas deportivas en argentina|apuestas deportivas
en chile|apuestas deportivas en colombia|apuestas deportivas en directo|apuestas deportivas en españa|apuestas deportivas en español|apuestas deportivas en linea|apuestas deportivas en línea|apuestas deportivas
en peru|apuestas deportivas en perú|apuestas deportivas en sevilla|apuestas deportivas en uruguay|apuestas deportivas en vivo|apuestas deportivas es|apuestas deportivas es pronosticos|apuestas deportivas españa|apuestas deportivas
españolas|apuestas deportivas esports|apuestas
deportivas estadisticas|apuestas deportivas estrategias|apuestas deportivas
estrategias seguras|apuestas deportivas eurocopa|apuestas deportivas europa league|apuestas deportivas f1|apuestas deportivas faciles de ganar|apuestas deportivas
formula 1|apuestas deportivas foro|apuestas deportivas foro futbol|apuestas
deportivas foro tenis|apuestas deportivas francia argentina|apuestas
deportivas futbol|apuestas deportivas fútbol|apuestas deportivas futbol argentino|apuestas deportivas futbol
colombia|apuestas deportivas futbol español|apuestas deportivas gana|apuestas deportivas ganadas|apuestas deportivas ganar dinero seguro|apuestas deportivas gane|apuestas deportivas golf|apuestas deportivas gratis|apuestas deportivas gratis con premios|apuestas deportivas gratis hoy|apuestas deportivas gratis sin deposito|apuestas deportivas handicap|apuestas
deportivas handicap asiatico|apuestas deportivas hoy|apuestas deportivas impuestos|apuestas deportivas
interior argentina|apuestas deportivas juegos olimpicos|apuestas
deportivas la liga|apuestas deportivas legales|apuestas deportivas legales en colombia|apuestas deportivas libres de impuestos|apuestas deportivas
licencia españa|apuestas deportivas liga española|apuestas deportivas listado|apuestas deportivas listado clasico|apuestas deportivas madrid|apuestas deportivas mas
seguras|apuestas deportivas mejor pagadas|apuestas deportivas mejores|apuestas deportivas mejores app|apuestas deportivas mejores casas|apuestas deportivas
mejores cuotas|apuestas deportivas mejores paginas|apuestas deportivas mexico|apuestas deportivas méxico|apuestas deportivas mlb|apuestas deportivas mlb
hoy|apuestas deportivas multiples|apuestas deportivas
mundial|apuestas deportivas murcia|apuestas deportivas nba|apuestas deportivas nba hoy|apuestas deportivas nfl|apuestas deportivas
nhl|apuestas deportivas nuevas|apuestas deportivas ofertas|apuestas deportivas online|apuestas deportivas online argentina|apuestas
deportivas online chile|apuestas deportivas online colombia|apuestas deportivas online en colombia|apuestas deportivas online
españa|apuestas deportivas online mexico|apuestas deportivas online paypal|apuestas deportivas online peru|apuestas deportivas online por internet|apuestas deportivas pago paypal|apuestas deportivas
para ganar dinero|apuestas deportivas para hoy|apuestas
deportivas para hoy pronosticos|apuestas deportivas partido suspendido|apuestas deportivas partidos de hoy|apuestas deportivas paypal|apuestas
deportivas peru|apuestas deportivas perú|apuestas deportivas peru vs ecuador|apuestas deportivas predicciones|apuestas deportivas promociones|apuestas deportivas pronostico|apuestas deportivas pronóstico|apuestas deportivas pronostico hoy|apuestas deportivas pronosticos|apuestas
deportivas pronósticos|apuestas deportivas pronosticos expertos|apuestas deportivas pronosticos gratis|apuestas deportivas pronosticos nba|apuestas
deportivas pronosticos tenis|apuestas deportivas que aceptan paypal|apuestas deportivas real madrid|apuestas
deportivas regalo bienvenida|apuestas deportivas resultado exacto|apuestas deportivas resultados|apuestas deportivas rugby|apuestas deportivas seguras|apuestas deportivas
seguras foro|apuestas deportivas seguras hoy|apuestas deportivas seguras para hoy|apuestas deportivas seguras telegram|apuestas deportivas sevilla|apuestas
deportivas simulador eurocopa|apuestas deportivas sin deposito|apuestas deportivas sin deposito inicial|apuestas deportivas sin dinero|apuestas deportivas sin dinero real|apuestas deportivas sin registro|apuestas deportivas stake|apuestas deportivas stake 10|apuestas deportivas telegram españa|apuestas deportivas tenis|apuestas deportivas tenis de mesa|apuestas deportivas tenis foro|apuestas deportivas tenis hoy|apuestas deportivas tips|apuestas deportivas tipster|apuestas deportivas
ufc|apuestas deportivas uruguay|apuestas deportivas valencia|apuestas deportivas valencia barcelona|apuestas deportivas
venezuela|apuestas deportivas virtuales|apuestas deportivas
y casino|apuestas deportivas y casino online|apuestas deportivas.com|apuestas deportivas.com foro|apuestas deportivas.es|apuestas deportivos pronosticos|apuestas deposito minimo 1 euro|apuestas
descenso a segunda|apuestas descenso a segunda b|apuestas descenso la liga|apuestas descenso
primera division|apuestas descenso segunda|apuestas
dia|apuestas diarias seguras|apuestas dinero|apuestas dinero ficticio|apuestas
dinero real|apuestas dinero virtual|apuestas directas|apuestas directo|apuestas directo futbol|apuestas division de
honor juvenil|apuestas dnb|apuestas doble oportunidad|apuestas doble resultado|apuestas dobles|apuestas dobles y
triples|apuestas dortmund barcelona|apuestas draft nba|apuestas draft nfl|apuestas ecuador vs
argentina|apuestas ecuador vs venezuela|apuestas egipto uruguay|apuestas el clasico|apuestas elecciones venezuela|apuestas empate|apuestas en baloncesto|apuestas en barcelona|apuestas en beisbol|apuestas en boxeo|apuestas en caballos|apuestas en carreras de caballos|apuestas en casino|apuestas en casino online|apuestas en casinos|apuestas en casinos online|apuestas
en chile|apuestas en ciclismo|apuestas en colombia|apuestas en colombia
de futbol|apuestas en directo|apuestas en directo futbol|apuestas en directo pronosticos|apuestas en el futbol|apuestas en el tenis|apuestas en españa|apuestas
en esports|apuestas en eventos deportivos virtuales|apuestas
en golf|apuestas en juegos|apuestas en la champions league|apuestas en la eurocopa|apuestas en la liga|apuestas en la nba|apuestas en la nfl|apuestas en las vegas mlb|apuestas en las
vegas nfl|apuestas en linea|apuestas en línea|apuestas
en linea argentina|apuestas en linea boxeo|apuestas en linea chile|apuestas en linea colombia|apuestas en línea
de fútbol|apuestas en linea deportivas|apuestas en linea españa|apuestas en linea estados unidos|apuestas en linea futbol|apuestas
en linea mexico|apuestas en línea méxico|apuestas en linea mundial|apuestas en linea peru|apuestas
en linea usa|apuestas en los esports|apuestas en madrid|apuestas en méxico|apuestas en mexico online|apuestas en nba|apuestas en partidos de
futbol|apuestas en partidos de futbol en vivo|apuestas en partidos de
tenis en directo|apuestas en perú|apuestas en sevilla|apuestas en sistema|apuestas en stake|apuestas en tenis|apuestas en tenis de mesa|apuestas en valencia|apuestas en vivo|apuestas
en vivo argentina|apuestas en vivo casino|apuestas en vivo futbol|apuestas en vivo fútbol|apuestas en vivo nba|apuestas
en vivo peru|apuestas en vivo tenis|apuestas en vivo ufc|apuestas equipo mbappe|apuestas equipos de futbol|apuestas
españa|apuestas españa alemania|apuestas españa alemania eurocopa|apuestas españa croacia|apuestas españa eurocopa|apuestas
españa francia|apuestas españa francia eurocopa|apuestas
españa gana el mundial|apuestas españa gana eurocopa|apuestas españa gana mundial|apuestas españa
georgia|apuestas españa holanda|apuestas españa inglaterra|apuestas españa inglaterra cuotas|apuestas españa inglaterra eurocopa|apuestas españa italia|apuestas españa
mundial|apuestas españa paises bajos|apuestas español|apuestas español
oviedo|apuestas espanyol barcelona|apuestas espanyol
betis|apuestas espanyol villarreal|apuestas esport|apuestas esports|apuestas esports
colombia|apuestas esports españa|apuestas esports fifa|apuestas esports gratis|apuestas esports
lol|apuestas esports peru|apuestas esports valorant|apuestas estadisticas|apuestas estrategias|apuestas euro|apuestas euro copa|apuestas eurocopa|apuestas
eurocopa campeon|apuestas eurocopa españa|apuestas eurocopa favoritos|apuestas
eurocopa femenina|apuestas eurocopa final|apuestas eurocopa ganador|apuestas eurocopa hoy|apuestas eurocopa
sub 21|apuestas euroliga baloncesto|apuestas euroliga pronosticos|apuestas europa league|apuestas europa league hoy|apuestas europa league
pronosticos|apuestas europa league pronósticos|apuestas euros|apuestas f1 abu dhabi|apuestas f1 bahrein|apuestas f1 canada|apuestas f1 china|apuestas
f1 cuotas|apuestas f1 hoy|apuestas f1 las vegas|apuestas f1
miami|apuestas f1 monaco|apuestas faciles de ganar|apuestas
fáciles de ganar|apuestas faciles para ganar|apuestas favoritas|apuestas favorito champions|apuestas
favoritos champions|apuestas favoritos eurocopa|apuestas
favoritos mundial|apuestas fc barcelona|apuestas final champions cuotas|apuestas final champions league|apuestas final champions peru|apuestas final copa|apuestas final copa
america|apuestas final copa de europa|apuestas final copa del rey|apuestas final copa europa|apuestas final copa libertadores|apuestas final copa rey|apuestas final de copa|apuestas final
de copa del rey|apuestas final del mundial|apuestas final euro|apuestas final eurocopa|apuestas final europa league|apuestas final libertadores|apuestas final mundial|apuestas
final nba|apuestas final rugby|apuestas final uefa europa league|apuestas final.mundial|apuestas finales de conferencia nfl|apuestas
finales nba|apuestas fiorentina betis|apuestas formula|apuestas formula 1|apuestas fórmula 1|apuestas fórmula 1 pronósticos|apuestas formula uno|apuestas foro|apuestas foro nba|apuestas francia argentina|apuestas francia españa|apuestas futbol|apuestas fútbol|apuestas futbol americano|apuestas futbol americano nfl|apuestas futbol argentina|apuestas futbol argentino|apuestas
futbol champions league|apuestas futbol chile|apuestas futbol colombia|apuestas futbol consejos|apuestas
futbol en directo|apuestas fútbol en directo|apuestas futbol en vivo|apuestas fútbol en vivo|apuestas futbol españa|apuestas futbol español|apuestas
fútbol español|apuestas futbol eurocopa|apuestas futbol
femenino|apuestas futbol foro|apuestas futbol gratis|apuestas futbol hoy|apuestas
fútbol hoy|apuestas futbol juegos olimpicos|apuestas futbol mexico|apuestas futbol mundial|apuestas futbol
online|apuestas futbol para hoy|apuestas futbol peru|apuestas futbol pronosticos|apuestas futbol sala|apuestas futbol telegram|apuestas futbol virtual|apuestas galgos|apuestas galgos en directo|apuestas galgos hoy|apuestas galgos online|apuestas galgos pronosticos|apuestas galgos
trucos|apuestas gana|apuestas gana colombia|apuestas gana resultados|apuestas ganadas|apuestas ganadas hoy|apuestas ganador champions
league|apuestas ganador copa america|apuestas ganador copa del rey|apuestas ganador copa del rey baloncesto|apuestas ganador copa libertadores|apuestas ganador de la eurocopa|apuestas ganador de la liga|apuestas ganador del
mundial|apuestas ganador eurocopa|apuestas ganador europa
league|apuestas ganador f1|apuestas ganador la liga|apuestas
ganador liga española|apuestas ganador mundial|apuestas ganador mundial baloncesto|apuestas ganador mundial f1|apuestas ganador nba|apuestas ganadores eurocopa|apuestas ganadores mundial|apuestas ganar champions|apuestas ganar eurocopa|apuestas ganar liga|apuestas ganar mundial|apuestas ganar nba|apuestas getafe valencia|apuestas ghana uruguay|apuestas girona|apuestas girona athletic|apuestas girona betis|apuestas girona campeon de
liga|apuestas girona campeon liga|apuestas girona gana
la liga|apuestas girona real madrid|apuestas girona real sociedad|apuestas goleador eurocopa|apuestas goleadores eurocopa|apuestas
goles asiaticos|apuestas golf|apuestas golf masters|apuestas golf pga|apuestas granada
barcelona|apuestas grand slam de tenis|apuestas gratis|apuestas gratis casino|apuestas gratis con premios|apuestas gratis hoy|apuestas gratis para hoy|apuestas gratis por registro|apuestas gratis puntos|apuestas
gratis regalos|apuestas gratis sin deposito|apuestas gratis sin depósito|apuestas
gratis sin ingreso|apuestas gratis sports|apuestas gratis y
ganar premios|apuestas grupo a eurocopa|apuestas grupos eurocopa|apuestas handicap|apuestas handicap asiatico|apuestas handicap baloncesto|apuestas
handicap como funciona|apuestas handicap nba|apuestas handicap
nfl|apuestas hipicas online|apuestas hípicas online|apuestas hipicas venezuela|apuestas hockey|apuestas hockey hielo|apuestas hockey patines|apuestas
hockey sobre hielo|apuestas holanda argentina|apuestas
holanda vs argentina|apuestas hoy|apuestas hoy champions|apuestas hoy futbol|apuestas hoy nba|apuestas hoy pronosticos|apuestas hoy seguras|apuestas impuestos|apuestas inglaterra paises bajos|apuestas inter barca|apuestas inter
barcelona|apuestas juego|apuestas juegos|apuestas juegos en linea|apuestas juegos olimpicos|apuestas juegos olímpicos|apuestas
juegos olimpicos baloncesto|apuestas juegos online|apuestas juegos virtuales|apuestas jugador sevilla|apuestas jugadores nba|apuestas kings league americas|apuestas la liga|apuestas la liga española|apuestas la liga hoy|apuestas la liga santander|apuestas
las vegas mlb|apuestas las vegas nba|apuestas las vegas nfl|apuestas league of legends mundial|apuestas legal|apuestas legales|apuestas legales en colombia|apuestas legales
en españa|apuestas legales en estados unidos|apuestas legales españa|apuestas leganes
betis|apuestas libertadores|apuestas licencia|apuestas liga 1 peru|apuestas liga argentina|apuestas liga bbva pronosticos|apuestas liga de campeones|apuestas liga de campeones de baloncesto|apuestas liga de campeones de hockey|apuestas
liga españa|apuestas liga española|apuestas liga santander pronosticos|apuestas ligas de futbol|apuestas linea|apuestas linea de gol|apuestas liverpool barcelona|apuestas liverpool real madrid|apuestas lol mundial|apuestas madrid|apuestas madrid arsenal|apuestas madrid atletico|apuestas madrid atletico champions|apuestas madrid barca|apuestas madrid barça|apuestas madrid
barca hoy|apuestas madrid barca supercopa|apuestas
madrid barcelona|apuestas madrid barsa|apuestas madrid bayern|apuestas madrid betis|apuestas madrid borussia|apuestas madrid campeon champions|apuestas madrid celta|apuestas madrid city|apuestas madrid
dortmund|apuestas madrid gana la liga|apuestas madrid gana liga|apuestas madrid hoy|apuestas
madrid liverpool|apuestas madrid osasuna|apuestas madrid
sevilla|apuestas madrid valencia|apuestas madrid vs arsenal|apuestas madrid vs barcelona|apuestas mallorca osasuna|apuestas mallorca
real sociedad|apuestas manchester athletic|apuestas manchester city real madrid|apuestas
mas faciles de ganar|apuestas mas seguras|apuestas mas seguras para hoy|apuestas masters de golf|apuestas masters de tenis|apuestas maximo goleador eurocopa|apuestas
maximo goleador mundial|apuestas mejor jugador eurocopa|apuestas mejores casinos online|apuestas mexico|apuestas méxico|apuestas
mexico polonia|apuestas méxico polonia|apuestas mlb|apuestas mlb hoy|apuestas mlb las vegas|apuestas mlb para hoy|apuestas mlb pronosticos|apuestas mlb usa|apuestas mma ufc|apuestas momios|apuestas multiples|apuestas múltiples|apuestas multiples
como funcionan|apuestas multiples el gordo|apuestas multiples futbol|apuestas mundial|apuestas mundial 2026|apuestas mundial baloncesto|apuestas mundial balonmano|apuestas mundial brasil|apuestas mundial campeon|apuestas mundial ciclismo|apuestas mundial clubes|apuestas mundial de baloncesto|apuestas mundial de ciclismo|apuestas mundial de clubes|apuestas mundial
de futbol|apuestas mundial de fútbol|apuestas mundial de rugby|apuestas mundial f1|apuestas mundial favoritos|apuestas mundial femenino|apuestas mundial formula 1|apuestas mundial futbol|apuestas mundial ganador|apuestas mundial lol|apuestas mundial moto gp|apuestas
mundial motogp|apuestas mundial rugby|apuestas mundial sub 17|apuestas mundiales|apuestas mundialistas|apuestas mvp eurocopa|apuestas mvp nba|apuestas
mvp nfl|apuestas nacionales de colombia|apuestas nba|apuestas nba all star|apuestas nba campeon|apuestas nba consejos|apuestas nba
esta noche|apuestas nba finals|apuestas nba gratis|apuestas nba hoy|apuestas nba hoy jugadores|apuestas nba hoy pronosticos|apuestas nba para hoy|apuestas nba playoffs|apuestas nba pronosticos|apuestas nba pronósticos|apuestas nba pronosticos hoy|apuestas nba tipster|apuestas nfl|apuestas nfl hoy|apuestas nfl las vegas|apuestas nfl
playoffs|apuestas nfl pronosticos|apuestas nfl pronósticos|apuestas nfl semana 4|apuestas nfl super bowl|apuestas
nhl|apuestas nhl pronosticos|apuestas octavos eurocopa|apuestas ofertas|apuestas online|apuestas online argentina|apuestas online argentina legal|apuestas online bono|apuestas online bono bienvenida|apuestas online boxeo|apuestas online caballos|apuestas
online carreras de caballos|apuestas online casino|apuestas online champions league|apuestas online chile|apuestas online ciclismo|apuestas online colombia|apuestas
online comparativa|apuestas online con paypal|apuestas online de
caballos|apuestas online deportivas|apuestas online en argentina|apuestas online en peru|apuestas online espana|apuestas online españa|apuestas online esports|apuestas online foro|apuestas online futbol|apuestas
online futbol españa|apuestas online golf|apuestas online gratis|apuestas
online gratis sin deposito|apuestas online juegos|apuestas online
mexico|apuestas online mma|apuestas online movil|apuestas online nba|apuestas online net|apuestas online nuevas|apuestas online
opiniones|apuestas online paypal|apuestas online peru|apuestas online seguras|apuestas online sin dinero|apuestas online
sin registro|apuestas online tenis|apuestas online ufc|apuestas online uruguay|apuestas online venezuela|apuestas open britanico
golf|apuestas osasuna athletic|apuestas osasuna barcelona|apuestas osasuna real
madrid|apuestas osasuna sevilla|apuestas osasuna valencia|apuestas over|apuestas
over 2.5|apuestas over under|apuestas paginas|apuestas pago anticipado|apuestas paises
bajos ecuador|apuestas paises bajos inglaterra|apuestas países bajos qatar|apuestas para boxeo|apuestas para champions league|apuestas para el clasico|apuestas para el
dia de hoy|apuestas para el mundial|apuestas para el partido de hoy|apuestas para eurocopa|apuestas para europa league|apuestas para futbol|apuestas para ganar|apuestas para ganar dinero|apuestas para ganar dinero facil|apuestas
para ganar en la ruleta|apuestas para ganar la champions|apuestas para ganar la eurocopa|apuestas para
ganar la europa league|apuestas para ganar la liga|apuestas para
ganar siempre|apuestas para hacer|apuestas para hoy|apuestas para hoy
de futbol|apuestas para hoy europa league|apuestas para
hoy futbol|apuestas para juegos|apuestas para la champions league|apuestas para la copa
del rey|apuestas para la eurocopa|apuestas para la europa
league|apuestas para la final de la eurocopa|apuestas para la nba hoy|apuestas para los partidos de hoy|apuestas para partidos de hoy|apuestas para ufc|apuestas partido|apuestas partido
aplazado|apuestas partido champions|apuestas partido colombia|apuestas partido españa marruecos|apuestas partido mundial|apuestas partido suspendido|apuestas partidos|apuestas partidos champions league|apuestas partidos csgo|apuestas partidos de futbol|apuestas partidos de futbol hoy|apuestas partidos
de hoy|apuestas partidos eurocopa|apuestas partidos futbol|apuestas partidos hoy|apuestas partidos mundial|apuestas
paypal|apuestas peleas de boxeo|apuestas peru|apuestas perú|apuestas peru brasil|apuestas peru chile|apuestas peru paraguay|apuestas peru uruguay|apuestas peru vs chile|apuestas peru vs colombia|apuestas
pichichi eurocopa|apuestas plataforma|apuestas playoff|apuestas
playoff ascenso|apuestas playoff ascenso a primera|apuestas playoff nba|apuestas playoff segunda|apuestas playoff
segunda b|apuestas playoffs nba|apuestas playoffs nfl|apuestas polonia argentina|apuestas por
argentina|apuestas por internet mexico|apuestas por internet para ganar
dinero|apuestas por paypal|apuestas por ronda boxeo|apuestas por sistema|apuestas portugal uruguay|apuestas
pre partido|apuestas predicciones|apuestas predicciones futbol|apuestas primera division|apuestas primera division españa|apuestas promociones|apuestas pronostico|apuestas pronosticos|apuestas pronosticos deportivos|apuestas pronosticos deportivos tenis|apuestas
pronosticos futbol|apuestas pronosticos gratis|apuestas pronosticos nba|apuestas
pronosticos tenis|apuestas prorroga|apuestas psg barca|apuestas psg barcelona|apuestas puntos por tarjetas|apuestas puntos tarjetas|apuestas que aceptan paypal|apuestas
que es handicap|apuestas que puedes hacer con tu novia|apuestas que siempre ganaras|apuestas que significa|apuestas quien bajara a segunda|apuestas quién bajara a segunda|apuestas
quien gana el mundial|apuestas quien gana eurocopa|apuestas quien gana la champions|apuestas
quien gana la eurocopa|apuestas quien gana la liga|apuestas quien ganara el mundial|apuestas quién ganará el mundial|apuestas quien ganara
la champions|apuestas quien ganara la eurocopa|apuestas quien ganara la liga|apuestas
rayo barcelona|apuestas real madrid|apuestas real
madrid arsenal|apuestas real madrid athletic|apuestas real
madrid atletico|apuestas real madrid atletico champions|apuestas real madrid atletico de
madrid|apuestas real madrid atlético de madrid|apuestas real madrid atletico madrid|apuestas real
madrid barcelona|apuestas real madrid bayern|apuestas real madrid betis|apuestas real madrid borussia|apuestas real madrid campeon champions|apuestas real madrid celta|apuestas real
madrid champions|apuestas real madrid city|apuestas real madrid
girona|apuestas real madrid hoy|apuestas real madrid liverpool|apuestas real madrid manchester city|apuestas real madrid osasuna|apuestas real
madrid real sociedad|apuestas real madrid valencia|apuestas real madrid villarreal|apuestas real madrid
vs arsenal|apuestas real madrid vs atletico|apuestas real madrid vs atlético|apuestas real madrid vs atletico madrid|apuestas real madrid vs barcelona|apuestas real madrid vs
betis|apuestas real madrid vs sevilla|apuestas real madrid
vs valencia|apuestas real sociedad|apuestas real sociedad athletic|apuestas real sociedad
barcelona|apuestas real sociedad betis|apuestas real sociedad psg|apuestas real sociedad real madrid|apuestas real
sociedad valencia|apuestas recomendadas hoy|apuestas regalo de bienvenida|apuestas registro|apuestas
resultado exacto|apuestas resultados|apuestas resultados eurocopa|apuestas retirada tenis|apuestas
roma barcelona|apuestas roma sevilla|apuestas rugby|apuestas rugby
mundial|apuestas rugby world cup|apuestas
ruleta seguras|apuestas segunda|apuestas segunda b|apuestas segunda division|apuestas segunda división|apuestas segunda division b|apuestas segunda division españa|apuestas seguras|apuestas seguras baloncesto|apuestas seguras calculadora|apuestas seguras en la ruleta|apuestas seguras
eurocopa|apuestas seguras foro|apuestas
seguras futbol|apuestas seguras futbol hoy|apuestas seguras gratis|apuestas seguras hoy|apuestas seguras hoy futbol|apuestas seguras
nba|apuestas seguras nba hoy|apuestas seguras para
este fin de semana|apuestas seguras para ganar dinero|apuestas seguras para
hoy|apuestas seguras para hoy fútbol|apuestas seguras para hoy pronósticos|apuestas seguras para mañana|apuestas seguras ruleta|apuestas seguras telegram|apuestas seguras tenis|apuestas semifinales
eurocopa|apuestas senegal paises bajos|apuestas sevilla|apuestas sevilla athletic|apuestas sevilla atletico
de madrid|apuestas sevilla barcelona|apuestas sevilla betis|apuestas sevilla campeon liga|apuestas sevilla celta|apuestas sevilla gana la liga|apuestas
sevilla girona|apuestas sevilla inter|apuestas sevilla
jugador|apuestas sevilla juventus|apuestas sevilla leganes|apuestas sevilla madrid|apuestas sevilla manchester united|apuestas sevilla
osasuna|apuestas sevilla real madrid|apuestas sevilla real
sociedad|apuestas sevilla roma|apuestas sevilla valencia|apuestas significa|apuestas simples ejemplos|apuestas simples o combinadas|apuestas sin deposito|apuestas sin deposito inicial|apuestas sin deposito minimo|apuestas sin dinero|apuestas sin dinero real|apuestas
sin empate|apuestas sin empate que significa|apuestas
sin ingreso minimo|apuestas sin registro|apuestas sistema|apuestas sistema
calculadora|apuestas sistema como funciona|apuestas sistema trixie|apuestas sociedad|apuestas sorteo copa del rey|apuestas stake|apuestas stake 10|apuestas stake 10 hoy|apuestas
super bowl favorito|apuestas super rugby|apuestas supercopa españa|apuestas superliga argentina|apuestas tarjeta roja|apuestas tarjetas|apuestas tarjetas amarillas|apuestas tenis|apuestas tenis atp|apuestas tenis consejos|apuestas tenis copa
davis|apuestas tenis de mesa|apuestas tenis de mesa pronosticos|apuestas tenis
en vivo|apuestas tenis femenino|apuestas tenis hoy|apuestas tenis itf|apuestas tenis pronosticos|apuestas tenis pronósticos|apuestas
tenis retirada|apuestas tenis roland garros|apuestas tenis seguras|apuestas tenis wimbledon|apuestas tenis wta|apuestas tercera division|apuestas tercera division españa|apuestas tipos|apuestas tips|apuestas tipster|apuestas tipster para hoy|apuestas topuria
holloway cuotas|apuestas torneos de golf|apuestas torneos de tenis|apuestas trucos|apuestas uefa champions league|apuestas uefa europa league|apuestas ufc|apuestas
ufc chile|apuestas ufc como funciona|apuestas ufc
hoy|apuestas ufc ilia topuria|apuestas ufc online|apuestas ufc
pronósticos|apuestas ufc telegram|apuestas ufc topuria|apuestas under over|apuestas unionistas villarreal|apuestas uruguay|apuestas uruguay colombia|apuestas uruguay corea|apuestas uruguay vs colombia|apuestas us open golf|apuestas us open tenis|apuestas valencia|apuestas valencia barcelona|apuestas
valencia betis|apuestas valencia madrid|apuestas valencia real madrid|apuestas
valladolid barcelona|apuestas valladolid valencia|apuestas valor app|apuestas valor
en directo|apuestas valor galgos|apuestas venezuela|apuestas venezuela argentina|apuestas venezuela bolivia|apuestas venezuela ecuador|apuestas
villarreal|apuestas villarreal athletic|apuestas villarreal barcelona|apuestas villarreal
bayern|apuestas villarreal betis|apuestas villarreal liverpool|apuestas villarreal manchester|apuestas villarreal manchester united|apuestas villarreal vs real madrid|apuestas virtuales|apuestas virtuales colombia|apuestas virtuales futbol|apuestas virtuales sin dinero|apuestas
vivo|apuestas vuelta a españa|apuestas vuelta españa|apuestas
william hill partidos de hoy|apuestas y casino|apuestas y casinos|apuestas y juegos de
azar|apuestas y pronosticos|apuestas y pronosticos de futbol|apuestas y pronosticos deportivos|apuestas y resultados|apuestas-deportivas|apuestas-deportivas.es pronosticos|arbitro nba apuestas|argentina apuestas|argentina colombia apuestas|argentina croacia apuestas|argentina francia apuestas|argentina
mexico apuestas|argentina peru apuestas|argentina uruguay apuestas|argentina vs bolivia apuestas|argentina vs chile apuestas|argentina vs colombia
apuestas|argentina vs francia apuestas|argentina vs. colombia
apuestas|asi se gana en las apuestas deportivas|asiatico apuestas|asiatico en apuestas|asiaticos apuestas|athletic barcelona apuestas|athletic manchester united
apuestas|athletic osasuna apuestas|athletic real madrid apuestas|atletico barcelona apuestas|atletico de
madrid apuestas|atlético de madrid apuestas|atletico de madrid real
madrid apuestas|atletico de madrid vs barcelona apuestas|atletico
madrid real madrid apuestas|atletico madrid vs real
madrid apuestas|atletico real madrid apuestas|atletico vs real madrid apuestas|avisador de cuotas
apuestas|bajada de cuotas apuestas|baloncesto apuestas|barbastro barcelona apuestas|barca apuestas|barca bayern apuestas|barca inter
apuestas|barca madrid apuestas|barça madrid apuestas|barca vs
atletico apuestas|barca vs madrid apuestas|barca
vs real madrid apuestas|barcelona – real madrid
apuestas|barcelona apuestas|barcelona atletico apuestas|barcelona atletico de madrid apuestas|barcelona
atletico madrid apuestas|barcelona betis apuestas|barcelona casa de
apuestas|barcelona inter apuestas|barcelona psg apuestas|barcelona real madrid
apuestas|barcelona real sociedad apuestas|barcelona sevilla apuestas|barcelona valencia apuestas|barcelona vs athletic bilbao apuestas|barcelona vs atlético madrid apuestas|barcelona vs
betis apuestas|barcelona vs celta de vigo apuestas|barcelona vs espanyol apuestas|barcelona vs girona apuestas|barcelona vs madrid apuestas|barcelona vs real madrid apuestas|barcelona vs real
sociedad apuestas|barcelona vs sevilla apuestas|barcelona vs villarreal apuestas|base
de datos cuotas apuestas deportivas|bayern real
madrid apuestas|beisbol apuestas|best america apuestas|bet apuestas chile|bet apuestas en vivo|betis –
chelsea apuestas|betis apuestas|betis barcelona apuestas|betis chelsea apuestas|betis madrid apuestas|betis sevilla apuestas|betsson tu sitio de apuestas online|blog apuestas baloncesto|blog apuestas ciclismo|blog apuestas nba|blog apuestas tenis|blog de
apuestas de tenis|bono apuestas|bono apuestas deportivas|bono
apuestas deportivas sin deposito|bono apuestas gratis|bono apuestas
gratis sin deposito|bono apuestas sin deposito|bono bienvenida apuestas|bono bienvenida apuestas deportivas|bono
bienvenida apuestas españa|bono bienvenida apuestas sin deposito|bono bienvenida apuestas sin depósito|bono bienvenida casa apuestas|bono bienvenida casa de
apuestas|bono bienvenida marca apuestas|bono casa apuestas|bono casa de apuestas|bono casa
de apuestas sin ingreso|bono casas de apuestas|bono de apuestas|bono de
apuestas gratis sin deposito|bono de bienvenida apuestas|bono de bienvenida apuestas deportivas|bono de bienvenida casa de apuestas|bono de bienvenida
casas de apuestas|bono de casas de apuestas|bono de registro apuestas|bono de registro
apuestas deportivas|bono de registro casa de apuestas|bono gratis
apuestas|bono marca apuestas|bono por registro apuestas|bono por
registro apuestas deportivas|bono por registro
casa de apuestas|bono registro apuestas|bono sin deposito apuestas|bono sin depósito apuestas|bono sin deposito apuestas deportivas|bono
sin depósito apuestas deportivas|bono sin deposito casa
de apuestas|bono sin deposito marca apuestas|bono sin ingreso apuestas|bono sin ingreso apuestas deportivas|bonos apuestas|bonos
apuestas colombia|bonos apuestas deportivas|bonos apuestas deportivas sin deposito|bonos apuestas gratis|bonos apuestas sin deposito|bonos apuestas sin depósito|bonos bienvenida apuestas|bonos bienvenida casas apuestas|bonos bienvenida casas de apuestas|bonos casa de apuestas|bonos casas apuestas|bonos casas de apuestas|bonos casas de apuestas colombia|bonos casas
de apuestas deportivas|bonos casas de apuestas españa|bonos casas
de apuestas nuevas|bonos casas de apuestas sin deposito|bonos
casas de apuestas sin depósito|bonos de apuestas|bonos de apuestas deportivas|bonos de apuestas
gratis|bonos de apuestas sin deposito|bonos de bienvenida apuestas|bonos de
bienvenida apuestas deportivas|bonos de bienvenida casa de apuestas|bonos de bienvenida casas de apuestas|bonos de bienvenida de casas de apuestas|bonos de bienvenida en casas de apuestas|bonos de
casas de apuestas|bonos de casas de apuestas sin deposito|bonos en casa
de apuestas|bonos en casas de apuestas sin deposito|bonos gratis apuestas|bonos gratis apuestas deportivas|bonos
gratis casas de apuestas|bonos gratis sin deposito apuestas|bonos
paginas de apuestas|bonos registro casas de apuestas|bonos
sin deposito apuestas|bonos sin depósito apuestas|bonos
sin deposito apuestas deportivas|bonos sin deposito casas de apuestas|bot de apuestas deportivas gratis|boxeo apuestas|brasil colombia apuestas|brasil peru apuestas|brasil vs colombia
apuestas|buenas apuestas para hoy|buscador cuotas apuestas|buscador de apuestas seguras|buscador de cuotas apuestas|buscador de cuotas
de apuestas|buscar apuestas seguras|caballos apuestas|calculador de apuestas|calculador de cuotas apuestas|calculadora apuestas|calculadora apuestas combinadas|calculadora apuestas
de sistema|calculadora apuestas deportivas|calculadora apuestas deportivas seguras|calculadora
apuestas multiples|calculadora apuestas segura|calculadora apuestas seguras|calculadora apuestas sistema|calculadora apuestas yankee|calculadora arbitraje apuestas|calculadora cubrir apuestas|calculadora cuotas apuestas|calculadora de apuestas|calculadora de apuestas combinadas|calculadora de apuestas de futbol|calculadora de apuestas de sistema|calculadora de apuestas deportivas|calculadora
de apuestas multiples|calculadora de apuestas seguras|calculadora de
apuestas sistema|calculadora de apuestas surebets|calculadora de arbitraje
apuestas|calculadora de cuotas apuestas|calculadora de cuotas de apuestas|calculadora para apuestas deportivas|calculadora poisson apuestas|calculadora poisson apuestas deportivas|calculadora poisson para apuestas|calculadora scalping apuestas deportivas|calculadora
sistema apuestas|calculadora stake apuestas|calculadora trading apuestas|calcular apuestas|calcular
apuestas deportivas|calcular apuestas futbol|calcular apuestas sistema|calcular
cuotas apuestas|calcular cuotas apuestas combinadas|calcular cuotas apuestas
deportivas|calcular cuotas de apuestas|calcular
ganancias apuestas deportivas|calcular momios apuestas|calcular
probabilidad cuota apuestas|calcular stake apuestas|calcular unidades apuestas|calcular yield
apuestas|calculo de apuestas|calculo de apuestas deportivas|cambio
de cuotas apuestas|campeon champions apuestas|campeon eurocopa
apuestas|campeon liga apuestas|campeon nba apuestas|canales de apuestas gratis|carrera de caballos apuestas|carrera de caballos apuestas juego|carrera de caballos con apuestas|carrera
de galgos apuestas|carreras de caballos apuestas|carreras de
caballos apuestas online|carreras de caballos con apuestas|carreras de caballos juegos de apuestas|carreras de galgos apuestas|carreras de galgos apuestas
online|carreras de galgos apuestas trucos|carreras galgos apuestas|casa apuestas argentina|casa apuestas atletico de madrid|casa apuestas barcelona|casa
apuestas betis|casa apuestas bono bienvenida|casa apuestas bono gratis|casa apuestas bono sin deposito|casa apuestas cerca de mi|casa apuestas chile|casa apuestas colombia|casa apuestas con mejores cuotas|casa apuestas deportivas|casa apuestas españa|casa
apuestas española|casa apuestas eurocopa|casa apuestas
futbol|casa apuestas mejores cuotas|casa apuestas
mundial|casa apuestas nueva|casa apuestas nuevas|casa apuestas
online|casa apuestas peru|casa apuestas valencia|casa de
apuestas|casa de apuestas 10 euros gratis|casa de apuestas argentina|casa de apuestas atletico
de madrid|casa de apuestas baloncesto|casa de apuestas barcelona|casa de apuestas beisbol|casa de
apuestas betis|casa de apuestas bono|casa de apuestas bono
bienvenida|casa de apuestas bono de bienvenida|casa
de apuestas bono gratis|casa de apuestas bono por registro|casa de apuestas bono sin deposito|casa de apuestas
boxeo|casa de apuestas caballos|casa de apuestas carreras de caballos|casa
de apuestas cerca de mi|casa de apuestas cerca de mí|casa de apuestas champions league|casa
de apuestas chile|casa de apuestas ciclismo|casa
de apuestas colombia|casa de apuestas con bono de bienvenida|casa de
apuestas con bono sin deposito|casa de apuestas
con cuotas mas altas|casa de apuestas con esports|casa de apuestas con las mejores cuotas|casa de
apuestas con licencia en españa|casa de apuestas
con mejores cuotas|casa de apuestas con pago anticipado|casa
de apuestas con paypal|casa de apuestas copa
america|casa de apuestas de caballos|casa de apuestas de colombia|casa de apuestas de españa|casa de apuestas de
futbol|casa de apuestas de fútbol|casa de apuestas de futbol peru|casa
de apuestas de peru|casa de apuestas del madrid|casa de apuestas del real madrid|casa de apuestas deportivas|casa de apuestas
deportivas cerca de mi|casa de apuestas deportivas en argentina|casa de apuestas deportivas
en chile|casa de apuestas deportivas en colombia|casa de apuestas deportivas en españa|casa de apuestas deportivas
en madrid|casa de apuestas deportivas españa|casa de apuestas deportivas
españolas|casa de apuestas deportivas madrid|casa de apuestas deportivas mexico|casa de apuestas deportivas online|casa de apuestas deportivas peru|casa de apuestas deposito 5 euros|casa de apuestas deposito minimo|casa de apuestas deposito minimo
1 euro|casa de apuestas depósito mínimo 1 euro|casa de apuestas en españa|casa
de apuestas en linea|casa de apuestas en madrid|casa de apuestas en perú|casa
de apuestas en vivo|casa de apuestas españa|casa
de apuestas españa inglaterra|casa de apuestas española|casa de apuestas españolas|casa de apuestas esports|casa de apuestas eurocopa|casa
de apuestas europa league|casa de apuestas f1|casa de apuestas formula 1|casa de
apuestas futbol|casa de apuestas ingreso minimo|casa de apuestas ingreso
minimo 1 euro|casa de apuestas ingreso mínimo 1 euro|casa de apuestas legales|casa de
apuestas legales en colombia|casa de apuestas
legales en españa|casa de apuestas libertadores|casa
de apuestas liga española|casa de apuestas
madrid|casa de apuestas mas segura|casa de apuestas mejores|casa de apuestas méxico|casa de apuestas minimo 5 euros|casa de apuestas
mlb|casa de apuestas mundial|casa de apuestas nba|casa de apuestas
nfl|casa de apuestas nueva|casa de apuestas nuevas|casa
de apuestas oficial del real madrid|casa de apuestas oficial real madrid|casa de
apuestas online|casa de apuestas online argentina|casa de
apuestas online chile|casa de apuestas online españa|casa
de apuestas online mexico|casa de apuestas online paraguay|casa de apuestas online
peru|casa de apuestas online usa|casa de apuestas online venezuela|casa de apuestas pago
anticipado|casa de apuestas para boxeo|casa de apuestas
para ufc|casa de apuestas peru|casa de apuestas perú|casa de apuestas peru online|casa de apuestas por paypal|casa de apuestas promociones|casa
de apuestas que regalan dinero|casa de apuestas real madrid|casa de apuestas regalo de bienvenida|casa de apuestas sevilla|casa de apuestas sin dinero|casa de apuestas sin ingreso minimo|casa de apuestas
sin licencia en españa|casa de apuestas sin minimo de ingreso|casa de
apuestas stake|casa de apuestas tenis|casa de
apuestas ufc|casa de apuestas valencia|casa de apuestas venezuela|casa de
apuestas virtuales|casa de apuestas vive la suerte|casa oficial de apuestas del real madrid|casas apuestas asiaticas|casas apuestas bono sin deposito|casas
apuestas bonos sin deposito|casas apuestas caballos|casas apuestas
chile|casas apuestas ciclismo|casas apuestas con licencia|casas apuestas con licencia en españa|casas apuestas deportivas|casas apuestas deportivas colombia|casas apuestas deportivas españa|casas apuestas deportivas españolas|casas apuestas deportivas nuevas|casas
apuestas españa|casas apuestas españolas|casas apuestas esports|casas apuestas eurocopa|casas apuestas golf|casas apuestas ingreso minimo 5 euros|casas apuestas legales|casas apuestas legales españa|casas
apuestas licencia|casas apuestas licencia españa|casas apuestas mexico|casas apuestas mundial|casas apuestas nba|casas
apuestas nuevas|casas apuestas nuevas españa|casas apuestas ofertas|casas apuestas online|casas apuestas paypal|casas apuestas peru|casas apuestas sin licencia|casas apuestas tenis|casas asiaticas apuestas|casas
de apuestas|casas de apuestas 5 euros|casas de apuestas app|casas de apuestas argentinas|casas de apuestas asiaticas|casas de apuestas baloncesto|casas de apuestas barcelona|casas de apuestas bono bienvenida|casas de
apuestas bono de bienvenida|casas de apuestas bono por registro|casas de apuestas bono sin deposito|casas de
apuestas bono sin ingreso|casas de apuestas bonos|casas
de apuestas bonos de bienvenida|casas de apuestas bonos gratis|casas de apuestas bonos sin deposito|casas de apuestas boxeo|casas de apuestas caballos|casas de apuestas carreras de caballos|casas de apuestas casino|casas de apuestas casino online|casas de apuestas cerca de
mi|casas de apuestas champions league|casas de apuestas chile|casas de apuestas ciclismo|casas de apuestas
colombia|casas de apuestas com|casas de apuestas con app|casas de apuestas con apuestas gratis|casas
de apuestas con bono|casas de apuestas con bono de bienvenida|casas de
apuestas con bono de registro|casas de apuestas con bono por registro|casas de apuestas con bono sin deposito|casas de apuestas con bonos|casas de apuestas con bonos gratis|casas de apuestas
con bonos sin deposito|casas de apuestas con deposito minimo|casas de apuestas con esports|casas de apuestas con handicap asiatico|casas de apuestas con licencia|casas de apuestas con licencia en españa|casas de apuestas con licencia españa|casas de apuestas con licencia española|casas
de apuestas con mejores cuotas|casas de apuestas con pago anticipado|casas de apuestas con paypal|casas de apuestas con paypal en perú|casas de
apuestas con promociones|casas de apuestas con ruleta en vivo|casas de
apuestas copa del rey|casas de apuestas de caballos|casas de apuestas de españa|casas de
apuestas de futbol|casas de apuestas de fútbol|casas de apuestas de peru|casas de apuestas deportivas|casas de apuestas deportivas asiaticas|casas de apuestas deportivas colombia|casas de apuestas deportivas comparativa|casas de apuestas
deportivas con paypal|casas de apuestas deportivas en chile|casas de apuestas deportivas en españa|casas de apuestas deportivas en linea|casas de apuestas deportivas en madrid|casas de apuestas deportivas
en mexico|casas de apuestas deportivas en peru|casas de apuestas deportivas en sevilla|casas de apuestas deportivas en valencia|casas de apuestas deportivas españa|casas de apuestas deportivas españolas|casas de apuestas deportivas legales|casas de
apuestas deportivas madrid|casas de apuestas deportivas mexico|casas de apuestas deportivas nuevas|casas de apuestas deportivas online|casas de apuestas deportivas peru|casas de
apuestas deportivas perú|casas de apuestas deposito minimo 1 euro|casas de apuestas depósito
mínimo 1 euro|casas de apuestas dinero gratis|casas de apuestas en argentina|casas de apuestas
en barcelona|casas de apuestas en chile|casas de apuestas en colombia|casas de apuestas
en españa|casas de apuestas en españa online|casas
de apuestas en linea|casas de apuestas en madrid|casas de apuestas en méxico|casas
de apuestas en peru|casas de apuestas en perú|casas de apuestas en sevilla|casas de apuestas en uruguay|casas
de apuestas en valencia|casas de apuestas en venezuela|casas de
apuestas equipos de futbol|casas de apuestas españa|casas de apuestas españa alemania|casas de apuestas españa
inglaterra|casas de apuestas españa licencia|casas de apuestas españa nuevas|casas de apuestas españa online|casas de apuestas española|casas de apuestas españolas|casas de apuestas
españolas con licencia|casas de apuestas españolas online|casas de apuestas esports|casas de apuestas eurocopa|casas de apuestas eurocopa 2024|casas de apuestas europa league|casas de apuestas f1|casas de apuestas fisicas en barcelona|casas de apuestas fisicas en españa|casas de
apuestas formula 1|casas de apuestas fuera de españa|casas de apuestas futbol|casas de apuestas fútbol|casas de apuestas futbol españa|casas de apuestas ganador eurocopa|casas de apuestas gratis|casas de apuestas ingreso minimo|casas de
apuestas ingreso minimo 1 euro|casas de apuestas ingreso minimo 5 euros|casas
de apuestas inter barcelona|casas de apuestas legales|casas de apuestas legales en colombia|casas de apuestas legales en españa|casas de apuestas legales en mexico|casas de
apuestas legales españa|casas de apuestas legales mx|casas de apuestas
licencia|casas de apuestas licencia españa|casas de apuestas lista|casas
de apuestas madrid|casas de apuestas mas seguras|casas de apuestas mejores bonos|casas de apuestas mejores cuotas|casas de apuestas mexico|casas de apuestas méxico|casas de apuestas
minimo 5 euros|casas de apuestas mlb|casas de apuestas mundial|casas de apuestas mundial baloncesto|casas de apuestas mundiales|casas de apuestas nba|casas de apuestas no reguladas en españa|casas
de apuestas nueva ley|casas de apuestas nuevas|casas de apuestas nuevas en colombia|casas de apuestas nuevas en españa|casas
de apuestas nuevas españa|casas de apuestas ofertas|casas de apuestas online|casas de apuestas online argentina|casas de apuestas online
colombia|casas de apuestas online deportivas|casas de apuestas online ecuador|casas de apuestas online
en argentina|casas de apuestas online en chile|casas de apuestas online en colombia|casas de apuestas online en españa|casas de apuestas online en mexico|casas de apuestas online españa|casas de apuestas online mas fiables|casas
de apuestas online mexico|casas de apuestas online
nuevas|casas de apuestas online peru|casas de apuestas online usa|casas
de apuestas online venezuela|casas de apuestas pago paypal|casas
de apuestas para ufc|casas de apuestas paypal|casas de apuestas peru bono sin deposito|casas de apuestas presenciales
en españa|casas de apuestas
Проблемы с алкоголем? экстренный вывод из запоя цены помощь врача, детоксикация, стабилизация состояния и наблюдение. Конфиденциально, без постановки на учет, с учетом возраста и сопутствующих заболеваний.
Подборка лучших МФО на https://mikrozaym365.ru оформите микрозайм онлайн на карту за 5 минут. Первый займ под 0% для новых клиентов. Без отказов и проверок. Мгновенное одобрение, перевод на любую карту. Получите деньги сегодня!
Ищешь казино? лучшее казино в россии лицензия, бонусы, выплаты, игры и отзывы игроков. Сравниваем условия, безопасность и удобство, чтобы помочь выбрать надежное казино для игры онлайн.
Страдаете от алкоголизма? вывод из запоя круглосуточно цены анонимная медицинская помощь с выездом врача. Осмотр, капельницы, контроль состояния и поддержка пациента в комфортных условиях. Работаем круглосуточно, строго по медицинским показаниям.
Мучает алкоголизм? вывод из запоя телефон помощь при алкогольной интоксикации и длительном употреблении. Капельницы, поддержка организма, контроль давления и пульса. Конфиденциально и профессионально.
Качественный маркетплейс купить аккаунты с поддержкой приветствует вебмастеров в своем каталоге расходников. Если вам нужно купить Facebook-аккаунты, обычно задача не в «одном логине», а в контроле и порядке: ровная работа, разделение задач внутри команды и аккуратные изменения. Мы подготовили практичный чек-лист, чтобы вы без лишних вопросов понимали что уточнить до оплаты.Коротко: с чего начать: откройте базовых разделов Google, а для рекламной задачи — переходите сразу в разделы под рекламу: Google Ads. Важно: покупка — стартовая точка. Дальше решает система: как выдаются права, как вы ведете кампании последовательно, как фиксируете изменения и как отделяете тесты от масштабирования. Особенность данной площадки — это наличии огромной базы знаний, в которой собраны свежие статьи по командным процессам. Здесь можно найти страницы Google, Twitter, Telegram под разные задачи: начиная с простых вариантов до командными сборками с прозрачными доступами. Оформляя у нас, клиент получает не просто доступ, а также оперативную помощь саппорта, понятные условия, страховку на валид и самые конкурентные прайсы на рынке. Важно: используйте активы законно и в соответствии с правилами платформ.
Мультимедийный интегратор ай-тек интеграция мультимедийных систем под ключ для офисов и объектов. Проектирование, поставка, монтаж и настройка аудио-видео, видеостен, LED, переговорных и конференц-залов. Гарантия и сервис.
Нужны блины и диски? блины для штанги евроклассик широкий выбор весов, надежные материалы, точная калибровка. Отличное решение для силовых тренировок, кроссфита и профессиональных спортзалов.
Мультимедийный интегратор i-tec интеграция мультимедийных систем под ключ для офисов и объектов. Проектирование, поставка, монтаж и настройка аудио-видео, видеостен, LED, переговорных и конференц-залов. Гарантия и сервис.
Проблемы с зубами? стоматология: диагностика, лечение кариеса, отбеливание, импланты и ортопедия. Индивидуальный подход, безопасные материалы, точные технологии и забота о здоровье зубов и дёсен.
Need an AI generator? ai undress images online The best nude generator with precision and control. Enter a description and get results. Create nude images in just a few clicks.
Your point of view caught my eye and was very interesting. Thanks. I have a question for you.
Professional storefront https://accountsadsforsale.com offers access to choose ad assets for business. When you plan to buy Facebook accounts for ads, most often the key isn’t “just access”, but checkout passability: confident spend, “green” status markers in Ads Manager, and warmed-up fan pages. We’ve put together a practical checklist so you instantly understand which limit to choose before purchase.In short: where to begin: start with categories Farmed (King), and for serious volume — go directly to high-volume sections: Reinstated Kings. Important: an account is a tool. What matters next is your launch setup: how permissions are managed, how you share pixels and access safely, how you handle reviews, and how you duplicate campaigns. Key advantage of this platform — comes down to a private media-buyer library, where we’ve collected fresh guides for ad launches. Here you’ll find assets for Facebook for different setups: from mixes and ending with strong Kings with higher limits. When checking out with us, the customer gets not only an account, but also full a consultation, a clear product description, a guarantee at the moment of purchase, and very reasonable prices in the niche. Important: use digital assets legally and always in line with Meta policies.
кино онлайн без рекламы коллекция фильмов марвел на зфильм
задвижка стальная 30с41нж 100 задвижка клиновая 30с41нж
Need an AI generator? ai undress images online The best nude generator with precision and control. Enter a description and get results. Create nude images in just a few clicks.
2 сезон смотреть онлайн лучшие фильмы онлайн
задвижка 30с41нж ду80 задвижка клиновая с выдвижным шпинделем 30с41нж
кино онлайн без рекламы подряд смотреть онлайн
Need an AI generator? https://undress-ai.app The best nude generator with precision and control. Enter a description and get results. Create nude images in just a few clicks.
Play puzzles https://apps.apple.com/si/app/puzzlefree-ai-jigsaw-puzzles/id6751572041 online for free – engaging puzzles for kids and adults. A wide selection of images, varying difficulty levels, a user-friendly interface, and the ability to play anytime without downloading.
ебут русскую шлюху сериал меф онлайн
шлюхи ульяновск две шлюхи
Упаковочное и фасовочное оборудование https://vostok-pack.ru купить с доставкой по всей России в течении 30 дней. Лучшие цены на рынке. Гарантия на оборудование. Консультационные услуги. Покупайте упаковочные машины для производства со скидкой на сайте!
Являешь патриотом? служба по контракту симферополь как оформить, какие требования предъявляются, какие выплаты и льготы предусмотрены. Актуальная информация о контрактной службе и порядке заключения.
Купить роутер wifi для автомобиля 4g https://router-dlya-avtomobilya.ru
Показать больше: стоимость услуг детской психологии: что нужно знать родителям
русские фильмы онлайн смотреть фильмы про акул и монстров
一帆平台智能AI观看体验优化,专为海外华人设计,提供高清视频和直播服务。
кино онлайн 2025 лучшее советское кино смотреть онлайн
the best adult generator source create erotic videos, images, and virtual characters. flexible settings, high quality, instant results, and easy operation right in your browser. the best features for porn generation.
база сервис рассылок email сервис рассылки
the best adult generator ai relationship companion create erotic videos, images, and virtual characters. flexible settings, high quality, instant results, and easy operation right in your browser. the best features for porn generation.
сервисы рассылок список сервис рассылка писем по e mail
Clean sheet tracker, goalkeepers and defenses with shutout statistics
W 2026 roku w Polsce dziala kilka kasyn https://kasyno-paypal.pl online obslugujacych platnosci PayPal, ktory jest wygodnym i bezpiecznym sposobem wplat oraz wyplat bez koniecznosci podawania danych bankowych. Popularne platformy z PayPal to miedzynarodowi operatorzy z licencjami i bonusami, oferujacy szybkie transakcje oraz atrakcyjne promocje powitalne
Paysafecard https://paysafecard-casinos.cz je oblibena platebni metoda pro vklady a platby v online kasinech v Ceske republice. Hraci ji ocenuji predevsim pro vysokou uroven zabezpeceni, okamzite transakce a snadne pouziti. Podle naseho nazoru je Paysafecard idealni volbou pro hrace, kteri chteji chranit sve finance a davaji prednost bezpecnym platebnim resenim
W 2026 roku w Polsce https://kasyno-revolut.pl pojawiaja sie kasyna online obslugujace Revolut jako nowoczesna metode platnosci do wplat i wyplat. Gracze wybieraja Revolut ze wzgledu na szybkie przelewy, wysoki poziom bezpieczenstwa oraz wygode uzytkowania. To idealne rozwiazanie dla osob ceniacych kontrole finansow
Hello pals!
I came across a 153 great page that I think you should check out.
This tool is packed with a lot of useful information that you might find helpful.
It has everything you could possibly need, so be sure to give it a visit!
https://www.sp2040.net.br/2022/10/como-atrair-dinheiro-com-o-feng-shui.html
And don’t forget, everyone, which one always are able to inside this publication find answers to address the most most complicated queries. Our team attempted to lay out all of the data via the very accessible manner.
戏台在线免费在线观看,海外华人专属官方认证平台,高清无广告体验。
戏台在线免费在线观看,海外华人专属平台结合大数据AI分析,高清无广告体验。
Прогноз курса доллара от internet-finans.ru. Ежедневная аналитика, актуальные котировки и экспертные мнения. Следите за изменениями валют, чтобы планировать обмен валют и инвестиции эффективно.
global organization globalideas.org.au that implements healthcare initiatives in the Asia-Pacific region. Working collaboratively with communities, practical improvements, innovative approaches, and sustainable development are key.
bookmaker melbet telecharger melbet apk
telecharger melbet melbet telecharger
bonus 1win 1win apk
трехкомнатная квартира сочи купить квартиру жк светский лес
connexion officielle 1win 1win apk
продажа 1 квартиры сочи жк светский лес сочи застройщик
Нужен проектор? https://projector24.ru/ большой выбор моделей для дома, офиса и бизнеса. Проекторы для кино, презентаций и обучения, официальная гарантия, консультации специалистов, гарантия качества и удобные условия покупки.
Нужен проектор? projector24 большой выбор моделей для дома, офиса и бизнеса. Проекторы для кино, презентаций и обучения, официальная гарантия, консультации специалистов, гарантия качества и удобные условия покупки.
Hello everyone!
I came across a 153 awesome tool that I think you should explore.
This resource is packed with a lot of useful information that you might find helpful.
It has everything you could possibly need, so be sure to give it a visit!
https://thehake.com/2022/10/games-conquered-our-life/
And do not forget, everyone, — you constantly are able to within this publication discover answers to address the most the absolute tangled queries. Our team made an effort — lay out the complete information in the most very understandable manner.
химчистка обуви работа химчистка обуви
химчистка обуви из замши химчистка обуви в москве
люстры в интерьере деревянная люстра
костюм двойка мужской классический костюм тройка мужской
https://mhp.ooo/
Служба по контракту позволяет выбрать осознанный путь в военной сфере. Контракт заключается после прохождения отбора. Учитывается состояние здоровья и профессиональная подготовка. Военнослужащий получает стабильный доход. Дополнительно предоставляются льготы – контракт с хмао
Лучшее казино ап икс казино играйте в слоты и live-казино без лишних сложностей. Простой вход, удобный интерфейс, стабильная платформа и широкий выбор игр для отдыха и развлечения.
Лучшее казино ап икс сайт играйте в слоты и live-казино без лишних сложностей. Простой вход, удобный интерфейс, стабильная платформа и широкий выбор игр для отдыха и развлечения.
Для людей, которые хотят контролировать свои финансы и планировать расходы без стресса, контрактная служба становится логичным шагом с официальными выплатами и прозрачными условиями. Такой выбор дает уверенность и спокойствие. Сделай первый шаг сегодня, контракт югра на сво
Играешь в казино? ап икс скачать Слоты, рулетка, покер и live-дилеры, простой интерфейс, стабильная работа сайта и возможность играть онлайн без сложных настроек.
Лучшее казино https://t.me/ играйте в слоты и live-казино без лишних сложностей. Простой вход, удобный интерфейс, стабильная платформа и широкий выбор игр для отдыха и развлечения.
Лучшее казино up x казино играйте в слоты и live-казино без лишних сложностей. Простой вход, удобный интерфейс, стабильная платформа и широкий выбор игр для отдыха и развлечения.
Best commercials milan production service company
Film shooting 2026 video production company in italy
Super subs, impact substitutes and their goal contributions
**herpafend official**
Herpafend is a natural wellness formula developed for individuals experiencing symptoms related to the herpes simplex virus. It is designed to help reduce the intensity and frequency of flare-ups while supporting the bodys immune defenses.
**prodentim reviews**
ProDentim is a distinctive oral-care formula that pairs targeted probiotics with plant-based ingredients to encourage strong teeth, comfortable gums, and reliably fresh breath
Counter attacks, fast break goals and transition play documented
Get instant livescore updates for Premier League, La Liga, Serie A and Bundesliga matches today
**neurosharp official**
Neuro Sharp is an advanced cognitive support formula designed to help you stay mentally sharp, focused, and confident throughout your day.
Live match sporx.com.az/ results, the latest sports news, transfers, and today’s TV schedule. Live updates, key events, and all sports information in one portal.
A sports portal https://sbs-sport.com.az with breaking news, statistics, and expert commentary. Match schedules, transfers, interviews, and competition results are available in real time.
Live match sporx.com.az/ results, the latest sports news, transfers, and today’s TV schedule. Live updates, key events, and all sports information in one portal.
A sports portal https://sbs-sport.com.az/ with breaking news, statistics, and expert commentary. Match schedules, transfers, interviews, and competition results are available in real time.
Can you be more specific about the content of your article? After reading it, I still have some doubts. Hope you can help me.
Live streams https://golvar.com.az and live matches online, including the latest football schedule for today. Follow games in real time, find out dates, start times, and key events of football tournaments.
**backbiome**
Mitolyn is a carefully developed, plant-based formula created to help support metabolic efficiency and encourage healthy, lasting weight management.
Нужна курсовая? курсовая работа на заказ Подготовка работ по заданию, методическим указаниям и теме преподавателя. Сроки, правки и сопровождение до сдачи включены.
Нужна курсовая? купить курсовую Подготовка работ по заданию, методическим указаниям и теме преподавателя. Сроки, правки и сопровождение до сдачи включены.
Авиабилеты по низким ценам https://tutvot.com посуточная аренда квартир, вакансии без опыта работы и займы онлайн. Актуальные предложения, простой поиск и удобный выбор решений для путешествий, работы и финансов.
Авиабилеты по низким ценам https://tutvot.com посуточная аренда квартир, вакансии без опыта работы и займы онлайн. Актуальные предложения, простой поиск и удобный выбор решений для путешествий, работы и финансов.
Военная карьера по контракту начинается с подписания договора. Контракт определяет выплаты и обязанности. Предусмотрены льготы. Подать заявление можно заранее – какие документы нужны для службы по контракту на сво 2026
捕风追影线上看免费在线观看,海外华人专属平台,高清无广告体验。
Thank you for your sharing. I am worried that I lack creative ideas. It is your article that makes me full of hope. Thank you. But, I have a question, can you help me?
Платформа для откровенных материалов предлагает широкий выбор видео для
взрослых развлечений. Выбирайте
надежные платформы для конфиденциального опыта.
Feel free to visit my homepage; BUY VIAGRA
Кент казино ориентировано на стабильность и доступность. Онлайн платформа работает круглосуточно. Пользователь может играть в удобное время. Техническая часть не отвлекает от процесса. Все проходит плавно: kent casino вход
заклепки вытяжные st st заклепка вытяжная алюм сталь
заклепка вытяжная гост заклепка вытяжная алюминиевая купить
Cutback assists, low crosses and their conversion rates tracked
Если нужен надежный игровой клуб обрати внимание на Atom казино онлайн. Большой выбор слотов и регулярные бонусы делают игру интересной. Регистрация занимает минимум времени. Проверь Atom казино официальный сайт прямо сейчас: казино атом зеркало
Для прибирання https://cleaninglviv.top/ зручно
Для будинку https://cleaninglviv.top/ підходить
ДВС и КПП https://vavtomotor.ru автозапчасти для автомобилей с гарантией и проверенным состоянием. В наличии двигатели и коробки передач для популярных марок, подбор по VIN, быстрая доставка и выгодные цены.
ДВС и КПП https://vavtomotor.ru автозапчасти для автомобилей с гарантией и проверенным состоянием. В наличии двигатели и коробки передач для популярных марок, подбор по VIN, быстрая доставка и выгодные цены.
Expanded article here: https://www.bytecheck.com/results?resource=yourfreepoll.com
Extended Review: https://selioftrust.com.atlaq.com/
Long range goals, strikes from outside the box documented
Clutch performers, players who score in big moments documented
дизайн террасы дома дизайн проект коттеджа
дизайн окон дома дизайн проект коттеджа
Куш казино официальный сайт подходит для комфортной игры онлайн. Регистрация проходит быстро. Вход без ограничений. Начни играть прямо сейчас – kush регистрация
Corner kick count, set piece statistics for all football matches
дизайн коридора в квартире дизайн 2 комнатной квартиры
дизайн ванной в квартире двухкомнатная квартира 53 кв м дизайн
Thank you for your sharing. I am worried that I lack creative ideas. It is your article that makes me full of hope. Thank you. But, I have a question, can you help me?
https://svobodapress.com.ua/karta-vyshnevoho/
捕风追影在线免费在线观看,海外华人专属平台采用机器学习个性化推荐,高清无广告体验。
ОЭРН – профессиональная платформа для проверки квалификации экспертов по экспертизе недр. Сервис помогает найти специалиста по профилям нефть и газ, геология и ГРР, ТПИ и сократить риски при согласовании отчётов и отчетов в тендерах https://oern2007.ru/
Лучшие и безопасные противопожарный резервуар эффективное решение для систем пожарной безопасности. Проектирование, производство и монтаж резервуаров для хранения воды в соответствии с требованиями нормативов.
Лучшие и безопасные наземные противопожарные резервуары эффективное решение для систем пожарной безопасности. Проектирование, производство и монтаж резервуаров для хранения воды в соответствии с требованиями нормативов.
Казино Кактус официальный сайт предлагает комфортную игру онлайн. Регистрация быстрая и понятная. Вход без ограничений. Начни прямо сейчас – cactus casino бонус
Слив курсов по биологии ЕГЭ https://courses-ege.ru
Бесплатные курсы ЕГЭ https://courses-ege.ru
Требование к подземным резервуарам https://underground-reservoirs.ru
Одностенные подземные резервуары https://underground-reservoirs.ru
Проститутки Сургута
Best New Online Casino Australia 2025 Fresh Bonuses Waiting
Лучшее казино вавада казино скачать слоты, настольные игры и live-казино онлайн. Простая навигация, стабильная работа платформы и доступ к играм в любое время без установки дополнительных программ.
Лучшее казино автоматы вавада слоты, настольные игры и live-казино онлайн. Простая навигация, стабильная работа платформы и доступ к играм в любое время без установки дополнительных программ.
Играешь в казино? казино фриспины бесплатные вращения в слотах, бонусы для новых игроков и действующие акции. Актуальные бонусы и предложения онлайн-казино.
Играешь в казино? бездепы казино с выводом бесплатные вращения в слотах, бонусы для новых игроков и действующие акции. Актуальные бонусы и предложения онлайн-казино.
полотенцесушитель цена полотенцесушитель электрический
полотенцесушитель сунержа полотенцесушитель ванны купить
Индивидуалки Владивосток
https://t.me/nur_intim/
Фриспины бесплатно https://casino-bonuses.ru бесплатные вращения в онлайн-казино без пополнения счета. Актуальные предложения, условия получения и список казино с бонусами для новых игроков.
Фриспины бесплатно бездепозитный бонус за регистрацию бесплатные вращения в онлайн-казино без пополнения счета. Актуальные предложения, условия получения и список казино с бонусами для новых игроков.
События в мире новостной портал события дня и аналитика. Актуальная информация о России и мире с постоянными обновлениями.
События в мире сайт сми события дня и аналитика. Актуальная информация о России и мире с постоянными обновлениями.
Завод специализируется на проектировании и изготовлении складских стеллажей для различных типов хранения. Мы производим паллетные, фронтальные и глубинные системы под конкретные задачи клиента. Каждое решение адаптируется под параметры склада и особенности логистических процессов. Такой подход повышает эффективность использования пространства https://www.met-izdeliya.com/
Тренды в строительстве заборов https://otoplenie-expert.com/stroitelstvo/trendy-v-stroitelstve-zaborov-dlya-dachi-v-2026-godu-sovety-po-vyboru-i-ustanovke.html для дачи в 2026 году: популярные материалы, современные конструкции и практичные решения. Советы по выбору забора и правильной установке с учетом бюджета и участка.
Тренды в строительстве заборов https://otoplenie-expert.com/stroitelstvo/trendy-v-stroitelstve-zaborov-dlya-dachi-v-2026-godu-sovety-po-vyboru-i-ustanovke.html для дачи в 2026 году: популярные материалы, современные конструкции и практичные решения. Советы по выбору забора и правильной установке с учетом бюджета и участка.
Отвод воды от фундамента https://totalarch.com/kak-pravilno-otvesti-vodu-ot-fundamenta-livnevka-svoimi-rukami-i-glavnye-zabluzhdeniya какие системы дренажа использовать, как правильно сделать отмостку и избежать подтопления. Пошаговые рекомендации для частного дома и дачи.
Отвод воды от фундамента https://totalarch.com/kak-pravilno-otvesti-vodu-ot-fundamenta-livnevka-svoimi-rukami-i-glavnye-zabluzhdeniya какие системы дренажа использовать, как правильно сделать отмостку и избежать подтопления. Пошаговые рекомендации для частного дома и дачи.
Experimentation reveals what works—buy tiktok views in different amounts (100, 500, 1,000) across various content types to identify which combinations trigger the best algorithmic response.
If you’re wondering buy tiktok likes and views, start by checking reviews and looking for gradual delivery—instant spikes can look sketchy to the algorithm.
Халява в казино https://casino-bonus-bezdep.ru Бесплатные вращения в популярных слотах, актуальные акции и подробные условия использования.
Халява в казино https://casino-bonus-bezdep.ru Бесплатные вращения в популярных слотах, актуальные акции и подробные условия использования.
косметология лица цена клиника косметологии услуги
Do you love gambling? usdt casinos allow you to play online using Bitcoin and altcoins. Enjoy fast deposits, instant payouts, privacy, slots, and live dealer games on reliable, crypto-friendly platforms.
This piece of writing provides clear idea designed for the new visitors of blogging, that genuinely how to do running a blog.
Thanks for one’s marvelous posting! I genuinely enjoyed reading it, you might be a great author. I will make certain to bookmark your blog and may come back down the road. I want to encourage you to continue your great job, have a nice weekend!
Компания предлагает мелкосерийное производство электроники. Выполняется сборка плат и монтаж компонентов. Проводится тестирование функциональности. Контролируется качество на всех этапах. Это позволяет выпускать стабильную продукцию для заказчика https://nc750.ru/member.php?u=11150
Эти технологии позволяют создавать сложное просто…
Do you love gambling? https://cryptodepositcasinos.com allow you to play online using Bitcoin and altcoins. Enjoy fast deposits, instant payouts, privacy, slots, and live dealer games on reliable, crypto-friendly platforms.
Онлайн платформа 7k casino предлагает логичную структуру и быстрый доступ к играм. Все основные разделы расположены удобно. Пользовательский опыт продуман до мелочей. Это положительно влияет на общее впечатление – казино 7к
iyf.tv海外华人首选,提供最新华语剧集、美剧、日剧等高清在线观看。
Can I simply say what a comfort to discover somebody who actually knows what they are discussing online. You certainly realize how to bring a problem to light and make it important. More people really need to check this out and understand this side of your story. I was surprised you aren’t more popular because you definitely possess the gift.
byueuropaviagraonline
Кент казино продолжает развиваться и улучшать пользовательский опыт. Регулярные обновления делают платформу актуальной. Такой подход поддерживает интерес аудитории – кент казино официальный сайт зеркало
Авторский блог https://blogger-tolstoy.ru о продвижении в Телеграм. Свежие гайды, проверенные стратегии и полезные советы по раскрутке каналов, чатов и ботов. Подробно о том, как увеличить аудиторию, повысить вовлеченность и эффективно монетизировать проекты в мессенджере Telegram.
дерматология косметология центр косметологии
телефон косметология студия косметологии
夜班医生第四季高清完整版,海外华人可免费观看最新热播剧集。
Погрузитесь в мир кино https://zonefilm.media с нашим онлайн-кинотеатром! Здесь каждый найдет фильмы для себя: от захватывающих блокбастеров и трогательных драм до мультфильмов для всей семьи. Удобный интерфейс, возможность смотреть онлайн на любом устройстве и постоянно обновляемая библиотека! Присоединяйтесь и наслаждайтесь!
Нужен сувенир или подарок? подарки для женщин с логотипом для компаний и мероприятий. Бизнес-сувениры, подарочные наборы и рекламная продукция с персонализацией и доставкой.
Лучшие подарки и сувениры https://perm-suveniry.ru нанесение логотипа, подарочные наборы, промо-продукция и деловые аксессуары для мероприятий и компаний.
Нужна бытовая химия? товары бытовой химии моющие и чистящие средства, порошки и гели. Удобный заказ онлайн, акции и доставка по городу и регионам.
Бытовая химия с доставкой магазин бытовой химии средства для уборки, стирки и ухода за домом. Широкий ассортимент, доступные цены и удобная оплата.
UEFA Champions League https://sampiyonlar-ligi.com.az/ matches, results, and live scores. See the schedule, standings, and draw for Europe’s premier club competition.
Football online soccerstand.com.az live match results and accurate online scores. Tournaments, schedules, and up-to-date team statistics.
Free online games https://1001.com.az/ for your phone and computer. Easy navigation, quick start, and a variety of genres with no downloads required.
Turkish Super League super-lig com az standings, match results, and live online scores. Game schedule and up-to-date team statistics.
Доброго времени суток.
Увидел интересную тему.
Думаю, многим будет полезно.
Линк:
[url=https://gccassociation.org/]kraken ссылка на сайт[/url]
Вроде норм.
בניסיון למצוא את הדגדגן או להיכנס פנימה. פחד ותשוקה הציפו את הילדה. פעם אחת באותו ערב, היא סובלת משני רגשות שונים. מה שמוביל את הגוף להתרגשות פראית. יורה לא רצה להפסיק, והוא חיבב את מלכוד במשפט של מישה, לא הופתעתי אם מישהו מהם היה מתחיל למצוץ לי את הזין של מישהו אחר, אבל אז האינטואיציה שלי אכזבה אותי. אליושה היה צעיר בהרבה, גם אני וגם קרוב משפחתו. בשלב זה, ybngen
https://marketsdarkweb.com darknet links
Всем привет!
Нашел полезную инфу.
Решил поделиться.
Вот ссылка:
Мега даркнет
Пользуйтесь на здоровье.
Hi there i am kavin, its my first occasion to commenting anyplace, when i read this paragraph i thought i could also create comment due to this good piece of writing.
This post will assist the internet visitors for building up new webpage or even a blog from start to end.
Hi, just wanted to tell you, I enjoyed this post. It was helpful. Keep on posting!
הבד לא הגן על חיק האישה. ובאותו רגע מאשה, נרגשת מהמצב ומהנגיעות שלי, גנחה בקול רם, מתפוצצת באורגזמה. אני, בלי לתת לה להתעורר, הכנסתי שלוש אצבעות לתוך הנרתיק, והתחלתי לזיין בצורה גסה צריך עוד תפוחי אדמה. והוא מביט בי בחיוך. לעזאזל! מה קורה? זה בסדר. בשביל הכיף אתה צריך לשלם. אומר לה: תירגע. אני אלך להביא את המעדר ואעזור. שנינו נחתוך אותו במהירות. הוא הלך הביתה, https://justsex.co.il/
В нашем женском журнале мы говорим о том, что действительно важно. Мы публикуем статьи о материнстве, делимся советами по уходу за собой, рассказываем о трендах моды и принципах здорового образа жизни. Наша цель поддерживать и вдохновлять вас каждый день. Читайте больше по ссылке https://universewomen.ru/
hello!,I really like your writing so so much! percentage we be in contact extra about your post on AOL? I require an expert on this house to resolve my problem. Maybe that is you! Taking a look ahead to see you.
夜班医生第四季高清完整版结合大数据AI分析,海外华人可免费观看最新热播剧集。
Шоурумы Москвы становятся всё более популярным форматом покупок для тех, кто ценит индивидуальный подход и уникальный ассортимент. В таких пространствах можно найти дизайнерскую одежду, капсульные коллекции и редкие бренды, которые не представлены в крупных торговых центрах. Атмосфера уюта и персонального сервиса делает процесс выбора особенно приятным https://rentry.co/fp2bcqmq
Hey I know this is off topic but I was wondering if you knew of any widgets I could add to my blog that automatically tweet my newest twitter updates. I’ve been looking for a plug-in like this for quite some time and was hoping maybe you would have some experience with something like this. Please let me know if you run into anything. I truly enjoy reading your blog and I look forward to your new updates.
奇思妙探高清完整官方版,海外华人可免费观看最新热播剧集。
Top Australian online casinos 2025 – real money gaming hub
凯伦皮里第一季高清完整版运用AI智能推荐算法,海外华人可免费观看最新热播剧集。
Медицинский сайт https://nogostop.ru об анатомии, патологиях и способах лечения. Симптомы, профилактика, современные препараты и рекомендации врачей в доступной форме.
Свежие новости https://plometei.ru России и мира — оперативные публикации, экспертные обзоры и важные события. Будьте в курсе главных изменений в стране и за рубежом.
Информационный портал https://diok.ru о событиях в мире, экономике, науке, автомобильной индустрии и обществе. Аналитика, обзоры и ключевые тенденции.
Thank you for the good writeup. It in fact was a amusement account it. Look advanced to more added agreeable from you! By the way, how can we communicate?
Hello, i think that i saw you visited my website thus i came to “return the favor”.I’m trying to find things to enhance my website!I suppose its ok to use some of your ideas!!
Сайт о фермерстве https://webferma.com и садоводстве: посадка, удобрения, защита растений, теплицы и разведение животных. Полезные инструкции и современные агротехнологии.
Справочный IT-портал https://help-wifi.ru программирование, администрирование, кибербезопасность, сети и облачные технологии. Инструкции, гайды, решения типовых ошибок и ответы на вопросы специалистов.
Новости и обзоры https://mechfac.ru о мире технологий, экономики, крипторынка, культуры и шоу-бизнеса. Всё, что важно знать о современном обществе.
Все об автозаконах https://autotonkosti.ru и штрафах — правила дорожного движения, работа ГИБДД, страхование ОСАГО, постановка на учет и оформление сделки купли-продажи авто.
В московских шоурумах можно собрать гардероб для разных сфер жизни от работы до отдыха. Продуманная структура ассортимента облегчает этот процесс. Подробнее по ссылке https://www.sitebs.ru/blogs/120936.html
I want to to thank you for this wonderful read!! I definitely enjoyed every little bit of it. I’ve got you saved as a favorite to check out new things you post…
Новостной портал https://webof-sar.ru свежие события России и мира, политика, экономика, общество, технологии и культура. Оперативные публикации и аналитика каждый день.
Онлайн новостной портал https://parnas42.ru с актуальными новостями, экспертными комментариями и главными событиями дня. Быстро, объективно и по существу.
дизайн интерьера онлайн сделать дизайн интерьера
Мировые новости https://m-stroganov.ru о технологиях и криптовалютах, здоровье и происшествиях, путешествиях и туризме. Свежие публикации и экспертные обзоры каждый день.
Читать далее: https://perfumerio.ru/s/tom-ford-tobacco-oud-intense/
Хочешь продать недвижимость? квартиры у метро в Москве экспертная оценка, подготовка к продаже, юридическая проверка и сопровождение на всех этапах сделки.
Все самое интересное новостной портал с лентой последних событий, аналитикой и комментариями экспертов. Оперативные публикации и аналитика каждый день.
jet tone games
Нужен новый телефон? смартфон apple iphone по выгодной цене. Интернет?магазин i4you предлагает оригинальные устройства Apple с официальной гарантией производителя — от года и более. Интернет?магазин i4you: оригинальные устройства Apple с гарантией от года. Выбирайте лучшее!
Новый iPhone 17 цена уже в продаже в Санкт?Петербурге! В интернет?магазине i4you вас ждёт широкий выбор оригинальных устройств Apple по выгодным ценам. На каждый смартфон действует официальная гарантия от производителя сроком от года — вы можете быть уверены в качестве и долговечности покупки.
What’s up, I log on to your blog like every week. Your story-telling style is witty, keep it up!
This paragraph is genuinely a nice one it assists new internet users, who are wishing in favor of blogging.
Интересует бьюти индустрия? каталог салонов красоты вакансии косметолога, массажиста, мастера маникюра, шугаринга, ресниц, бровиста, колориста и администратора салона красоты. Курсы для бьюти мастеров, онлайн обучение и сертификаты.
Планируешь ремонт? отделка ванной комнаты от косметического обновления до капитальной перепланировки. Индивидуальный подход, современные технологии и официальное оформление договора.
https://lidiastyle.com.ua/
jetton casino зеркало t me
Is Crown Casino online legit? – Australian players guide
Реклама на заднем стекле автомобиля https://oklejka-transporta.ru
塔尔萨之王第二季高清完整版智能AI观看体验优化,海外华人可免费观看最新热播剧集。
Сервисный центр Miele в Москве ориентирован на долгосрочное сотрудничество. Клиенты получают консультации и рекомендации по дальнейшей эксплуатации техники. Такой подход помогает снизить риск повторных поломок. Подробная информация представлена на сайте – ремонт стиральных машин miele в москве
jet ton promo
https://labirint-kids.com.ua/
https://labirint-kids.com.ua/
https://itcent.com.ua/
Сервисный центр Miele в Москве ориентирован на долгосрочное сотрудничество. Клиенты получают консультации и рекомендации по дальнейшей эксплуатации техники. Такой подход помогает снизить риск повторных поломок. Подробная информация представлена на сайте: https://mieleservis.ru/
I think the admin of this website is in fact working hard in favor of his site, for the reason that here every information is quality based material.
Сервисный центр Miele в Москве работает с холодильным оборудованием бренда. При нарушении температурного режима специалисты проверяют компрессор и систему охлаждения. Это помогает восстановить стабильную и экономичную работу устройства. Узнайте больше на странице компании – https://mieleservis.ru/
https://goodfinance.com.ua/
范德沃克第二季高清完整官方版,海外华人可免费观看最新热播剧集。
https://digital-world.com.ua/
https://itcent.com.ua/
海外华人必备的yifan官方认证平台,24小时不间断提供最新高清电影、电视剧,无广告观看体验。
https://poehali.com.ua/
Охраны труда для бизнеса охрана труда дистанционно аудит системы безопасности, обучение персонала, разработка локальных актов и внедрение стандартов. Помогаем минимизировать риски и избежать штрафов.
Проблемы с зубами? стоматологический центр профилактика, лечение, протезирование и эстетическая стоматология. Забота о здоровье зубов с применением передовых методик.
Professional сonstruction Moraira: architecture, engineering systems, and finishing. We work with local regulations and regional specifics in mind. We handle permitting and material procurement so you can enjoy the creative process without the stress of management.
https://digital-world.com.ua/
https://digital-world.com.ua/
https://mylikari.com.ua/
Professional сonstruction Moraira: architecture, engineering systems, and finishing. We work with local regulations and regional specifics in mind. We handle permitting and material procurement so you can enjoy the creative process without the stress of management.
Охраны труда для бизнеса центр охраны труда аудит системы безопасности, обучение персонала, разработка локальных актов и внедрение стандартов. Помогаем минимизировать риски и избежать штрафов.
Нужен фулфилмент? https://mp-full.ru — хранение, сборка заказов, возвраты и учет остатков. Работаем по стандартам площадок и соблюдаем сроки поставок.
https://b-mobile.com.ua/
Запчасти для сельхозтехники https://selkhozdom.ru и спецтехники МТЗ, МАЗ, Амкодор — оригинальные и аналоговые детали в наличии. Двигатели, трансмиссия, гидравлика, ходовая часть с быстрой доставкой и гарантией качества.
Оформления медицинских справок https://med-official2.info справки для трудоустройства, водительские, в бассейн и учебные заведения. Купить справку онлайн быстро
Медицинская справка https://086y-spr.info 086у в Москве по доступной цене — официальное оформление для поступления в вуз или колледж.
https://b-mobile.com.ua/
Медицинские справки https://norma-spravok2.info по доступной цене — официальное оформление. Быстрая запись, прозрачная стоимость и выдача документа установленного образца.
Оформление медицинских https://spr-goroda2.info справок в Москве недорого консультации специалистов и выдача официальных документов. Соблюдение стандартов и минимальные сроки получения.
Медицинские справки https://medit-norma1.info в Москве с прозрачной ценой — анализы и выдача официального документа без лишних ожиданий. Удобная запись, прозрачные цены и быстрое получение документа установленного образца.
Медицинская справка https://sp-dom1.ru с доставкой — официальное оформление. Удобная запись, прозрачные цены и получение документа курьером.
Получение медицинской https://gira-spravki2.ru справки с доставкой после официального оформления. Комфортная запись, минимальные сроки и законная выдача документа.
Справка 29н https://forma-029.ru в Москве с доставкой — без прохождение обязательного медосмотра в клинике. Отправка готового документа по указанному адресу.
Медицинские справки https://meduno.info и анализы в Москве — официально и удобно. Сеть из 10 клиник, оперативный прием специалистов и оформление документов по действующим стандартам.
https://architector.com.ua/
Орби казино http://orby-casino.com онлайн-платформа с широким выбором слотов, настольных игр и бонусных предложений. Узнайте об акциях, турнирах и возможностях для комфортного игрового досуга.
Онлайн казино Орби http://orby-casino.net большой выбор слотов, бонусы для новых и постоянных игроков, регулярные турниры с призами.
Купить квартиру недорого https://spb-novostroyki-gid.ru актуальные предложения на первичном и вторичном рынке. Подбор вариантов по бюджету, помощь в ипотеке и полное юридическое сопровождение сделки.
https://goldmaster.com.ua/
https://mylikari.com.ua/
https://proitservice.com.ua/
https://g-smile.com.ua/
https://goldmaster.com.ua/
https://agrotis.com.ua/
What’s up to all, how is everything, I think every one is getting more from this web page, and your views are good for new viewers.
byueuropaviagraonline
https://pohod.com.ua/
https://nailsforyou.com.ua/
Чудові казіно з бонусами — депозитні бонуси, бездепозитні бонуси та Турнір з призами. Обзори пропозицій і правила участі.
Найпопулярніша платформа ігри казино – популярні слоти, бонуси та турніри з призами. Огляди гри та правила участі в акціях.
Грайте в ігри слоти — популярні ігрові автомати, джекпоти та спеціальні пропозиції. Огляди гри та можливості для комфортного харчування.
https://g-smile.com.ua/
Найкращі ігри в казино – безліч ігрових автоматів, правил, бонусів покерів і. Огляди, новинки спеціальні
Квартиры в новостройках https://domik-vspb.ru от застройщика — студии, однокомнатные и семейные варианты. Сопровождение сделки и прозрачные условия покупки.
海外华人必备的iyf平台AI深度学习内容匹配,提供最新高清电影、电视剧,无广告观看体验。
Un’accogliente pasticceria https://www.pasticceriabonati.it con fragranti prodotti da forno, classici dolci italiani e torte natalizie personalizzate. Ingredienti naturali e attenzione a ogni dettaglio.
https://asport.com.ua/
https://eu-apteka.com.ua/
розчинники
https://eu-apteka.com.ua/
https://infobanks.com.ua/
https://eu-apteka.com.ua/
https://pravdahub.com.ua/hora-shpytsi-vysota-nayvyshcha-vershyna-tatr-u-slovachchyni/
https://infobanks.com.ua/
Металлический кованый факел под старину с доставкой — прочная конструкция, эстетичный внешний вид и устойчивость к погодным условиям.
розчинники
拜仁孔帕尼神评莱默:队里最搞笑男人!2026足球新闻队内趣闻,德甲比分之外的欢乐时刻超治愈!
Хочешь восстановить мрамор? реставрация мрамора устранение трещин, пятен и потертостей. Современные технологии шлифовки и кристаллизации для идеального результата.
https://mobiboom.com.ua/
https://vodkat.top/
https://ua-sport.com/
https://mobiboom.com.ua/
https://vodkat.top/
Carbon credits https://offset8capital.com and natural capital – climate projects, ESG analytics and transparent emission compensation mechanisms with long-term impact.
https://vodkat.top/
Carbon credits https://offset8capital.com and natural capital – climate projects, ESG analytics and transparent emission compensation mechanisms with long-term impact.
Свежие новости SEO https://seovestnik.ru и IT-индустрии — алгоритмы, ранжирование, веб-разработка, кибербезопасность и цифровые инструменты для бизнеса.
Свежие новости SEO https://seovestnik.ru и IT-индустрии — алгоритмы, ранжирование, веб-разработка, кибербезопасность и цифровые инструменты для бизнеса.
Строительство бассейнов под ключ https://atlapool.ru
Стоимость строительства бассейна под ключ https://atlapool.ru
Хочешь помочь своей стране? заполнить контракт на сво требования, документы, порядок заключения контракта и меры поддержки. Условия выплат и социальных гарантий.
Последние публикации: https://svetasanders.com/search/label/konad/
Читать расширенную версию: https://le-parfume.ru/index.php?route=product/product&product_id=12708
sparkdex SparkDex is redefining decentralized trading with speed, security, and real earning potential. On spark dex, you keep full control of your assets while enjoying fast swaps and low fees. Powered by sparkdex ai, the platform delivers smarter insights and optimized performance for confident decision-making. Trade, earn from liquidity, and grow your crypto portfolio with sparkdex — the future of DeFi starts here.
Rowy, Poddabie, Debina https://turystycznybaltyk.pl noclegi, pensjonaty i domki blisko plazy. Najnowsze aktualnosci, imprezy i wydarzenia z regionu oraz porady dla turystow odwiedzajacych wybrzeze.
Лучшие фриспины без депозита — бесплатные бонусы для старта, подробные обзоры и сравнение условий различных платформ.
Лучшие https://casinonodeposit.ru — бесплатные бонусы для старта, подробные обзоры и сравнение условий различных платформ.
Нужны казино бонусы? новые промокоды казино — бонусы за регистрацию и пополнение счета. Обзоры предложений и подробные правила использования кодов.
Онлайн покер сайт покерок — турниры с крупными гарантиями, кеш-игры и специальные предложения для игроков. Обзоры форматов и условий участия.
Нужны казино бонусы? бездепозитные промокоды — бонусы за регистрацию и пополнение счета. Обзоры предложений и подробные правила использования кодов.
Онлайн покер покерок официальный сайт — турниры с крупными гарантиями, кеш-игры и специальные предложения для игроков. Обзоры форматов и условий участия.
чат нейросеть для учебы чат нейросеть для учебы .
реферат через нейросеть реферат через нейросеть .
чат нейросеть для учебы nejroset-dlya-ucheby-6.ru .
нейросеть для школьников и студентов нейросеть для школьников и студентов .
нейросеть для учебы nejroset-dlya-ucheby-5.ru .
ии для школьников и студентов ии для школьников и студентов .
перепланировка квартир перепланировка квартир .
ии для учебы студентов ии для учебы студентов .
Все о фундаменте https://rus-fundament.ru виды оснований, расчет нагрузки, выбор материалов и этапы строительства. Практичные советы по заливке ленточного, плитного и свайного фундамента.
Портал о жизни в ЖК https://pioneer-volgograd.ru инфраструктура, паркинг, детские площадки, охрана и сервисы. Информация для будущих и действующих жителей.
чат нейросеть для учебы чат нейросеть для учебы .
Зарубежная недвижимость https://realtyz.ru актуальные предложения в Европе, Азии и на побережье. Информация о ценах, налогах, ВНЖ и инвестиционных возможностях.
Все о ремонте квартир https://belstroyteh.ru и отделке помещений — практические инструкции, обзоры материалов и современные решения для интерьера.
нейросеть для учебы онлайн nejroset-dlya-ucheby-7.ru .
нейросеть для студентов онлайн нейросеть для студентов онлайн .
нейросеть реферат онлайн нейросеть реферат онлайн .
ии реферат ии реферат .
нейросеть для рефератов нейросеть для рефератов .
перепланировка квартиры москва [url=https://pereplanirovka-kvartir9.ru/]pereplanirovka-kvartir9.ru[/url] .
Зарубежная недвижимость https://realtyz.ru актуальные предложения в Европе, Азии и на побережье. Информация о ценах, налогах, ВНЖ и инвестиционных возможностях.
ии для школьников и студентов ии для школьников и студентов .
Свежие мировые новости https://m-stroganov.ru оперативные публикации, международные события и экспертные комментарии. Будьте в курсе глобальных изменений.
Всё про строительство https://hotimsvoydom.ru и ремонт — проекты домов, фундаменты, кровля, инженерные системы и отделка. Практичные советы, инструкции и современные технологии.
ии реферат ии реферат .
нейросеть реферат нейросеть реферат .
лучшая нейросеть для учебы nejroset-dlya-ucheby-6.ru .
ии реферат ии реферат .
Всё про строительство https://hotimsvoydom.ru и ремонт — проекты домов, фундаменты, кровля, инженерные системы и отделка. Практичные советы, инструкции и современные технологии.
нейросеть для студентов онлайн нейросеть для студентов онлайн .
помощь в согласовании перепланировки квартиры помощь в согласовании перепланировки квартиры .
умная нейросеть для учебы nejroset-dlya-ucheby-5.ru .
Найкращі казіно з бонусами — депозитні акції, бездепозитні пропозиції та турніри із призами. Огляди та порівняння умов участі.
нейросеть для рефератов нейросеть для рефератов .
лучшая нейросеть для учебы лучшая нейросеть для учебы .
Грати в найкраще найкраще онлайн казино — широкий вибір автоматів та настільних ігор, вітальні бонуси та спеціальні пропозиції. Дізнайтеся про умови участі та актуальні акції.
ии реферат ии реферат .
нейросеть для учебы онлайн нейросеть для учебы онлайн .
перепланировка москва pereplanirovka-kvartir9.ru .
Найкращі бонусы казино — депозитні акції, бездепозитні пропозиції та турніри із призами. Огляди та порівняння умов участі.
генерация nejroset-dlya-ucheby-5.ru .
Грати в найкраще онлайн казіно — широкий вибір автоматів та настільних ігор, вітальні бонуси та спеціальні пропозиції. Дізнайтеся про умови участі та актуальні акції.
нейросеть онлайн для учебы нейросеть онлайн для учебы .
нейросеть для учебы nejroset-dlya-ucheby-7.ru .
нейросеть для учебы нейросеть для учебы .
лучшая нейросеть для учебы лучшая нейросеть для учебы .
согласование перепланировки в москве согласование перепланировки в москве .
генерация генерация .
Wolves 2-2 Arsenal – 2026 Premier League dramatic draw! Wolves boss says “felt like a win” – football scores update shakes title race!
нейросеть онлайн для учебы nejroset-dlya-ucheby-7.ru .
сайт для рефератов сайт для рефератов .
узаконивание перепланировки pereplanirovka-kvartir9.ru .
нейросеть пишет реферат нейросеть пишет реферат .
перепланировка квартиры проектные организации proekt-pereplanirovki-kvartiry22.ru .
перепланировка квартиры стоимость перепланировка квартиры стоимость .
нейросеть реферат нейросеть реферат .
Грати в популярні слоти – великий каталог автоматів, бонуси за реєстрацію та регулярні турніри. Інформація про умови та можливості для гравців.
Онлайн ігри в казино – великий вибір автоматів, рулетки та покеру з бонусами та акціями. Огляди, новинки та спеціальні пропозиції.
чат нейросеть для учебы nejroset-dlya-ucheby-6.ru .
внедрение 1с управление предприятие 1s-vnedrenie.ru .
нейросеть для школьников и студентов нейросеть для школьников и студентов .
Грати в слоти безкоштовно – великий каталог автоматів, бонуси за реєстрацію та регулярні турніри. Інформація про умови та можливості для гравців.
Онлайн онлайн ігри казино – великий вибір автоматів, рулетки та покеру з бонусами та акціями. Огляди, новинки та спеціальні пропозиції.
online betting on sports online betting on sports .
сколько стоит согласование перепланировки skolko-stoit-uzakonit-pereplanirovku-8.ru .
проект перепланировки квартиры москва проект перепланировки квартиры москва .
скачать мелбет скачать мелбет .
сайт для рефератов сайт для рефератов .
внедрение 1с услуги 1s-vnedrenie.ru .
реферат через нейросеть реферат через нейросеть .
реферат нейросеть реферат нейросеть .
стоимость узаконивания перепланировки skolko-stoit-uzakonit-pereplanirovku-8.ru .
мелбет приложение скачать мелбет приложение скачать .
melbet – sports betting melbet – sports betting .
проект перепланировки москва проект перепланировки москва .
внедрение 1с в организации внедрение 1с в организации .
лучшая нейросеть для учебы nejroset-dlya-ucheby-6.ru .
нейросеть студент бот нейросеть студент бот .
сколько стоит узаконить перепланировку сколько стоит узаконить перепланировку .
мелбет мобильное приложение мелбет мобильное приложение .
мелбет зеркало официальный сайт мелбет зеркало официальный сайт .
заказать проект перепланировки квартиры в москве proekt-pereplanirovki-kvartiry22.ru .
внедрение 1с москва внедрение 1с москва .
скачать бк мелбет на андроид скачать бк мелбет на андроид .
узаконить перепланировку стоимость skolko-stoit-uzakonit-pereplanirovku-8.ru .
скачать мелбет скачать мелбет .
мел бет мел бет .
перепланировка квартиры проектные организации proekt-pereplanirovki-kvartiry22.ru .
внедрение 1с 8 1s-vnedrenie.ru .
сайт мелбет сайт мелбет .
melbet betting app melbet betting app .
сколько стоит оформить перепланировку квартиры skolko-stoit-uzakonit-pereplanirovku-8.ru .
проект перепланировки квартиры москва проект перепланировки квартиры москва .
бк мелбет ру http://melbet-ru.it.com/ .
услуга внедрение 1с 1s-vnedrenie.ru .
мелбет мобильная mobilemelbet.ru .
Онлайн покер Покер онлайн https://mypokercraft.ru — регулярные турниры, кеш-игры и специальные предложения для игроков. Обзоры возможностей платформы и условий участия.
скачать приложение мелбет бесплатно скачать приложение мелбет бесплатно .
melbet sports melbet sports .
Онлайн покер Покер онлайн pokerok — регулярные турниры, кеш-игры и специальные предложения для игроков. Обзоры возможностей платформы и условий участия.
Slotini uning tovuq yo’l slot jonli dizayni, qiziqarli mexanikasi va qoshimcha oyin xususiyatlari bilan sinab koring. Qoidalar va format haqida hamma narsani bilib oling.
мелбет скачать мелбет скачать .
Игровой автомат https://chickenroadgames.top — современный слот с интересной концепцией и бонусами. Подробности о механике и особенностях геймплея.
melbet зеркало скачать http://www.mobilemelbet.ru/ .
скачать мелбет казино на андроид скачать мелбет казино на андроид .
мелбет зеркало мелбет зеркало .
slot oyunu https://mineslot.club/tr/ piksel grafikler, bonus ogeler ve ilgi cekici mekanikler. Oyunun kurallar? ve ozellikleri hakk?nda bilgi edinin.
melbet казино слоты melbet казино слоты .
Discover a minecraft game at the casino with an original theme and bonus features. Learn about the mechanics and gameplay features.
?n yaxs? Kazino oyununda Minecraft mas?n? canl? dizayn? v? ?lav? xususiyy?tl?ri olan qeyri-adi bir slot mas?n?d?r. Oyuncular ucun xususiyy?tl?r? v? s?rtl?r? n?z?r sal?n.
ойын автоматы Mine Drop бонус ойыны ?алай ж?мыс істейді – т?пн?с?а т?жырымдамасы мен жар?ын дизайны бар динамикалы? ойын автоматы. Механика, бонусты? м?мкіндіктер ж?не ойын процесіні? м?мкіндіктері туралы білі?із.
melbet приложение melbet приложение .
leadmark site – Color palette felt calming, nothing distracting, just focused, thoughtful design.
leadmark site – Found practical insights today; sharing this article with colleagues later.
промокоды на мелбет промокоды на мелбет .
Der Online-Slot https://zeusvshades250.com/de/ bietet eine olympische Atmosphare, thematisch passende Symbole und ein dynamisches Spielformat. Erfahren Sie mehr uber die Spielregeln und -funktionen.
boostster site – Overall, professional vibe here; trustworthy, polished, and pleasantly minimal throughout.
boostster site – Bookmarked this immediately, planning to revisit for updates and inspiration.
A catalog of cars https://www.auto.ae/catalog/ across all brands and generations—specs, engines, trim levels, and real market prices. Compare models and choose the best option.
melbet melbet .
A catalog of cars http://www.auto.ae/catalog/ across all brands and generations—specs, engines, trim levels, and real market prices. Compare models and choose the best option.
мелбет фрибет за регистрацию мелбет фрибет за регистрацию .
I’m not sure exactly why but this blog is loading incredibly slow for me. Is anyone else having this issue or is it a issue on my end? I’ll check back later and see if the problem still exists.
I really like your blog.. very nice colors & theme. Did you create this website yourself or did you hire someone to do it for you? Plz respond as I’m looking to design my own blog and would like to find out where u got this from. appreciate it
Un sito web https://www.sopicks.it per trovare abbigliamento, accessori e prodotti alla moda con un motore di ricerca intelligente. Trova articoli per foto, marca, stile o tendenza, confronta le offerte dei negozi e crea look personalizzati in modo rapido e semplice.
Нужно быстрое и недорогое такси https://taxi-aeroport.su в Москве? Делюсь находкой — сервис Taxi-Aeroport. Удобный онлайн-заказ за пару кликов, фиксированная цена без сюрпризов, чистые машины и вежливые водители. Проверил сам: в аэропорт подали вовремя, довезли спокойно, без переплат и лишней суеты. Отличный вариант для поездок по городу и комфортных трансферов.
Dzisiejsze mecze http://www.mecze-dzis.pl aktualny harmonogram z dokladnymi godzinami rozpoczecia. Dowiedz sie, jakie mecze pilki noznej, hokeja i koszykowki odbeda sie dzisiaj, i sledz turnieje, ligi i druzyny w jednym wygodnym kalendarzu.
Un sito web https://www.sopicks.it per trovare abbigliamento, accessori e prodotti alla moda con un motore di ricerca intelligente. Trova articoli per foto, marca, stile o tendenza, confronta le offerte dei negozi e crea look personalizzati in modo rapido e semplice.
A convenient car catalog http://www.auto.ae/catalog/ brands, models, specifications, and current prices. Compare engines, fuel consumption, trim levels, and equipment to find the car that meets your needs.
Wiadomosci tenisowe https://teniswiadomosci.pl z Polski i ze swiata: najnowsze wyniki meczow, rankingi zawodniczek, analizy turniejow i wywiady z zawodniczkami. Sledz wydarzenia ATP i WTA, dowiedz sie o zwyciestwach, niespodziankach i najwazniejszych meczach sezonu.
Dzisiejsze mecze https://www.mecze-dzis.pl aktualny harmonogram z dokladnymi godzinami rozpoczecia. Dowiedz sie, jakie mecze pilki noznej, hokeja i koszykowki odbeda sie dzisiaj, i sledz turnieje, ligi i druzyny w jednym wygodnym kalendarzu.
A convenient car catalog http://www.auto.ae/catalog brands, models, specifications, and current prices. Compare engines, fuel consumption, trim levels, and equipment to find the car that meets your needs.
龙之家族第三季2026 海外华人奇幻巨制 高清龙焰对决 全球加速观看
Wiadomosci tenisowe https://www.teniswiadomosci.pl z Polski i ze swiata: najnowsze wyniki meczow, rankingi zawodniczek, analizy turniejow i wywiady z zawodniczkami. Sledz wydarzenia ATP i WTA, dowiedz sie o zwyciestwach, niespodziankach i najwazniejszych meczach sezonu.
обучение в интернете best-schools-online.ru .
Siatkowka w Polsce siatkowkanews najnowsze wiadomosci, wyniki meczow, terminarze i transfery druzyn. Sledz PlusLige, wystepy reprezentacji narodowych i najwazniejsze wydarzenia sezonu w jednej wygodnej sekcji sportowej.
Koszykowka koszykowkanews najnowsze wiadomosci, PLK, transfery i wyniki meczow. Sledz polska lige, turnieje miedzynarodowe i postepy zawodnikow, dowiedz sie o transferach, statystykach i najwazniejszych wydarzeniach sezonu.
Jan Blachowicz https://www.janblachowicz.pl to polski zawodnik MMA i byly mistrz UFC w wadze polciezkiej. Pelna biografia, historia kariery, statystyki zwyciestw i porazek, najlepsze walki i aktualne wyniki.
структура креатива реклама reklamnyj-kreativ9.ru .
рекламный креатив рекламный креатив .
водопонижение строительных котлованов водопонижение строительных котлованов .
водопонижение скважинами водопонижение скважинами .
водопонижение строительное xn—77-eddkgagrc5cdhbap.xn--p1ai .
Siatkowka w Polsce siatkowkanews pl najnowsze wiadomosci, wyniki meczow, terminarze i transfery druzyn. Sledz PlusLige, wystepy reprezentacji narodowych i najwazniejsze wydarzenia sezonu w jednej wygodnej sekcji sportowej.
Koszykowka koszykowkanews najnowsze wiadomosci, PLK, transfery i wyniki meczow. Sledz polska lige, turnieje miedzynarodowe i postepy zawodnikow, dowiedz sie o transferach, statystykach i najwazniejszych wydarzeniach sezonu.
Jan Blachowicz http://www.janblachowicz.pl to polski zawodnik MMA i byly mistrz UFC w wadze polciezkiej. Pelna biografia, historia kariery, statystyki zwyciestw i porazek, najlepsze walki i aktualne wyniki.
обзор образовательных платформ best-schools-online.ru .
A convenient car catalog https://auto.ae/catalog/ brands, models, specifications, and current prices. Compare engines, fuel consumption, trim levels, and equipment to find the car that meets your needs.
структура креатива реклама reklamnyj-kreativ9.ru .
глубинное водопонижение глубинное водопонижение .
A convenient car catalog https://auto.ae/catalog/ brands, models, specifications, and current prices. Compare engines, fuel consumption, trim levels, and equipment to find the car that meets your needs.
водопонижение иглофильтрами грунтовых вод vodoponizhenie-msk.ru .
ии анализ креативов 60 секунд reklamnyj-kreativ8.ru .
понижение уровня грунтовых вод vodoponizhenie-moskva.ru .
осушение котлованов осушение котлованов .
осушение котлованов осушение котлованов .
выбор онлайн школы best-schools-online.ru .
запоминаемость слогана реклама reklamnyj-kreativ9.ru .
водопонижение на строительной площадке водопонижение на строительной площадке .
откачка грунтовых вод откачка грунтовых вод .
A convenient car catalog https://www.auto.ae/catalog brands, models, specifications, and current prices. Compare engines, fuel consumption, trim levels, and equipment to find the car that meets your needs.
строительное водопонижение строительное водопонижение .
бурение водопонижение бурение водопонижение .
a/b тест баннеров reklamnyj-kreativ8.ru .
1win казино слоты 1win казино слоты
бурение водопонижение vodoponizhenie-iglofiltrami-moskva.ru .
лучшие онлайн школы лучшие онлайн школы .
Julie Cash https://juliecash.online on OnlyFans features exclusive content, private posts, and regular updates for subscribers. Subscribe to gain access to original content and special offers.
водопонижение котлована иглофильтрами xn—77-eddkgagrc5cdhbap.xn--p1ai .
анализ креативов анализ креативов .
Everything about FC Qarabag https://www.qarabag.com.az in one place: match results and schedule, Premier League standings, squads and player stats, transfers, live streams, and home ticket sales.
IDMAN TV idman tv com az live stream online: watch the channel in high quality, check today’s program guide, and find the latest TV schedule. Conveniently watch sporting events and your favorite shows live.
Free online games oyun-oyna.com.az with no installation required—play instantly in your browser. A wide selection of genres: arcade, racing, strategy, puzzle, and multiplayer games are available in one click.
Watch Selcuksport TV https://selcuksports.com.az/ live online in high quality. Check the broadcast schedule, follow sporting events, and watch matches live on a convenient platform.
Julie Cash juliecash on OnlyFans features exclusive content, private posts, and regular updates for subscribers. Subscribe to gain access to original content and special offers.
вакуумное водопонижение вакуумное водопонижение .
водопонижение котлована иглофильтрами водопонижение котлована иглофильтрами .
melbet регистрация по телефону melbet регистрация по телефону
система водопонижения иглофильтрами vodoponizhenie-msk.ru .
водопонижение иглофильтрами водопонижение иглофильтрами .
Crystal Lust crystal lust is the official website, featuring original publications, premium content, and special updates for subscribers. Stay up-to-date with new posts and gain access to exclusive content.
Exclusivo de Candy Love candylove contenido original, publicaciones vibrantes. Suscribete para ser el primero en enterarte de las nuevas publicaciones y acceder a actualizaciones privadas.
Brooke Tilli https://brooketilli.online official website features unique, intimate content, exclusive publications, and revealing updates. Access original content and the latest news on the official platform.
Shilpa Sethi http://www.shilpasethi.in/ exclusive content, breaking news, and regular updates. Get access to new publications and stay up-to-date on the most interesting events.
дистанционное обучение детей дистанционное обучение детей .
анализ наружной рекламы анализ наружной рекламы .
MiniTinah http://www.minitinah.es comparte contenido exclusivo y las ultimas noticias. Siguenos en Instagram y Twitter para enterarte antes que nadie de nuestras nuevas publicaciones y recibir actualizaciones emocionantes a diario.
You really make it seem really easy along with your presentation but I to find this matter to be really something which I think I’d by no means understand. It sort of feels too complicated and extremely extensive for me. I am looking ahead to your subsequent submit, I will try to get the hang of it!
водопонижение котлована vodoponizhenie-iglofiltrami-moskva.ru .
melbet куда вводить промокод melbet куда вводить промокод
upmark site – Navigation felt smooth, found everything quickly without any confusing steps.
a/b тест баннеров reklamnyj-kreativ9.ru .
Eva Elfie https://evaelfie.ing shares unique intimate content and new publications. Her official page features original materials, updates, and exclusive offers for subscribers.
Lily Phillips https://lily-phillips.com offers unique intimate content, exclusive publications, and revealing updates for subscribers. Stay up-to-date with new content, access to original photos, and special announcements on her official page.
Unique content from Angela White http://www.angelawhite.ing/ new publications, exclusive materials, and personalized updates. Stay up-to-date with new posts and access exclusive content.
Sweetie Fox sweetiefox.ing offers exclusive content, original publications, and regular updates. Get access to new materials, private photos, and special announcements on the official page.
водопонижение скважинами водопонижение скважинами .
Souzan Halabi https://souzanhalabi.online shares exclusive content and new publications. Get access to private updates and original materials on the official platform.
вакуумное водопонижение вакуумное водопонижение .
clicktraffic site – Loved the layout today; clean, simple, and genuinely user-friendly overall.
осушение котлованов осушение котлованов .
1win ставки на баскетбол Кыргызстан http://www.1win50742.help
как играть в crash мостбет https://mostbet61527.help/
дистанционное обучение по школьной программе дистанционное обучение по школьной программе .
вакуумное водопонижение вакуумное водопонижение .
Riley Reid https://rileyreid.ing is a space for exclusive content, featuring candid original material and regular updates. Get access to new publications and stay up-to-date on the hottest announcements.
Shilpa Sethi https://shilpasethi.in/ official page features unique, intimate content and premium publications. Private updates, fresh photos, and personal announcements are available to subscribers.
Brianna Beach’s exclusive briannabeach online page features personal content, fresh posts, and the chance to stay up-to-date on new photos and videos.
Luiza Marcato Official https://luizamarcato.online exclusive updates, personal publications, and the opportunity to connect. Get access to unique content and official announcements.
Exclusive Aeries Steele aeries steele intimate content, and original publications all in one place. New materials, special announcements, and regular updates for those who appreciate a premium format.
карточки товаров wildberries карточки товаров wildberries .
1вин visa пополнение 1вин visa пополнение
осушение котлованов осушение котлованов .
узнаваемость бренда баннер reklamnyj-kreativ9.ru .
водопонижение строительных котлованов водопонижение строительных котлованов .
seogrowth site – Pages loaded fast, images appeared sharp, and formatting stayed consistent.
mines игра мостбет https://www.mostbet61527.help
1win не приходит смс код http://1win50742.help/
Sabrina Cortez sabrinacortez.online offers unique content and fresh publications. Join us on social media to receive exclusive updates and participate in exciting activities.
Google salaries by position https://salarydatahub.uk comparison of income, base salary, and benefits. Analysis of compensation packages and career paths at the tech company.
Exclusive content Alexis Fawx alexisfawx online original publications and special updates. Follow us on social media to stay up-to-date on new releases and participate in exciting events.
Любишь азарт? https://eva-vlg.ru онлайн-платформа с широким выбором слотов, настольных игр и живого казино. Бонусы для новых игроков, акции, турниры и удобные способы пополнения счета доступны круглосуточно.
Bunny Madison https://bunnymadison.online/ features exclusive, intimate content, and special announcements. Join us on social media to receive unique content and participate in exciting events.
иглофильтровое водопонижение иглофильтровое водопонижение .
водопонижение иглофильтрами москва [url=https://vodoponizhenie-msk.ru/]vodoponizhenie-msk.ru[/url] .
бурение скважин обратной промывкой бурение скважин обратной промывкой .
seogrowth site – Pages loaded fast, images appeared sharp, and formatting stayed consistent.
mostbet статистика матчей http://mostbet61527.help
бурение водопонижение бурение водопонижение .
система водопонижения грунтовых вод система водопонижения грунтовых вод .
clicktraffic site – Overall, professional vibe here; trustworthy, polished, and pleasantly minimal throughout.
Jill Kassidy Exclusives http://www.jillkassidy-official.online/ featuring original content, media updates, and special announcements.
Discover Avi Love’s https://avilove.online world: exclusive videos, photos, and premium content on OnlyFans and other platforms.
Die Welt von Monalita monalita.de bietet exklusive Videos, ausdrucksstarke Fotos und Premium-Inhalte auf OnlyFans und anderen beliebten Plattformen. Abonniere den Kanal, um als Erster neue Inhalte und besondere Updates zu erhalten.
Johnny Sins https://johnny-sins.com is the official channel for news, media updates, and exclusive content. Be the first to know about new releases and stay up-to-date on current events.
водопонизительная скважина xn—77-eddkgagrc5cdhbap.xn--p1ai .
проект на водопонижение vodoponizhenie-moskva.ru .
согласование перепланировки квартиры под ключ sostav.ru/blogs/286398/77663 .
Читать расширенную версию: оснащение мультимедийным оборудованием
Discover the world of LexiLore lexilore exclusive videos, original photos, and vibrant content. Regular updates, new publications, and special content for subscribers.
Dive into the world of Dolly Little dollylittle-official.online original videos, exclusive photos, and unique content available on OnlyFans and other services. Regular updates and fresh publications for subscribers.
Serenity Cox https://serenitycox.ing/ shares exclusive content and regular updates. Follow her on Instagram, Twitter, and Telegram to stay up-to-date on creative projects and inspiring events.
Athletic Bilbao vs Elche – 2026 La Liga live score kicks off 21:00! Lions ready to roar at San Mamés – Spanish football scores heating up fast!
雨霖铃2026 杨洋章若楠 高清古装仙侠虐恋 海外华人高清无广告 AI内容匹配
top sms activate alternatives top sms activate alternatives .
sms activate service sms activate service .
Купить квартиру https://sbpdomik.ru актуальные предложения на рынке недвижимости. Новостройки и вторичное жильё, удобный поиск по цене, району и площади. Подберите идеальную квартиру для жизни или инвестиций.
ии анализ креативов 60 секунд reklamnyj-kreativ8.ru .
smsactivate smsactivate .
best virtual number service github.com/SMS-Activate-Alternatives .
глубинное водопонижение глубинное водопонижение .
Karely Ruiz http://www.karelyruiz.mx comparte contenido exclusivo y actualizaciones periodicas. Siguela en Instagram, Twitter y Telegram para estar al tanto de sus proyectos creativos y eventos inspiradores.
Get to know JakKnife http://www.jakknife.online/ and discover unique content. Regular updates, special publications, and timely announcements are available to subscribers.
Discover the world of Comatozze https://www.comatozze.in exclusive content on OnlyFans and active updates on social media. Subscribe to stay up-to-date on new publications and exciting projects.
The official website of MiniTina http://www.minitinah.com your virtual friend with exclusive publications, personal updates, and exciting content. Follow the news and stay connected in a cozy online space.
мелбет mines стратегия https://melbet09342.help/
ranklio site – Content reads clearly, helpful examples made concepts easy to grasp.
rankrise site – Mobile version looks perfect; no glitches, fast scrolling, crisp text.
rankrise site – Pages loaded fast, images appeared sharp, and formatting stayed consistent.
1win как пополнить счет 1win как пополнить счет
Нужна плитка? тротуарная плитка купить большой ассортимент, современные формы и долговечные материалы. Подходит для мощения тротуаров, площадок и придомовых территорий.
водопонижение котлована иглофильтрами [url=https://vodoponizhenie-moskva.ru/]водопонижение котлована иглофильтрами[/url] .
перепланировка квартиры в москве sostav.ru/blogs/286398/77663 .
sms activate sms activate .
бурение скважин для водопонижения xn—77-eddkgagrc5cdhbap.xn--p1ai .
sms activate sms activate .
sms activation http://www.linkedin.com/pulse/top-5-sms-activate-services-ultimate-guide-virtual-phone-mike-davis-gnhre/ .
1вин crash 1вин crash
водопонизительная скважина vodoponizhenie-iglofiltrami-moskva.ru .
melbet пополнить баланс http://www.melbet09342.help
sms activate service sms activate service .
At spanish slots portal you can enjoy a very immersive atmosphere with localized themes that resonate well with the Spanish audience. The bonuses are transparent and easy to track within your personal account.
Строишь дом или забор? завод газоблоков продажа газобетона и газоблоков в Краснодаре с доставкой по Краснодарскому краю и СКФО. В наличии автоклавные газобетонные блоки D400, D500, D600, опт и розница, расчет объема, цены от производителя, доставка на объект манипулятором
Нужен газоблок? https://gazobeton-krasnodar.ru/katalog/ каталог газоблоков и газобетона в Краснодаре: размеры, характеристики и цены на газобетонные блоки КСМК. Можно купить газоблоки с доставкой по Краснодару, краю и СКФО. Актуальная цена газоблоков, помощь в подборе, расчет объема и заказ с завода
Нужны ЖБИ? https://postroi-ka.by широкий ассортимент ЖБИ, прочные конструкции и оперативная доставка на объект. Консультации специалистов и индивидуальные условия сотрудничества.
Visiting legal gambling chile gives you access to a legitimate gaming platform with clear terms and conditions regarding bonuses. The registration is fast, and the verification process didn’t take more than a few hours in my case.
перепланировка москва sostav.ru/blogs/286398/77663 .
sms activate website sms activate website .
best sms activate service github.com/SMS-Activate-Service .
sms activate sms activate .
Unique content from Gattouz0 – daily reviews, new materials, and the opportunity for personal interaction. Stay connected and get access to the latest publications.
Contenido exclusivo de KarelyRuiz: resenas diarias, nuevos materiales y la oportunidad de interactuar personalmente. Mantengase conectado y acceda a las ultimas publicaciones.
Discover the world of CandyLove: exclusive content, daily reviews, and direct communication. Subscribe to receive the latest updates and stay up-to-date with new publications.
Immerse yourself in the world of CrystalLustOfficiall: unique content, daily reviews, and direct interaction. Here you’ll find not only content but also live, informal communication.
一饭封神在线免费观看2026 海外华人专属 高清无广告
Exclusive from Sky Bri – daily reviews, new publications, and direct communication. Subscribe to stay up-to-date and in the know.
巴萨达尼·奥尔莫:欧冠需改变很多才能争冠2026足球新闻,最新La Liga比分前瞻巴萨挑战莱万特。
aiyifan平台2026 海外华人必备 无广告高清电影电视剧
Thank you for the good writeup. It actually was a entertainment account it. Look advanced to far introduced agreeable from you! By the way, how could we keep in touch?
smsactivate smsactivate .
official page ElleLee features hot posts, private selfies, and real-life videos. Subscribe to receive daily updates and exclusive content.
The official LexisStarOfficial page features daily breaking news, personal selfies, and intriguing content. Subscribe to stay up-to-date with new updates.
The official delux_girlOfficiall channel features daily hot content, private selfies, and exclusive videos. Intriguing real-life moments and regular updates for those who want to get closer.
Discover the world of NaomiHughes: daily vibrant content, candid selfies, and dynamic videos. Real life moments and regular updates for those who appreciate a lively format.
best sms activate service github.com/SMS-Activate-Login .
согласование перепланировки под ключ согласование перепланировки под ключ .
Discover the world of MickLiter Official: behind-the-scenes stories, bold provocations, and personal footage. All the most interesting content gathered in one place with regular updates.
top sms activate alternatives top sms activate alternatives .
sms activation http://www.linkedin.com/pulse/top-5-sms-activate-services-ultimate-guide-virtual-phone-mike-davis-gnhre/ .
Descubre el mundo de LiaLinOficial: historias tras bambalinas, provocaciones audaces y videos personales. Todo el contenido mas interesante reunido en un solo lugar con actualizaciones periodicas.
Immerse yourself in the MewSlutOfficial experience: candid behind-the-scenes moments, provocative vibes, and intriguing updates all in one place.
intriguing publications ReislinOfficiall and new materials appear regularly, creating a truly immersive experience. Personal moments, striking provocations, and unexpected materials are featured. Stay tuned for new publications.
smsactivate smsactivate .
At this time I am going away to do my breakfast, later than having my breakfast coming again to read additional news.
mostbet регистрация без кода https://www.mostbet61527.help
mostbet приложение Киргизия mostbet приложение Киргизия
узаконивание перепланировки sostav.ru/blogs/286398/77663 .
sms activate alternatives sms activate alternatives .
sms activate alternatives sms activate alternatives .
Actually when someone doesn’t be aware of then its up to other users that they will assist, so here it occurs.
traffio site – Found practical insights today; sharing this article with colleagues later.
sms activator http://www.linkedin.com/pulse/top-5-sms-activate-services-ultimate-guide-virtual-phone-mike-davis-gnhre/ .
мелбет изменить номер телефона http://melbet09342.help/
мелбет лайв мелбет лайв
nicheninja site – Bookmarked this immediately, planning to revisit for updates and inspiration.
The best of MilaSolana Official – sharing all the most interesting content in one channel. Behind-the-scenes atmosphere, provocative mood, and personal snippets. Stay tuned and don’t miss any new releases.
leadzo site – Bookmarked this immediately, planning to revisit for updates and inspiration.
reachly site – Content reads clearly, helpful examples made concepts easy to grasp.
exclusive revelations Monalita genuine passion and bold aesthetics. Private content you’ll find only here—directly from the author, without filters or unnecessary boundaries.
honest revelations Alina Rai vivid emotions and a sensual atmosphere. Unique private content, available only on this page—directly from me.
passionate atmosphere AmadaniOfficiall openness and a personal format of communication. Exclusive content, created without intermediaries—only for those who want more.
bold format BigTittyGothEggOfficiall sincere emotions and expressive images. Private materials and special publications that you’ll only see here.
nicheninja site – Overall, professional vibe here; trustworthy, polished, and pleasantly minimal throughout.
reachly site – Color palette felt calming, nothing distracting, just focused, thoughtful design.
leadzo site – Content reads clearly, helpful examples made concepts easy to grasp.
personal revelations Eva Elfie powerful energy and private publications. Unique content, available exclusively here—directly from me.
leadora site – Found practical insights today; sharing this article with colleagues later.
Genuine emotions Girthmasterr Officiall bold visual presentation, and personal communication. Exclusive content revealed only to its audience.
Pure emotion Reislin bold presentation, and a private format without boundaries. Exclusive content, personally created and available only here—for those who appreciate true energy.
Candid style Diana Rider vibrant passion, and a unique atmosphere. Private publications and unique materials that you’ll find exclusively in this space.
leadora site – Navigation felt smooth, found everything quickly without any confusing steps.
sms activate login sms activate login .
sms activate alternatives sms activate alternatives .
перепланировка услуги перепланировка услуги .
мостбет официальный сайт Кыргызстан mostbet61527.help
Pure emotion ReislinOfficiall bold presentation, and a private format without boundaries. Exclusive content, personally created and available only here—for those who appreciate true energy.
Vivid revelations SweetiefoxOfficiall sensual aesthetics, and a signature format. Private materials created without boundaries or templates—available only in one place.
Candid style DianaRider vibrant passion, and a unique atmosphere. Private publications and unique materials that you’ll find exclusively in this space.
Boldness and sincerity Luna Okko maximum intimacy. Personal content without intermediaries—only here and only directly from me.
sms activate alternatives sms activate alternatives .
best sms activate service github.com/SMS-Activate-Alternatives .
Maximum candor PrincesslsiOfficiall vibrant energy, and a private atmosphere. Exclusive content is personally created and available only here—for those ready for a truly unique experience.
A bold image LunaOkko strong charisma, and a personal communication format. Private publications and special materials revealed only to our audience.
Frank emotions RaeLilBlacOficiall captivating aesthetics, and a personalized format. Content without unnecessary filters—directly from the author.
The energy of passion RomiRainOfficiall sincerity, and private access. Unique publications created for those who appreciate a personalized and bold format.
Играешь в казино? https://eva-vlg.ru популярная онлайн-платформа с большим выбором слотов, настольных игр и лайв-казино. Бонусы для новых игроков, регулярные акции и удобные способы пополнения доступны круглосуточно.
Нужен промокод казино? промокод на бесплатные ставки получите бесплатные вращения в популярных слотах. Актуальные бонус-коды, условия активации и пошаговая инструкция по использованию для новых и действующих игроков.
Bold aesthetics SiriDahl Officiall personal revelations, and an intimate atmosphere. Exclusive content is created without compromise—only for our audience, and only here.
Sensual style CocoLovelock vibrant energy, and an unfiltered format. Unique materials available exclusively in this space.
Лучшее казино онлайн https://detsad47kamyshin.ru слоты, джекпоты, карточные игры и лайв-трансляции. Специальные предложения для новых и постоянных пользователей, акции и турниры каждый день.
Нужен промокод казино? бездепозитыне промокоды получите бесплатные вращения в популярных слотах. Актуальные бонус-коды, условия активации и пошаговая инструкция по использованию для новых и действующих игроков.
top sms activate alternatives top sms activate alternatives .
Play unblocked games online without registration or downloading. A large catalog of games across various genres is available right in your browser at any time.
Нужен компрессор? https://macunak.by для производства и мастерских. Надёжные системы сжатого воздуха, гарантия, монтаж и техническая поддержка на всех этапах эксплуатации.
Работаешь с авито? авито магазин профессиональное создание и оформление Авито-магазина, настройка бизнес-аккаунта и комплексное ведение. Поможем увеличить охват, повысить конверсию и масштабировать продажи.
Больше на нашем сайте: Поведенческая психотерапия в Москве: ключ к гармонии и развитию
buy weed in prague hashish delivery in prague
cannabis delivery in prague weed delivery in prague
buy cali weed in prague hashish shop in prague
thc chocolate in prague buy marijuana in prague
cannabis shop in prague cali weed in prague
Hello, yup this paragraph is really good and I have learned lot of things from it regarding blogging. thanks.
thc joint delivery in prague weed store in prague
420 store in prague weed delivery in prague
buy hash in prague weed store in prague
kush for sale in prague hemp in prague
cbd weed in prague hash shop in prague
praha 420 buy thc vape in prague
420 store in prague marijuana in prague
cannafood in prague weed in prague
hash in prague buy marijuana in prague
Hey there! Quick question that’s totally off topic. Do you know how to make your site mobile friendly? My website looks weird when browsing from my iphone 4. I’m trying to find a theme or plugin that might be able to correct this issue. If you have any suggestions, please share. Many thanks!
cannabis cali weed delivery in prague
thc chocolate delivery in prague buy cannafood in prague
hashish for sale in prague hemp delivery in prague
buy hashish in prague thc gummies shop in prague
Jouez-vous au casino? https://sultan-willd-fr.eu.com une plateforme de jeux moderne proposant une variete de machines a sous, de jackpots et de jeux de table. Inscription et acces faciles depuis n’importe quel appareil.
Check visit here for essential information regarding local community initiatives and the strategic goals set by leadership. The layout is very clear, which makes it easy to find specific data about upcoming public events and policy updates without much effort. It really helps bridge the gap by providing transparent and timely information that matters to every active citizen in the region.
Visit more info to find unique entertainment tips and detailed guides about the latest lifestyle trends. This platform is well-researched and provides a fresh perspective for anyone interested in high-quality content that isn’t covered by mainstream blogs. I especially like how they categorize their posts, making it easy to navigate through different themes without feeling overwhelmed.
At online slots portal you will find an extensive library of licensed slots and live dealer tables that definitely cater to all types of players. The site has a reputation for offering very competitive bonuses with fair wagering requirements, making it a solid choice for both beginners and pros. I’ve personally found their withdrawal process to be quite efficient, which is always a top priority when choosing a new platform.
Try https://casamiamarblehead.com/ if you are looking for the official Mr.Jackbet platform with the most reliable slots and betting options. This destination is very professional and provides all the necessary details and service descriptions you might need before you start playing for real. It’s a great example of a secure environment that values transparency and makes it easy for users to find exactly what they need.
проектная организация для перепланировки квартиры teletype.in/@jorik11/proekt-dlya-pereplanirovki .
internet caiu caiu.site .
Казино Мартин Казино Мартин .
Казино фугу Казино фугу .
заказать кухню по своим размерам заказать кухню по своим размерам .
заказать кухню онлайн заказать кухню онлайн .
заказать кухню цены zakazat-kuhnyu-1.ru .
Inside 1xBet India login you will find a massive selection of games specifically tailored for the Indian market, including hits like Teen Patti and Andar Bahar. The platform utilizes high-level encryption to ensure all transactions and personal data remain secure at all times. I also found that they offer excellent local deposit options, which makes the whole experience much more convenient for users in the region.
At Amunra slots players in the Czech region can experience high-quality slots and live dealer games in a completely secure and localized environment. The site supports popular local payment methods and offers 24/7 customer support to resolve any technical or account issues as quickly as possible. It’s a very reliable destination for those looking for a smooth registration process and a diverse library of certified casino games.
On official Greek link you can enjoy a very engaging loyalty program that rewards active players with frequent cashback and exclusive tournament invitations. The platform is highly stable and performs well on both desktop and mobile browsers, ensuring you never miss a beat. It’s a great choice for those who value long-term rewards and a consistent gaming environment with plenty of variety.
Playing Plinko gaming portal is a fantastic way to experience this classic arcade-style game with modern graphics and certified fair mechanics. The interface is very straightforward, allowing you to jump straight into the action without dealing with overly complicated settings or menus. It’s perfect for those who enjoy quick gaming sessions where the outcome is clear and the gameplay remains consistently engaging.
Visit Greek betting portal if you are looking for a premium gaming experience in Greece with a heavy focus on sports-themed slots and live betting. The site is fully localized, making navigation easy for Greek speakers, and the bonus offers are quite generous for new registrations. They have a great mix of classic casino games and modern sportsbook features that keep the overall experience very diverse.
проект перепланировки квартиры москва проект перепланировки квартиры москва .
1win xush kelibsiz bonusi Oʻzbekiston https://1win5767.help/
internet caiu caiu.site .
Лучшие онлайн казино Лучшие онлайн казино .
Казино онлайн в России Казино онлайн в России .
заказать кухню по своим размерам заказать кухню по своим размерам .
заказать кухню по индивидуальному заказу zakazat-kuhnyu-2.ru .
Visiting mega meduza online is essential for those tracking the latest digital trends and platform launches in Spain for the upcoming year. The site provides technical details and roadmap updates that are quite valuable for anyone involved in the local tech or gaming sectors. It serves as an official hub for news and announcements regarding several key digital initiatives starting in early 2024.
Reading https://fabersingt.com/buran-casino/ will give you a detailed overview of the platform’s features, from its unique space-themed design to its massive game library. This expert review breaks down the pros and cons, helping you decide if their current welcome package fits your playing style. It’s a very helpful resource for anyone who likes to do a bit of research before committing to a new online casino.
Visiting official fan site gives you a detailed look into the career and professional achievements of one of Mexico’s top football stars. The site includes exclusive content, career milestones, and regular updates that are perfect for dedicated fans of the midfielder. It’s a well-organized tribute to his journey from local clubs to the international stage and his ongoing impact on the sport.
On official sports site you will find a wide range of articles covering everything from local football to international sports tournaments. It’s a comprehensive portal for anyone who wants to stay updated on Mexican sports without having to visit multiple different news sites. The quality of the reporting is very high, and they cover a diverse range of athletic disciplines beyond just soccer.
Explore Mexico betting tips to find professional analysis and data-driven predictions for all major sporting events in the region. The site uses advanced statistical models to help users make more informed decisions when placing their bets on football, baseball, or other popular sports. It’s a great starting point for anyone looking to add a layer of expert insight to their wagering strategy.
производство кухонь в спб на заказ kuhni-spb-41.ru .
заказать кухню цена заказать кухню цена .
перепланировка квартиры в москве sites.google.com/view/dokument-dlya-pereplan/главная-страница .
проектная организация для перепланировки квартиры teletype.in/@jorik11/proekt-dlya-pereplanirovki .
This Rayados portal link portal provides comprehensive coverage of the club’s history, current roster, and community initiatives in the Monterrey region. I check it regularly for official injury reports and transfer news to stay updated on the team’s latest developments. It’s a great resource for dedicated supporters who want to follow every aspect of the club’s journey in the league.
заказать кухню через интернет zakazat-kuhnyu-1.ru .
See https://el-toluca.com.mx/ for the most accurate statistics and official statements directly from the club’s management this season. The site offers a detailed look at the team’s performance metrics and upcoming match analysis, which is perfect for fans who like to dive deep into the numbers. It’s a professional and well-maintained site that serves as the official voice of the team for its loyal fanbase.
The 365bet.com.mx/app is the recommended tool for Mexican players who want instant access to their betting accounts from any location. It’s fast, secure, and includes all the features found on the main website, such as live streaming and instant cash-outs. Downloading the official app ensures you have the most stable connection possible, even when you’re away from your desktop.
Checking https://chivas-de-guadalajara.com.mx/ is a must for any fan looking for the latest news, match schedules, and official team updates. The portal provides in-depth coverage of the club’s performance and includes exclusive interviews with players and coaching staff throughout the season. It’s the most reliable source for verified information regarding upcoming fixtures and official club announcements.
Using https://apuestas-legales.com.mx/ ensures that you are only accessing verified and licensed operators that fully comply with local Mexican laws. This guide is essential for players who prioritize financial security and want to avoid offshore sites with questionable reputations. It provides a clear list of legal platforms and explains the current regulations in a way that is very easy to understand.
Онлайн казино без верификации и паспорта Онлайн казино без верификации и паспорта .
AWS down caiu.site .
1win plinko o‘yin https://1win5767.help
Казино фугу Казино фугу .
1win mirror actual http://www.1win5805.help
заказать кухню под ключ zakazat-kuhnyu-3.ru .
заказать индивидуальную кухню zakazat-kuhnyu-2.ru .
mostbet зеркало Киргизия https://mostbet52718.help/
печатать в типографии https://writexo.com/share/a0a36243dce4 .
проект перепланировки квартиры проект перепланировки квартиры .
купить в спб инкогнито с рук мефедрон купить амфетамин метадон мефедрон в москве
ебут русскую шлюху купить наркотики мефедрон
грузоперевозки с грузчиками грузчики москва цена
1win schimb valutar MDL https://1win5805.help
подработка грузчиком грузчики недорого срочно
кухни спб kuhni-spb-41.ru .
Казино онлайн играть Казино онлайн играть .
Медицинская мебель https://tenchat.ru/0614265/ это основа оснащения клиник, лабораторий и частных кабинетов. Мы предлагаем мебель медицинская для любых задач: шкафы, столы, тумбы, стеллажи и специализированные решения. В ассортименте можно купить медецинскую мебель, соответствующая санитарным требованиям и стандартам безопасности.
заказать кухню с установкой zakazat-kuhnyu-4.ru .
Santander caiu Santander caiu .
Казино Ирвин Казино Ирвин .
cum activez bonus 1win cum activez bonus 1win
1win blocare cont temporara http://www.1win5805.help
заказать кухню на заказ заказать кухню на заказ .
Play online https://bloxd-io.com.az/ for free right in your browser. Build, compete, and explore the world in dynamic multiplayer mode with no downloads or installations required.
Football online https://qol.com.az/ goals, live match results, top scorers table, and detailed statistics. Follow the news and never miss the action.
пин ап официальный сайт казино https://games-pinup.ru
Lily Phillips https://www.lilyphillips.es te invita a un mundo de creatividad, conexion y emocionantes descubrimientos. Siguela en Instagram y Twitter para estar al tanto de nuevas publicaciones y proyectos inspiradores.
El sitio web oficial de Kareli Ruiz karelyruiz es ofrece contenido exclusivo, noticias de ultima hora y actualizaciones periodicas. Mantengase al dia con las nuevas publicaciones y anuncios.
заказать кухню под размеры zakazat-kuhnyu-1.ru .
сколько стоит заказать кухню по размерам zakazat-kuhnyu-2.ru .
типография полного цикла xn--http://-5gga3h0d.xn--/forum/topic-ugk8c.php?forum=3&topic=2655 .
проект перепланировки квартиры москва проект перепланировки квартиры москва .
Казино в тг с бонусами Казино в тг с бонусами .
99 down caiu.site .
Казино онлайн топ Казино онлайн топ .
кухни на заказ в спб от производителя kuhni-spb-41.ru .
согласование перепланировки квартиры под ключ sites.google.com/view/dokument-dlya-pereplan/главная-страница .
заказать кухню под размеры заказать кухню под размеры .
1win cash out https://www.1win5805.help
заказать кухню с доставкой zakazat-kuhnyu-3.ru .
сколько стоит заказать кухню по размерам zakazat-kuhnyu-2.ru .
мостбет crash на деньги https://mostbet52718.help/
печатать в типографии https://exchange.prx.org/series/60434 .
проект на перепланировку квартиры заказать teletype.in/@jorik11/proekt-dlya-pereplanirovki .
Казино Мартин Казино Мартин .
Nubank caiu Nubank caiu .
Рейтинг онлайн казино 2026 Рейтинг онлайн казино 2026 .
заказать кухню рассчитать стоимость zakazat-kuhnyu-1.ru .
сейф встраиваемый в пол купить
1win Uzcard http://1win5767.help
перепланировка в москве sites.google.com/view/dokument-dlya-pereplan/главная-страница .
заказ кухни заказ кухни .
заказать кухню под заказ заказать кухню под заказ .
Hello!
Unlock the power of mysterious interesting info for valuable personal growth now and transform your mindset completely see on the website for growth trackers
Full information on the link – https://101flow.site
All the best and development in business!
1win platformasi 1win platformasi
1win rəsmi link https://1win5763.help
полиграфия в МСК http://maraforum.iboards.ru/viewtopic.php?f=10&t=9428 .
1win site functioneaza [url=http://1win5805.help]http://1win5805.help[/url]
1win pul yatırma kartla https://www.1win5763.help
вломостойкие сейфы
где согласовать перепланировку sites.google.com/view/dokument-dlya-pereplan/главная-страница .
кухни на заказ производство спб kuhni-spb-41.ru .
заказать кухню цена заказать кухню цена .
заказать кухню по своим размерам zakazat-kuhnyu-1.ru .
типография в Москве https://telegra.ph/kak-popast-v-gorodskoj-rejting-predprinimatelej-02-24 .
1win giriş et 1win giriş et
сейф встраиваемый в пол купить
1win USDTga yechish http://1win5767.help
сейфы для квартиры встраиваемый в стену
внедрение erp цена 1с внедрение erp цена 1с .
1win Uzcard ishlamayapti https://1win5767.help/
Wow, this post is good, my younger sister is analyzing these things, therefore I am going to tell her.
производство кухонь в спб на заказ kuhni-spb-41.ru .
заказ полиграфии https://teletype.in/@writes/8mimhz17860 .
взломостойкий сейф
заказать кухню сайт zakazat-kuhnyu-1.ru .
взломостойкие сейфы
внедрение erp 1с http://www.1s-erp-vnedrenie.ru .
заказать кухню в рассрочку zakazat-kuhnyu-3.ru .
заказать кухню рассчитать стоимость zakazat-kuhnyu-2.ru .
перепланировка квартиры москва sites.google.com/view/dokument-dlya-pereplan/главная-страница .
Gəncə 1win http://www.1win5763.help
производство кухонь в спб на заказ производство кухонь в спб на заказ .
кухни в спб от производителя кухни в спб от производителя .
кухни на заказ от производителя кухни на заказ от производителя .
mostbet как вывести выигрыш https://mostbet52718.help
заказать индивидуальную кухню заказать индивидуальную кухню .
1с внедрение erp http://www.1s-erp-vnedrenie.ru/ .
мостбет карта вывод http://mostbet52718.help
кухни на заказ производство спб кухни на заказ производство спб .
заказ кухни спб заказ кухни спб .
кухни в спб от производителя кухни в спб от производителя .
1win apk linki https://1win5763.help
1win crash Azərbaycan http://1win5763.help
внедрение erp 1с https://1s-erp-vnedrenie.ru .
plinko 1win estrategia http://1win5771.help/
кухни на заказ в спб цены kuhni-spb-43.ru .
купить сейф встраиваемый в стену
кухни на заказ санкт петербург kuhni-spb-42.ru .
Hello everyone!
Access premium mysterious content with interesting and valuable insights inside and enjoy exclusive member benefits see on the website for membership signup
Full information on the link – https://202fliks.site
All the best and development in business!
свадебные платья официальный каталог свадебных платьев купить цены
Нужны столбики? столбики для ограждения с лентами столбики для складов, парковок и общественных пространств. Прочные материалы, устойчивое основание и удобство перемещения обеспечивают безопасность и порядок.
mostbet поддержка Кыргызстан https://mostbet52718.help
купить метр провода купить кабель минск
Looking for a yacht? exclusive boat charters in Cyprus for unforgettable sea adventures. Charter luxury yachts, catamarans, or motorboats with or without crew. Explore crystal-clear waters, secluded bays, and iconic coastal locations in first-class comfort onboard.
1win btc https://1win5771.help
мостбет результаты матчей https://mostbet52718.help/
внедрение ерп в организации http://1s-erp-vnedrenie.ru .
1win boxeo apuestas http://www.1win5771.help
descargar apk de 1win https://www.1win5771.help
кухни под заказ в спб kuhni-spb-44.ru .
купить кухню купить кухню .
мебель для кухни спб от производителя kuhni-spb-42.ru .
сейф взломостойкий цена
1с внедрение erp http://1s-erp-vnedrenie.ru/ .
1win ethereum 1win ethereum
встраиваемые сейфы для квартиры
кухни в спб на заказ кухни в спб на заказ .
кухни под заказ спб kuhni-spb-43.ru .
сейф встраиваемый
кухни под заказ кухни под заказ .
adster – Bookmarked this immediately, planning to revisit for updates and inspiration.
reacho – Pages loaded fast, images appeared sharp, and formatting stayed consistent.
offerorbit – Loved the layout today; clean, simple, and genuinely user-friendly overall.
adster – Pages loaded fast, images appeared sharp, and formatting stayed consistent.
reacho – Appreciate the typography choices; comfortable spacing improved my reading experience.
кухня по индивидуальному проекту kuhni-spb-44.ru .
offerorbit – Color palette felt calming, nothing distracting, just focused, thoughtful design.
promova – Pages loaded fast, images appeared sharp, and formatting stayed consistent.
современные кухни на заказ в спб kuhni-spb-43.ru .
rankora – Content reads clearly, helpful examples made concepts easy to grasp.
cейфы взломостойкие
кухни на заказ петербург kuhni-spb-42.ru .
trendfunnel – Bookmarked this immediately, planning to revisit for updates and inspiration.
promova – Pages loaded fast, images appeared sharp, and formatting stayed consistent.
1win apuestas ufc en vivo https://1win5771.help/
rankora – Pages loaded fast, images appeared sharp, and formatting stayed consistent.
сейф пожаровзломостойкие купить
trendfunnel – Loved the layout today; clean, simple, and genuinely user-friendly overall.
scaleify – Found practical insights today; sharing this article with colleagues later.
With havin so much written content do you ever run into any problems of plagorism or copyright infringement? My blog has a lot of exclusive content I’ve either authored myself or outsourced but it looks like a lot of it is popping it up all over the internet without my permission. Do you know any methods to help prevent content from being ripped off? I’d truly appreciate it.
scaleify – Appreciate the typography choices; comfortable spacing improved my reading experience.
мелбет скачать с официального сайта https://melbet41263.help
мелбет пополнение киргизия https://melbet41263.help
When I initially left a comment I appear to have clicked on the -Notify me when new comments are added- checkbox and now every time a comment is added I recieve 4 emails with the exact same comment. Perhaps there is an easy method you can remove me from that service? Many thanks!
наркологическая служба на дом ростов-на-дону narkolog-na-dom-v-rostove.ru .
мелбет кошелек вывод http://melbet41263.help/
нарколог на дом срочно ростов-на-дону narkolog-na-dom-v-rostove-1.ru .
пин ап rəsmi sayt пин ап rəsmi sayt
срочный вызов нарколога на дом ростов narkolog-na-dom-v-rostove.ru .
частный нарколог на дом в ростове частный нарколог на дом в ростове .
melbet турнир https://melbet41263.help
pin-up çıxarış üçün nə lazımdır https://pinup09715.help/
психиатр нарколог на дом в ростове narkolog-na-dom-v-rostove.ru .
pin-up VIP Chile http://pinup37056.help
1win рабочая ссылка http://1win19643.help/
нарколог на дом в ростове анонимно нарколог на дом в ростове анонимно .
melbet скачать без вирусов melbet скачать без вирусов
наркологическая служба на дом ростов-на-дону narkolog-na-dom-v-rostove-1.ru .
melbet джекпот слоты melbet джекпот слоты
crash en pin up http://pinup37056.help
вызов нарколога на дом в ростове вызов нарколога на дом в ростове .
Looking for a yacht? Cyprus luxury boat tours for unforgettable sea adventures. Charter luxury yachts, catamarans, or motorboats with or without crew. Explore crystal-clear waters, secluded bays, and iconic coastal locations in first-class comfort onboard.
pin-up aviator pin-up aviator
pin-up confirmar correo http://www.pinup37056.help
нарколог на дом в ростове-на-дону нарколог на дом в ростове-на-дону .
вызов нарколога на дом в ростове вызов нарколога на дом в ростове .
психиатр нарколог на дом в ростове narkolog-na-dom-v-rostove.ru .
I am truly grateful to the holder of this web site who has shared this impressive paragraph at here.
свадебные платья официальный свадебные платья купить каталог
купить кабель 6 купить кабель минск
pin-up acceso alternativo Chile pinup37056.help
нарколог на дом ночью ростов-на-дону narkolog-na-dom-v-rostove-2.ru .
нарколог на дом ростов круглосуточно narkolog-na-dom-v-rostove.ru .
1win пополнение без комиссии карта 1win пополнение без комиссии карта
психиатр нарколог на дом в ростове narkolog-na-dom-v-rostove-1.ru .
срочный вызов нарколога на дом ростов срочный вызов нарколога на дом ростов .
нарколог выезд на дом ростов нарколог выезд на дом ростов .
вывод из запоя в стационаре в ростове на дону vyvod-iz-zapoya-v-rostove-1.ru .
наркологическая клиника в ростове вывод из запоя vyvod-iz-zapoya-v-rostove-3.ru .
вывод из запоя в стационаре в ростове на дону вывод из запоя в стационаре в ростове на дону .
pin-up slot jackpot pin-up slot jackpot
вывод из запоя в ростове цена вывод из запоя в ростове цена .
монтаж газового пожаротушения под ключ montazh-gazovogo-pozharotusheniya.ru .
клиника в ростове вывод из запоя клиника в ростове вывод из запоя .
For those seeking an exceptional online gaming experience, us.com](https://maxispin.us.com/) stands out as a premier destination. At Maxispin Casino, players can enjoy a vast array of pokies, table games, and other thrilling options, all accessible in both demo and real-money modes. The casino offers attractive bonuses, including free spins and a generous welcome offer, along with cashback promotions and engaging tournaments. To ensure a seamless experience, Maxispin provides various payment methods, efficient withdrawal processes, and reliable customer support through live chat. Security is a top priority, with robust safety measures and a strong focus on responsible gambling tools. Players can easily navigate the site, with detailed guides on account creation, verification, and payment methods. Whether you’re interested in high RTP slots, hold and win pokies, or the latest slot releases, Maxispin Casino delivers a user-friendly and secure platform. Explore their terms and conditions, read reviews, and discover why many consider Maxispin a legitimate and trustworthy choice in Australia.
It features advanced tools to produce distinctive and engaging textual content.
**Features of MaxiSpin.us.com**
By inputting their requirements, users can receive personalized content in just a few minutes.
**Benefits of Using MaxiSpin.us.com**
MaxiSpin.us.com is cost-effective, delivering high-quality content at a much lower cost than traditional approaches.
нарколог на дом ночью ростов-на-дону narkolog-na-dom-v-rostove-2.ru .
pin-up qeydiyyat necə pinup09715.help
вызвать нарколога на дом ростов-на-дону вызвать нарколога на дом ростов-на-дону .
pin-up cl sitio pin-up cl sitio
вывод из запоя в стационаре в ростове на дону вывод из запоя в стационаре в ростове на дону .
нарколог на дом срочно ростов-на-дону нарколог на дом срочно ростов-на-дону .
нарколог на дом без постановки на учет ростов narkolog-na-dom-v-rostove-3.ru .
вывод из запоя в ростове вывод из запоя в ростове .
вывод из запоя в ростове вывод из запоя в ростове .
анонимный вывод из запоя в ростове анонимный вывод из запоя в ростове .
лицензия на монтаж газового пожаротушения montazh-gazovogo-pozharotusheniya.ru .
клиника в ростове вывод из запоя клиника в ростове вывод из запоя .
нарколог на дом в ростове анонимно нарколог на дом в ростове анонимно .
1win вывод в сомах 1win вывод в сомах
pin-up Quba pinup09715.help
нарколог вывод из запоя в ростове нарколог вывод из запоя в ростове .
сколько стоит нарколог на дом в ростове сколько стоит нарколог на дом в ростове .
нарколог на дом в ростове анонимно нарколог на дом в ростове анонимно .
1win авиатор коэффициенты 1win авиатор коэффициенты
круглосуточный вывод из запоя в ростове круглосуточный вывод из запоя в ростове .
нарколог вывод из запоя на дому в ростове vyvod-iz-zapoya-v-rostove-1.ru .
вывод из запоя на дому в ростове-на-дону вывод из запоя на дому в ростове-на-дону .
монтаж газового пожаротушения сертифицированными специалистами montazh-gazovogo-pozharotusheniya.ru .
нарколог на дом без постановки на учет ростов narkolog-na-dom-v-rostove-2.ru .
pin-up məxfilik https://pinup09715.help
вывод из запоя дома в ростове vyvod-iz-zapoya-v-rostove-2.ru .
вывод из запоя на дому в ростове на дону вывод из запоя на дому в ростове на дону .
срочный вызов нарколога на дом ростов срочный вызов нарколога на дом ростов .
нарколог на дом ночью ростов-на-дону narkolog-na-dom-v-rostove-3.ru .
вывод из запоя в ростове-на-дону на дому вывод из запоя в ростове-на-дону на дому .
стоимость монтажа газового пожаротушения montazh-gazovogo-pozharotusheniya.ru .
анонимный вывод из запоя в ростове анонимный вывод из запоя в ростове .
вывод из запоя в клинике в ростове vyvod-iz-zapoya-v-rostove-1.ru .
1win Bakai Bank 1win Bakai Bank
вывод из запоя в ростове цена vyvod-iz-zapoya-v-rostove-2.ru .
1win вывод через элсом инструкция 1win вывод через элсом инструкция
вывод из запоя в стационаре в ростове вывод из запоя в стационаре в ростове .
нарколог на дом ночью ростов-на-дону нарколог на дом ночью ростов-на-дону .
вывод из запоя в ростове на дону на дому вывод из запоя в ростове на дону на дому .
нарколог на дом ростов круглосуточно нарколог на дом ростов круглосуточно .
монтаж газового пожаротушения для склада montazh-gazovogo-pozharotusheniya.ru .
вывод из запоя на дому в ростове на дону вывод из запоя на дому в ростове на дону .
вывод из запоя на дому в ростове на дону вывод из запоя на дому в ростове на дону .
bytehq – Bookmarked this immediately, planning to revisit for updates and inspiration.
cloudhq – Navigation felt smooth, found everything quickly without any confusing steps.
stackhq – Bookmarked this immediately, planning to revisit for updates and inspiration.
bytehq – Loved the layout today; clean, simple, and genuinely user-friendly overall.
cloudhq – Loved the layout today; clean, simple, and genuinely user-friendly overall.
нарколог в ростове цена вывод из запоя нарколог в ростове цена вывод из запоя .
Нужны столбики? столбики ограждения с вытяжной лентой столбики для складов, парковок и общественных пространств. Прочные материалы, устойчивое основание и удобство перемещения обеспечивают безопасность и порядок.
stackops – Appreciate the typography choices; comfortable spacing improved my reading experience.
недорогие свадебные платья свадебные платья каталог фото цена
сейф для офиса купить в москве
круглосуточный нарколог на дом в ростове круглосуточный нарколог на дом в ростове .
купить кабель ввг кабель минск
круглосуточный вывод из запоя в ростове круглосуточный вывод из запоя в ростове .
Looking for a yacht? private yacht charter in Cyprus for unforgettable sea adventures. Charter luxury yachts, catamarans, or motorboats with or without crew. Explore crystal-clear waters, secluded bays, and iconic coastal locations in first-class comfort onboard.
devopsly – Mobile version looks perfect; no glitches, fast scrolling, crisp text.
наркологическая клиника в ростове вывод из запоя vyvod-iz-zapoya-v-rostove-4.ru .
нарколог на дом в ростове на дону нарколог на дом в ростове на дону .
stackops – Navigation felt smooth, found everything quickly without any confusing steps.
монтаж газового пожаротушения в офис montazh-gazovogo-pozharotusheniya.ru .
круглосуточный вывод из запоя в ростове круглосуточный вывод из запоя в ростове .
kubeops – Appreciate the typography choices; comfortable spacing improved my reading experience.
вывод из запоя дома в ростове vyvod-iz-zapoya-v-rostove-1.ru .
crash oyunu mostbet http://mostbet13670.help/
сейфы простые
где купить сейф
сейф на оружие
mostbet plinko taktika mostbet13670.help
вывод из запоя в ростове-на-дону вывод из запоя в ростове-на-дону .
печать стикеров москва печать стикеров москва .
cloudopsly – Pages loaded fast, images appeared sharp, and formatting stayed consistent.
cum depun pe mostbet http://mostbet96150.help/
cloudopsly – Found practical insights today; sharing this article with colleagues later.
mostbet futbol mərc mostbet futbol mərc
Link exchange is nothing else except it is just placing the other person’s weblog link on your page at appropriate place and other person will also do same in support of you.
mostbet descărcare 2026 http://mostbet96150.help
сейф гостиничный
сейф офисный москва
стикеры наклейки на заказ pechat-nakleek-v-moskve.ru .
mostbet app 2026 http://mostbet96150.help/
mostbet creare cont rapid mostbet creare cont rapid
купить сейф интернете
For those seeking an exceptional online gaming experience, us.com](https://maxispin.us.com/) stands out as a premier destination. At Maxispin Casino, players can enjoy a vast array of pokies, table games, and other thrilling options, all accessible in both demo and real-money modes. The casino offers attractive bonuses, including free spins and a generous welcome offer, along with cashback promotions and engaging tournaments. To ensure a seamless experience, Maxispin provides various payment methods, efficient withdrawal processes, and reliable customer support through live chat. Security is a top priority, with robust safety measures and a strong focus on responsible gambling tools. Players can easily navigate the site, with detailed guides on account creation, verification, and payment methods. Whether you’re interested in high RTP slots, hold and win pokies, or the latest slot releases, Maxispin Casino delivers a user-friendly and secure platform. Explore their terms and conditions, read reviews, and discover why many consider Maxispin a legitimate and trustworthy choice in Australia.
The platform is user-friendly, making it accessible to everyone.
**Features of MaxiSpin.us.com**
MaxiSpin.us.com features an intuitive and easy-to-navigate interface.
**Benefits of Using MaxiSpin.us.com**
MaxiSpin.us.com’s scalability allows it to meet the needs of users across various industries and sizes.
оружейный сейф
купить сейф оружейный
Нужны столбики? столбики для ограждения с лентами столбики для складов, парковок и общественных пространств. Прочные материалы, устойчивое основание и удобство перемещения обеспечивают безопасность и порядок.
интернет кабель купить купить проводку для дома цена в минске
mostbet securitate plata https://www.mostbet96150.help
наклейки на заказ наклейки на заказ .
mostbet canlı kazino qeydiyyat https://mostbet13670.help
1win Ош катталуу https://1win91276.help
сейфы гостиничные
Нужны столбики? металлические столбики ограждение столбики для складов, парковок и общественных пространств. Прочные материалы, устойчивое основание и удобство перемещения обеспечивают безопасность и порядок.
купить медный кабель магазин электрики в минске
сейфы для офиса купить
Hey there would you mind letting me know which web host you’re working with? I’ve loaded your blog in 3 different internet browsers and I must say this blog loads a lot faster then most. Can you suggest a good hosting provider at a honest price? Thank you, I appreciate it!
купить гостиничный сейф
我欲为人第二季平台2026 海外华人 高清视频直播
yifan平台2026 最新高清影视 无广告 AI智能推荐
mostbet кэшбэк Кыргызстан https://mostbet39081.help/
заказать печать наклеек pechat-nakleek-v-moskve.ru .
mostbet Republica Moldova site http://mostbet96150.help
mostbet bonus kodu https://www.mostbet13670.help
купить сейф для офиса
mostbet android apk necə yükləmək olar https://www.mostbet13670.help
мостбет статистика матчей мостбет статистика матчей
сейф купить цена
сейф купить москва
печать стикеров печать стикеров .
цена сейфа для оружия
keywordcraft – Pages loaded fast, images appeared sharp, and formatting stayed consistent.
огнестойкие сейфы купить
сейф в шкаф
купить сейф